You are using an out of date browser. It may not display this or other websites correctly.
You should upgrade or use an alternative browser.
You should upgrade or use an alternative browser.
custom jakk's pacific stormtrooper
- Thread starter zeca
- Start date


davidvaradyszab
New Member
These large scale Jakks figures are a decent alternative for modding (especially when you consider the price) I have seen some folks doing miracles on them. Zeca, yours is pretty promising too. Keep us posted!


zeca
Active Member
the arms now, disassembly, then I cut them at the elbows, gluing the different parts and reassembly without glue on the torso


once the arms were raised I was able to determine a more dynamic pose:


once the position of the correct arms I reformed the elbows with resin and fiberglass :


once the arms were raised I was able to determine a more dynamic pose:
once the position of the correct arms I reformed the elbows with resin and fiberglass :
Attachments


zeca
Active Member
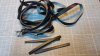
in parralel I started to make the pouches of the belt


a bit of leather, foam recovered at work, glue contact, and paper template calculated with respect to the height of a stormtrooper that must be within 1m80 meters, so this gives a scale of 1/25


assembly not complicated, the front glued first without forgetting the closing clip and the back, build the three elements and stick together.


- - - Updated - - -
once installed on the captain

a bit of leather, foam recovered at work, glue contact, and paper template calculated with respect to the height of a stormtrooper that must be within 1m80 meters, so this gives a scale of 1/25
assembly not complicated, the front glued first without forgetting the closing clip and the back, build the three elements and stick together.
- - - Updated - - -
once installed on the captain
Attachments
Galactican
Sr Member
That new posture looks much cooler than the original one. Awesome modding work so far! :thumbsup
Erh, a Stormie would be 7,2 cm tall at 1/25 (I guess you meant 1/4 )..!")
a bit of leather, foam recovered at work, glue contact, and paper template calculated with respect to the height of a stormtrooper that must be within 1m80 meters, so this gives a scale of 1/25
Erh, a Stormie would be 7,2 cm tall at 1/25 (I guess you meant 1/4 )..!
zeca
Active Member
yes I was wrong I wanted to write 1 / 2.5
some pictures on the progress :


first time and fill holes and second primary.


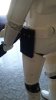
final gluing of the legs and preparation of the area to be filled between the upper thigh and the ab plate :

then filling the area with bondo


and finally a new primer layer.


some pictures on the progress :
first time and fill holes and second primary.
final gluing of the legs and preparation of the area to be filled between the upper thigh and the ab plate :
then filling the area with bondo
and finally a new primer layer.
davidvaradyszab
New Member
This is truly amazing. I am speechless.
gedmac66
Sr Member
Hey@zeca ,
Thanks for sharing your modification build . Your idea’s and progress have been inspiring ( I have one waiting to be modded as well ) .
I’m wondering , did you also shave down / remove some material from the ‘ shoulders ‘ - the white armour plating ?
Asking because they don’t appear as high as they originally were in your post #1 compared to post #7 ? i.e. the Black undershirt is the same height as the plating now , and the troopers neck also seems taller .
:cheersGed
zeca
Active Member
Hey@zeca ,
Thanks for sharing your modification build . Your idea’s and progress have been inspiring ( I have one waiting to be modded as well ) .
I’m wondering , did you also shave down / remove some material from the ‘ shoulders ‘ - the white armour plating ?
Asking because they don’t appear as high as they originally were in your post #1 compared to post #7 ? i.e. the Black undershirt is the same height as the plating now , and the troopers neck also seems taller .
:cheersGed
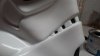
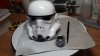
ah I see what you mean, for now I have not reattailed the shoulders bells, I planned anyway to raise the matter inside so that they are closer to the shoulders, see the photo or I removed the plastic support.

For the neck, I extended it a little more, I thought the helmet was too deep in relation to the shoulders.
gedmac66
Sr Member
Thank you for the clarification regarding the shoulder armour plating / bells , I didn’t realise they were separate pieces that attached to the shoulders !
The extension of the neck is a good idea too . Looking forward to seeing how much more you’ll modify and ultimately produce a very fine figure from a reasonably priced ‘ Toy ‘
:cheersGed
The extension of the neck is a good idea too . Looking forward to seeing how much more you’ll modify and ultimately produce a very fine figure from a reasonably priced ‘ Toy ‘
:cheersGed
zeca
Active Member
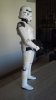
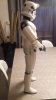
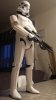
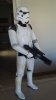
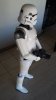
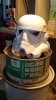
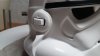
application now a layer of white satin, I did not paint arms because I do not want to keep the blaster is really too big and I will try to make a 100% scratch, so I do not know again if I have to retouch the direction of the arms.


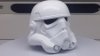
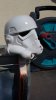
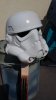
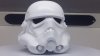
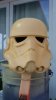
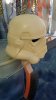
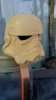
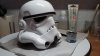
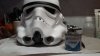
While waiting to know what I'm going to do with my arms, I start the helmet:
First a shot of acetone everywhere to remove the old paint, then primary beige color, then white satin paint.


Then comes the time to paint the details with the correct color.
While waiting to know what I'm going to do with my arms, I start the helmet:
First a shot of acetone everywhere to remove the old paint, then primary beige color, then white satin paint.
Then comes the time to paint the details with the correct color.
Attachments
-
 20170809_181146.jpg437.6 KB · Views: 83
 -
 20170429_165047.jpg643.4 KB · Views: 83
 -
 20170429_165043.jpg561 KB · Views: 81
 -
 20170809_181254.jpg445.9 KB · Views: 81
 -
 20170429_164401.jpg497.8 KB · Views: 105
 -
 20170429_164348.jpg558.2 KB · Views: 77
 -
 20170429_164344.jpg487.1 KB · Views: 85
 -
 20170429_133614.jpg609.1 KB · Views: 74
 -
 20170815_165750.jpg574.9 KB · Views: 74
 -
 20170815_165744.jpg593.7 KB · Views: 96
 -
 20170815_165732.jpg684.7 KB · Views: 90
 -
 20170815_165710.jpg688.9 KB · Views: 80
 -
 20170815_165655.jpg705.9 KB · Views: 101
Last edited:


Cool piece, nice job


Similar threads
- Replies
- 4
- Views
- 480
- Replies
- 0
- Views
- 340
- Replies
- 5
- Views
- 994
- Replies
- 2
- Views
- 489