You are using an out of date browser. It may not display this or other websites correctly.
You should upgrade or use an alternative browser.
You should upgrade or use an alternative browser.
1953 Martian War Machine CG built
- Thread starter epoxinator
- Start date


epoxinator
Well-Known Member
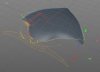
I stopped working on my previous mesh. I started it with too many polygons, and so there are annoying depressions in the mesh on the bottom. Below are a still from the film and one of the MWM blueprints floating around online.


So these illustrate two challenges I see with making the machine. All of the photos of replicas I've seen online have, for example, wingtips that look too narrow to me, comparing them to the above still from the film. Here's a copyrighted still of I believe a Pegasus model built by Jeff Shafer, posted on CultTVMan.com. The wingtips and the wings themselves look far thinner than do those on the film model. That doesn't leave much room inside to light them adequately, especially in a model size.

I want to try to make my model a bit easier to light inside.
The second problem is, the blueprint above has proved a bit challenging to use as base to make a model. It seems like no matter how I pull the points between the top, front and side views I can't get them to align. When I finally checked the relationships between the front, top and side views I discovered they had areas that didn't match each other. So, my next step is to build a better blueprint.
So these illustrate two challenges I see with making the machine. All of the photos of replicas I've seen online have, for example, wingtips that look too narrow to me, comparing them to the above still from the film. Here's a copyrighted still of I believe a Pegasus model built by Jeff Shafer, posted on CultTVMan.com. The wingtips and the wings themselves look far thinner than do those on the film model. That doesn't leave much room inside to light them adequately, especially in a model size.
I want to try to make my model a bit easier to light inside.
The second problem is, the blueprint above has proved a bit challenging to use as base to make a model. It seems like no matter how I pull the points between the top, front and side views I can't get them to align. When I finally checked the relationships between the front, top and side views I discovered they had areas that didn't match each other. So, my next step is to build a better blueprint.
Last edited:
epoxinator
Well-Known Member
Where to start? With a chalkboard drawing done in 1952 or whenever for the construction of the film model.

I brought the picture into Photoshop and did my best to remove the perspective from the photo.


I used the top view of the machine from the blueprint image to correct the height of the chalkboard image. I don't know if it's accurate but I have no other references. As far as I remember there are no shots in the film of the machine from straight up or straight down. This overlay picture illustrates some substantial proportion changes from the original shape that made it into the blueprint. In the blueprint the wingtips are farther forward than in the chalkboard drawing, and the front edge of the wing is more curved. From above the Chalkboard version's wings look like they jut in a straight line out of the main hull. Also, the front window part of the hull looks like more of a parabola, rather than the half-circle of the blueprint version.
I brought the corrected perspective Photoshop file into Illustrator.


In Illustrator I made a bunch of guides. Then, I made shapes over half of the front and top views and then mirrored each shape to make the other side. Due to either my faulty perspective removal or to human error in the pre-computer aided original drawing, the sides weren't matching equally. I chose the left side. To be accurate for a blueprint, the width, depth and height of each should be equal to the others' relevant sides. The front and the top match pretty well, but not so the side. In the third picture above I have duplicated the side view in purple and overlaid it on the top view. The original side view was much shorter, so I scaled it up to match the height of the top view. Then I copied it and rotated it 90 to compare against the front view. As you can see, now the body of the side view is too fat and the wingtip goes down lower than it does in the front view. The fourth picture show my correction: I scaled the body to be the same hight as in the front view and brought the wingtip up to match as well. What I didn't see until later is that the wingtip of the side view, as seen in the third pic above, and the place where the wing juts out of the main hull, is too far back in comparison to the top view. And, here is the fix.

I brought the picture into Photoshop and did my best to remove the perspective from the photo.
I used the top view of the machine from the blueprint image to correct the height of the chalkboard image. I don't know if it's accurate but I have no other references. As far as I remember there are no shots in the film of the machine from straight up or straight down. This overlay picture illustrates some substantial proportion changes from the original shape that made it into the blueprint. In the blueprint the wingtips are farther forward than in the chalkboard drawing, and the front edge of the wing is more curved. From above the Chalkboard version's wings look like they jut in a straight line out of the main hull. Also, the front window part of the hull looks like more of a parabola, rather than the half-circle of the blueprint version.
I brought the corrected perspective Photoshop file into Illustrator.
In Illustrator I made a bunch of guides. Then, I made shapes over half of the front and top views and then mirrored each shape to make the other side. Due to either my faulty perspective removal or to human error in the pre-computer aided original drawing, the sides weren't matching equally. I chose the left side. To be accurate for a blueprint, the width, depth and height of each should be equal to the others' relevant sides. The front and the top match pretty well, but not so the side. In the third picture above I have duplicated the side view in purple and overlaid it on the top view. The original side view was much shorter, so I scaled it up to match the height of the top view. Then I copied it and rotated it 90 to compare against the front view. As you can see, now the body of the side view is too fat and the wingtip goes down lower than it does in the front view. The fourth picture show my correction: I scaled the body to be the same hight as in the front view and brought the wingtip up to match as well. What I didn't see until later is that the wingtip of the side view, as seen in the third pic above, and the place where the wing juts out of the main hull, is too far back in comparison to the top view. And, here is the fix.
Last edited:
epoxinator
Well-Known Member
Jintosh I think I have fixed all the broken picture links.
epoxinator
Well-Known Member
cavx, the 1953 version has never made it to BluRay. It needs a LOT of restoration and there just isn't the interest in the general public to pay the cost of restoration. I myself purchased the downloadable clip off of iTunes. The copy it was taken from is a little beat up and aged, but it looks better than the DVD did.
I did see, last week, where someone posted on Youtube some unused footage and miniature shots from both WOW and When Worlds Collide.
Here's the WOW link:
https://www.youtube.com/watch?v=v0kQpihBy7I&t=19s
I did see, last week, where someone posted on Youtube some unused footage and miniature shots from both WOW and When Worlds Collide.
Here's the WOW link:
https://www.youtube.com/watch?v=v0kQpihBy7I&t=19s
cavx
Master Member
cavx, the 1953 version has never made it to BluRay. It needs a LOT of restoration and there just isn't the interest in the general public to pay the cost of restoration. I myself purchased the downloadable clip off of iTunes. The copy it was taken from is a little beat up and aged, but it looks better than the DVD did.
I did see, last week, where someone posted on Youtube some unused footage and miniature shots from both WOW and When Worlds Collide.
Here's the WOW link:
https://www.youtube.com/watch?v=v0kQpihBy7I&t=19s
That explains why I never found it.
epoxinator
Well-Known Member


Mesh based upon these:


epoxinator
Well-Known Member
Happened upon a youtube video featuring a montage of photos from the film.
https://www.youtube.com/watch?v=h-Ywd0-0bg4
At 1:00 is a still of my reference shot, only more clear than I've ever seen it before. I grabbed a still, and in Photoshop tweaked it to bring out more detail.


I've used this still as a reference to search Chrome, to try online to find an even larger version.The detail is there, but I would like to see a larger and even cleaner version of this shot. I left a question on the video page but it was posted back in 2014. Anyone else know from where this better image
might have come?
https://www.youtube.com/watch?v=h-Ywd0-0bg4
At 1:00 is a still of my reference shot, only more clear than I've ever seen it before. I grabbed a still, and in Photoshop tweaked it to bring out more detail.
I've used this still as a reference to search Chrome, to try online to find an even larger version.The detail is there, but I would like to see a larger and even cleaner version of this shot. I left a question on the video page but it was posted back in 2014. Anyone else know from where this better image
might have come?
epoxinator
Well-Known Member
Compilation of renders from the old one I did years back. It looks good, but here and there you can see mesh issues where I had to cut through the mesh with a boolion object. For the new one, if I want to get it printed I need to avoid those mesh issues.
They do illustrate the different vantage points you can explore of the object.


They do illustrate the different vantage points you can explore of the object.
Attachments


AWESOME build !!!Compilation of renders from the old one I did years back. It looks good, but here and there you can see mesh issues where I had to cut through the mesh with a boolion object. For the new one, if I want to get it printed I need to avoid those mesh issues.
They do illustrate the different vantage points you can explore of the object.
View attachment 809075View attachment 809076View attachment 809078View attachment 809079View attachment 809080View attachment 809081View attachment 809082
Similar threads
- Replies
- 4
- Views
- 1,147
- Replies
- 15
- Views
- 2,721
- Replies
- 34
- Views
- 3,275