First Scratch Build Lightsaber

Ahhh... you may be correct. I didnt realize he abandoned one and went to another.. (I thought he has always been using the WTV model...) Sorry to mis-lead.

The .wav files sound worse? YIKES!


Usually from everything I have read and experienced.. .wav files are preferred for gapless/seamless playback without any metadata in the file.

I'll try and do some tests with the DFPlayer board and its seamless looping ability.

According to Protonerd... you cant. You have to 'hardcode' the time a files end and start up a new file 10mS before the previous ends to get seamless transition.

I'm not sure how that relates to a single file looping.


I current have a looping file for a Rocketeer project I'm wrapping up... and it sound 'ok'.... not real gap/empty space between loop cycles... but I can tell the file itself was not made to be seamless (zero crossfade..etc)

For what they are.. the < $2.00 DFPlayers are nice.
 
No problem. You've given me lots of information so far.

Being uncompressed, you'd think wav files might play faster, but nope. I did try hard coding the time and playing them both synchronously and asynchronously, but to no avail. I'll try one of the other boards and see how that goes.

Setting the electronics aside for a bit. Space is going to be a premium, so I cut down the crystal and made a new holder. The first one was too shiny, so I made a new one out of steel and heat coloured it to look more used.

Crystal1.pngCrystal2.pngCrystal3.png
 
Last edited:
nice... did you thread manually? (have a CNC?.. or use a die?)

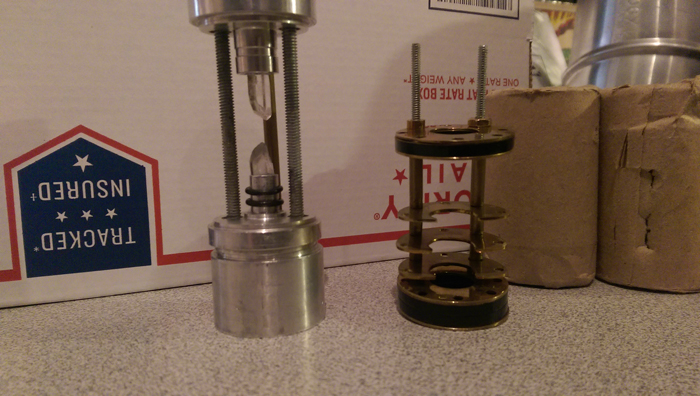
I was just going some through old parts I had laying around...

and quickly slapped these together to give to someone as a gift.

1_small.jpg


Was just sending the person a TCSS activation/control box... and decided to throw in some more 'stuff'...

Hopefully they will enjoy it.

:)
 
nice... did you thread manually? (have a CNC?.. or use a die?)

I was just going some through old parts I had laying around...

and quickly slapped these together to give to someone as a gift.

http://dmstudios.net/misc/gift/1_small.jpg


Was just sending the person a TCSS activation/control box... and decided to throw in some more 'stuff'...

Hopefully they will enjoy it.

:)
I used a die. My lathe "can" do threading, but I have to manually change gears and I can't get the collar out of the one that came installed. It's a pretty cheap lathe. There is a 1/2 turn of slack on every dial and a lot of slop. There's a lot of cutting a bit and checking with the calipers. I don't trust any of the markings on the dials. It must have been made on a Friday afternoon, if you know what I mean. Having said that, a crappy lathe is still very handy.

Those crystal chambers look great! I'm sure the recipient will love them.

Sent from my Nexus 6P using Tapatalk
 
I was struggling with how to install switches. I considered capacitive switches attached to the control knobs, but I remembered seeing a video somewhere that had the LEDs as the switches. I found LED SPST momentary switches on sparkfun.com, but I couldn't find any light pipes long enough. I found acrylic rods on Amazon and made my own light pipes.

I made a tool for cutting the round ends of the light pipes. My first attempt at making a tool for my lathe; luckily you don't need very hard steel for cutting acrylic.

Rounding the end of the rod.
IMG_20180331_115622.jpgIMG_20180331_115722.jpg

A little polishing compound and it looks crystal clear.
IMG_20180331_120142.jpgIMG_20180331_120533.jpg

The completed parts.
101_2630.JPG

I made a mount for the perfboard with Shapelock.
101_2626.JPG

Part of what will be the chassis, holding the led's and switches.
101_2621.JPG

Testing
101_2619.JPG

Here's a video showing a test of the switches.

Edit:
I found the video that gave me the idea for the LED switches.
https://www.youtube.com/watch?v=jauuXQRZLaU
 
Last edited by a moderator:
Yeah the ST run from OM...

Great job on the home brew solution.

Turned out good!..


And,..+1 for making your own tooling!!
 
More work on the emitter. I didn't have any aluminum bar stock large enough, so I cut a couple of pieces from some 1/4" aluminum plate and glued them together. I'm not sure how I'm going to finish it, so there's still some work to do on it.

101_2636.JPG101_2637.JPG101_2638.JPG
 
friend I am putting a saber like yours I have the module wtv020 you have the connection scheme to the arduino and how I program the arduino so that it works for me I had it with another module but that occupied the pin 13 that I use it for the power crystal with this module wtv020 I use it but I must do the programmed again and you have it you could provide it please I do the saber is ami son
 
friend I am putting a saber like yours I have the module wtv020 you have the connection scheme to the arduino and how I program the arduino so that it works for me I had it with another module but that occupied the pin 13 that I use it for the power crystal with this module wtv020 I use it but I must do the programmed again and you have it you could provide it please I do the saber is ami son


Here is the library I used. It is attached to the first post in this thread on the Arduino fourm.

https://forum.arduino.cc/index.php?topic=117009.0
 
good afternoon friend I saw the page but you do not have the connection of how it goes with the wtv020 module with the nano arduino because I have everything but I do not have how the connection is I saw the video of you and I would like to know how you connect it please help me
 
I've been waiting for parts to arrive, but there's been a little progress on the emitter


I made a black ring to dress up the front of the emitter. I found a plastic file folder with a nice texture, but the plastic was fibrous and didn't cut cleanly, so I machined down a piece of PVC and painted it with textured paint to achieve the look I wanted. The first attempt is on the left, with the painted PVC ring on the right.
101_2647.JPG101_2648.JPG

The emitter parts. A TCSS LED and heatsink and the beginnings of a blade plug.

101_2649.JPG

Test fit of the emitter parts.
101_2651.JPG
 
good afternoon friend I saw the page but you do not have the connection of how it goes with the wtv020 module with the nano arduino because I have everything but I do not have how the connection is I saw the video of you and I would like to know how you connect it please help me

Here's the information you need. I've decided not to use this board, as there is a noticeable delay when switching sound files.

http://www.buildcircuit.com/example-1-using-wtv020sd-16p-music-module-with-arduino/

http://www.buildcircuit.com/example-2-using-wtv020sd-16p-music-module-with-arduino/
 
...

If you do in fact stick with the DFPlayer board.. (and you are using the default DFRobot library for it... comment out the reset() command in the begin() method in the .cpp file..

this stop that horrible 'pop' coming from the speaker when powered on/off..

I did stick with the DFPlayer with the DFRobot library. I tried commenting out the reset(), but it didn't stop the pop on startup. I set doReset = false in begin() and that fixed it.

As you mentioned, the play order is a bit odd, but I just used a renaming program to get them in the order I wanted and then copied them in that order and then I can find them easily.

I had to use a transistor to reverse the input to the BuckPuck to prevent it from turning on the LED before the Arduino has booted. I'm ramping up and down the LED brightness with the power on and off sounds respectively. No motion sensing yet. I'm using a 2 cell LiPo, which doesn't have a low voltage cutoff, so I'm using the Arduino to monitor the battery voltage and set off an alarm when the battery is low.

Here is a video test of the LED and audio.

 
Last edited by a moderator:
Some parts I've been waiting for have finally arrived, so I've resumed working on this project. I found that I just didn't have enough room for everything if I wanted a crystal reveal, so I broke down and bought a DIYino. I was using the DFPlayer and the mpu6050 anyways, so the programming was mostly the same. xl97 suggested I do that in the beginning, but I now have a better understanding of how it works, so it's not a total wasted effort.

I thought I'd give 3D printing a try, so I downloaded Blender and designed a grip and blade plug cap and had them printed at Shapeways.

I made my own menu command prompts with apps on my phone and tablet. I still need to paint it and do some fine tuning on the programming, but it's getting close to done.

101_2668.JPG101_2678.JPG101_2681.JPG101_2685.JPG

Lightsaber Test

Crystal Chamber

Config Menu
 
Last edited by a moderator:
Finally finished. I basically knew nothing about building a Lightsaber before this and it was a steep learning curve, but a lot of fun. Thanks to xl97 for the tips.

I used my phone for the video, so it's not the best.

101_2688a.jpg101_2689a.jpg101_2693a.jpg101_2692a.jpg101_2694a.jpg101_2701a.jpg101_2699a.jpg

Finished and working.

Configuration Menu

Crystal Chamber and MP3 Player
 
Last edited by a moderator:
This thread is more than 5 years old.

Your message may be considered spam for the following reasons:

  1. This thread hasn't been active in some time. A new post in this thread might not contribute constructively to this discussion after so long.
If you wish to reply despite these issues, check the box below before replying.
Be aware that malicious compliance may result in more severe penalties.
Back
Top