Korben Dallas' Blaster

modified

Active Member
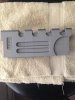
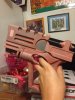
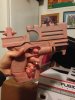
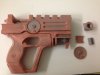
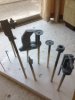
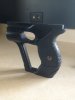
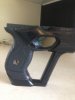
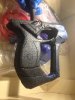
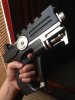
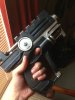
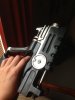
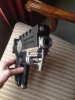
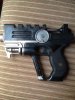
Greetings everyone. I'm usually someone who has studied this forum from afar. I would pick up bits of knowledge here and there, and well I finally decided to make a prop. A lot of people make props from franchises or movies that resonate with them. For me that particular movie is The Fifth Element. There are so many great props in the movie, but for me Korbens' gun stands out in every scene that it's in. If anyone has any questions about the build process please feel free to ask.
 

Attachments

  • KG5.JPG
    KG5.JPG
    1.3 MB · Views: 1,427
  • KG4.JPG
    KG4.JPG
    1.3 MB · Views: 489
  • KG3.JPG
    KG3.JPG
    1.3 MB · Views: 222
  • KG2.jpg
    KG2.jpg
    1.5 MB · Views: 275
  • KG1.jpg
    KG1.jpg
    2 MB · Views: 377
Last edited:
it's really looking great. I'm interested in knowing more indeed. would love it if you posted photos and explanations of the build.
congrats! want to make one now :thumbsup
 
Ask and you shall receive. I honestly made a lot of mistakes along the way so I would be more than happy to catalog the process so that others can avoid the same mistakes. Like any other 3d printed product you're going to want to get rid of the lines and make the finish as smooth as possible. Now a lot of people sand away all the lines flat, but most plastics are really hard to sand, and of course sanding too hard can lead to uneven spots. I found it easier to fill in the smaller areas and then sand it. This was much easier for me to get the look I was going for. I filled it in with Spot putty. This is essentially bondo that is used as a spot correcter, it even air dries which is pretty gosh darn convenient. I sanded using 120 grit to 320 for this initial phase until I was happy with the results.
 

Attachments

  • 3d printed lines.jpg
    3d printed lines.jpg
    786.5 KB · Views: 118
  • 9pcWwO3.jpg
    9pcWwO3.jpg
    666.9 KB · Views: 160
  • MfgopnU.jpg
    MfgopnU.jpg
    633.8 KB · Views: 123
Last edited:
I wanted to just say that a lot of videos I saw online showed people making their kits smooth by using epoxy resin or xtc-3D and I'm sure these products work wonders but I advise against using these. Because if you are inexperienced you might end up using too much, and it clumps up in crevices and pocketed areas. Not to mention that it also is very finnicky with the temperature of the environment you're working in and sometimes it can take forever to cure or not cure at all if mixed improperly. Bondo and spot putty sand quite easily. (Be sure to use a respirator when working with these materials!!!!!!)
 
When I got the initial sanding done I had decided to go over every piece using 400 grit and working my way up to 600 grit. I ended up getting the surface smooth enough to where I was ready to begin painting. Just for fun I had decided to do a mockup to test the fit of the parts. This is always important to do to see where you need to sand more or less in certain areas.
 

Attachments

  • aYr1lN7.jpg
    aYr1lN7.jpg
    668.8 KB · Views: 124
Last edited:
I filled in the area where the ammo counter was supposed to be. I decided that I was not going to pursue figuring out the electronics that would be involved to pull that off, and in my honest opinion that particular feature worked for the movie but in real life makes it look like a toy. I decided to fill it in using Bondo and give it and unaffected look. I personally was really happy with the finished result going this route.
 
At this point I was ready for paint. I decided to used Aclad laquer paints for this build. Mighty expensive tbh. If I had to do it over again I would probably just experiment using graphite powder for the black parts and silver rub-n-buff for the aluminum parts. However I can definitely vouch for the quality of the Aclad line of lacquer paints. I started off by using their black microfiller bottle. In hindsight I honestly could have just used a large can of microfiller primer and it honestly would have cost about the same. next time I will opt to do that instead of paying $8 for a 4oz. bottle... I ended up using grey filler primer anyways.. I used a make shift painting set up by supergluing my pieces onto wodden dowels that I cut to different sizes and some skewers for the smaller bits.
 

Attachments

  • IMG_1994(1).JPG
    IMG_1994(1).JPG
    1.9 MB · Views: 177
After the primer dried I decided to go at it with a gloss black base followed by a run of aqua gloss clear cotehttps://www.youtube.com/watch?v=gTH2994-0zY. This is recommended for finished that require a high shine. Unfortunately i didn't take any pics of this process however. Here is a handy link of the tutorial I watched to understand the technique. Bill Doran is a god send to prop makers everywhere.
 
This next part I'm honestly really proud of. I went looking around the internet at pictures of this gun for reference and I found that there was no real contrast to the gun. The black was very consuming and there was not much else for the eye to be drawn to other than the metallic pieces. I decided that I was going to make the grip have a rubber texture so that it can be another detail to catch the eyes attention. It also would serve a functional reason to be there as the grip becomes non slip and feels quite tactile. It truly makes this prop a little more authentic in my opinion. Believe it or not I picked up this trick up from a blog using this stuff for camera lenses.


(Full disclosure) I royally messed up using this stuff initially. I guess I expected it to be like a textured spray paint. I didn't realize how thick this stuff sprays on. I ended up getting globs of it on the finish that ended up looking like the tar monster from scooby doo. I ended up having to hack at it with an exact knife and sanding and repainting......... yeah... some tears were shed... Anyways I was able to bounce back and get to the same spot. This time I sprayed from a couple feet out and simply sprayed for a fraction of a second at a time as I guided the paint where it needed to be.

- - - Updated - - -

I colored in the "V" on the grip using a gold sharpie pen. I needed to use a fine point in order to fill in that small detail
 

Attachments

  • IMG_2053.JPG
    IMG_2053.JPG
    2 MB · Views: 167
  • IMG_2052.JPG
    IMG_2052.JPG
    1.4 MB · Views: 226
  • IMG_2051.JPG
    IMG_2051.JPG
    2 MB · Views: 175
  • FullSizeRender(2).jpg
    FullSizeRender(2).jpg
    2 MB · Views: 164
  • IMG_2030.JPG
    IMG_2030.JPG
    1.9 MB · Views: 154
Thanks man! It is definitely something I will consider for future builds. It's kind of sad though because I'm at that point where I'm like "now what?" it actually feels nice to have a project on hand.
 
Last edited:
Interesting, I've never seen that rubber undercoating product before. I like the texture that it gives. And well done on all the rest of the work and thank you for the photos! I'm working on a printed Rey blaster and any reference I can get for finishing prints nicely is always appreciated. Sure is a lot of work, but the results are worth it.

Did you model this yourself? I don't know a lot about this gun, but it looks really good to me.
 
This thread is more than 6 years old.

Your message may be considered spam for the following reasons:

  1. This thread hasn't been active in some time. A new post in this thread might not contribute constructively to this discussion after so long.
If you wish to reply despite these issues, check the box below before replying.
Be aware that malicious compliance may result in more severe penalties.
Back
Top