Somerset
Sr Member

Last summer I bought one of @Walter 's fibreglass X-Wing helmets. I had always wanted a fibreglass version of this helmet since the only other similar versions I was familiar with were the eFX ones which now cost a small fortune. Anyway, since acquiring this I didn't really have a chance to work on it until January. The first thing I had to decide was who to paint it as. My favourite OT character was always Wedge, but, let's face it, he has one of the more mundane helmet designs. So to have something that stood out a little more from the others I opted to go with Red Leader, who I was happy to see get some bonus screen time in Rogue One.
Unfortunately, because I live in a small one bedroom London flat, the only place I can work on this is either on the mini-balcony or right up by the door against it. This meant I could only really work on it at weekends, and only then if it was warm enough to be outside! So it took a little longer than I had hoped!
The kit is really nice - lightweight and durable. It required minimal sanding to prep it. The mohawk and end cap come as separate pieces that you glue on. The only real lack of detail I could find was that the cheek dimples were quite shallow, but that's understandable given that this isn't vac-formed.
Others have already painted this helmet up, so I followed some of their methods - so thanks to all whose threads I looked at!
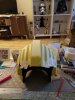
First stage was to coat the inside with black spray on plasti-dip. This left a nice smoother and rubbery coating on the inside, but caused me a bit of a headache when the missus disapproved of the smell it was leaving as it dried... I then gave it a coat of white primer from a rattle-can that would show through where I would late apply weathering.
For the base coat I took some inspiration from some older threads here and at the Rebel Legion, and used a mix of Tamiya Yellow-Green with Desert Yellow. This was actually my first time using an airbrush, so was a lot of fun getting to grips with how to coat it evenly.

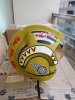
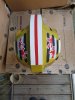
Next came masking off the stripes on the forehead. Thanks to @superjedi for giving me some measurements to get started. As advice to anyone making Red Leader in the future, if you're using decals I suggest waiting to paint the stripes until after they arrive. That way you can accurately position them in relation to the size of the sun-bursts. My stripes aren't quite long enough and so they're a bit too close together. It's also important to note that the stripes are asymmetrical between the two sides.


I then used flat black to paint all the stripes around the rams' horns and up the sides. These are probably a bit too thick but they'll do for me.
Next I used Scott DeLuck's vinyl decals - they go on very easily and are top quality

Next, weathering!
Attachments
Last edited:


")


