Bounty Hunter build - Pre Rogue 1 era

Ozymandias

New Member
Hey,

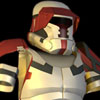
I'm building a unique bounty hunter and I have been inspired by Dengar's piecemeal armour to ask the question "What would a patchwork bounty hunter look like around the end of the clone wars"

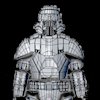
I have gone with a Clone Trooper Airborne helmet - Raw cast from SkygunBros - and want to take the shoulders and chest piece from a Sith Trooper or maybe a Havok Trooper but can't find any templates already done for these.

images.jpgCd2XwzkUAAA7ste.jpg

I was wondering if anyone had any pep or template files for these to save time on the patterning? I plan to prototype in foam and then either vac form or urethane cast these pieces once finished.

Progress photos of the helmet build are below, was putting the headliner in when the nose fell off today which needs reattaching with more 5min epoxy.

If you want to see the other bits that I am working on including a 16gauge steel mandalorian armour set check out my FB page - Junkyard Grizzly

Helmet 02.jpgHelmet 01.jpgHelmet 03.jpgHelmet 08.jpgHelmet 06.jpgHelmet 07.jpgHelmet 04.jpgHelmet 05.jpg
 
Been really considering doing one of these. Love the creativity that can come out of a custom bounty hunter build. Sky's the limit!
 
Dude! There’s nothing I love more than custom Star Wars builds. You’re doing brilliant work, can’t wait for your updates [emoji1303][emoji1303][emoji1303]

N.


Sent from my iPhone using Tapatalk
 
Just updating the thread with the progress photos.

I just did a first pull of the shoulder pad as a test and it came out really good. I purposefully created a mould while the master is still a little rough to give it 1st stage battle damage. I am going to finish the master so there is no dents, dings, dinks or other imperfections so I can make pristine versions in the future.

Overall I'm pretty happy for the first attempt and have learned allot about what not to do when casting.


Havok shoulder pad - pep  (1).jpgHavok shoulder pad - pep  (2).jpgHavok shoulder pad - pep  (3).jpgHavok shoulder pad - pep  (4).jpgHavok shoulder pad - pep  (5).jpg
 
Second pad pulled, testing with the helmet for look and I think it's coming along. I have killed my hand sander with all of this work and need a new one.

Got to work out the paint job and finish cutting out all the chest piece parts for assembly. That is something I am not looking forwards to.


Havok shoulder pad -moulded 2.jpgHavok shoulder pad -moulded.jpgHavok shoulder pad -Pull 2.jpg
 
Latest updated from the weekend, pads are all painted and weathered up.

Now onto the chest armour, not looking forwards to that bit but just need to plod on.


Helmet and pads 1.jpgHelmet and pads 2.jpgHelmet and pads 3.jpgHelmet and pads 4.jpgHelmet and pads 5.jpg
 
It's as a simple as paint by numbers -

Each stage was masked off and sprayed, final weathering was done with multiple black acrylic washes and a mix of brown, burned umber dry brushing and stippling.

Flaking paint was done by masking with liquid latex before each coat of paint was sprayed on then peeled off when the paint was dry enough.

Final paint job was clear coated for protection and durability.


Havok shoulder pad - paint 1.jpgHavok shoulder pad - paint 2.jpgHavok shoulder pad - paint 3.jpgHavok shoulder pad - paint 4.jpgHavok shoulder pad - paint 5.jpgHavok shoulder pad - paint 6.jpgHavok shoulder pad - paint 7.jpgHavok shoulder pad - paint 9.jpgHavok shoulder pad - paint.jpg
 
I'm currently in the middle of the cut and stick phase of the chest armour. It is taking a while and driving me crazy..

So this weekend I am distracting myself with making a couple of bounty trophy lightsabers. Will be adding more photos to this comment tonight. Current progress on first saber.

Still needs some greeblies on the handle and then onto the final painting and weathering..

Saber 1.PNG
 
As this costume is for a game that uses nerf guns I have had to get a custom belt made by a friend of mine. I have to say, I love this belt, and it looks awesome with the trophies dangling off it.


holster 1.jpgholster.jpgholster 2.jpg
 
Bit more of a build update this time.

The theme of this update is SANDING!

The pepakura blank took approximately 2-3 weeks to assemble as the first attempt was totally the wrong scale.

I then covered the paper blank in fibreglass resin then reinforced with a bodyfiller/resin slush which is quick and gets right into the corners without having to press like bodyfiller alone would need.

After the reinforcement I started sanding in anger. I think so far I am about 12-13 hours into the sanding and shaping the outer shell. I think I still have a good 4-5 hours worth of fine tuning before I can move into some finer grits as I am using 120 now.

There was quite a bit of deformation that needed correcting at the back and although not perfect I may live with it as I am hoping to have this costume ready for wearing at MCM in two weeks.

Expect allot of progress in the next 14 days!


Chest.jpgChest 4.jpgChest 5.jpgChest 1.jpgChest 2.jpgChest 3.jpg
 
I worked up some options for the paint job while I did the base coats of black and white.

After thinking about it I decided to go with option A and I think it was a great choice.

There is quite a bit of cleaning up to do as there was leakage of the red which is a pain.

I am also likely to repaint the black sections on the back as red but am out of masking tape.

Magnets are on order and the straps need adjusting for a better fit.

Overall happy with the progress this week even if everything in my Workshop is covered in 2 inches of dust.


32952110_10156142173977324_7398423579332706304_n.jpgArmour parts.jpgOptions.png
 
Looks like Old Republic trooper

The old republic trooper was an early concept for this before I started to piece it together out of individual parts.

Thanks for all the great feedback, this is the only photo of the costumes first outing this weekend at MCM London.

The vambraces and leg armour were just slapped together last minute I still need to make a much better set to go with the outfit and I also need to change those boots as they are a size too small.

Costume dress 1 (2).jpg
 
The old republic trooper was an early concept for this before I started to piece it together out of individual parts.

Thanks for all the great feedback, this is the only photo of the costumes first outing this weekend at MCM London.

The vambraces and leg armour were just slapped together last minute I still need to make a much better set to go with the outfit and I also need to change those boots as they are a size too small.

View attachment 820649

Great final product. Amazing work
 
This thread is more than 5 years old.

Your message may be considered spam for the following reasons:

  1. This thread hasn't been active in some time. A new post in this thread might not contribute constructively to this discussion after so long.
If you wish to reply despite these issues, check the box below before replying.
Be aware that malicious compliance may result in more severe penalties.
Back
Top