mathraptor
New Member

This is a mod I've been working on for the past 2 weeks. Some may recognize it as the massive Walmart toy that Hasbro released for the premier of Star Wars: Rebels.

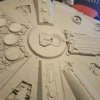
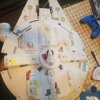
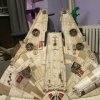
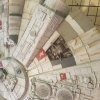
For those who don't know, this is what she looked like when she arrived. With it, comes a series of stickers to be applied to add some color, and (unfortunately) details. For example, using stickers to give the appearance of the grills and engine grill, and even worse, the entirety of the side panels. So the details were the first step, and after doing some math, I determined that 3D printing was the way to go. Given what materials I already had, the cost of scratch building the sides and grills would have been more expensive than just having them printed. I luckily found exactly what I wanted on Shapeways.

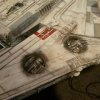
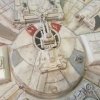
The parts were super high quality and honestly I couldn't have been happier with them. Once the parts arrived; I completely disassembled the Falcon, Dremeled out the engine grill, and installed all the parts to the top half of the ship. I also used a hot knife to add in some screen-accurate battle damage.


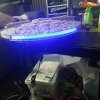
Next, I worked on the lights. I accomplished this with some simple strip-lights attached to a switch. I covered the housing in aluminum tape for reflection, and was super pleased with the results.


Next it was time to prime. Now this toy is made of polypropylene, and I always see people going through hours of prep to try and get paint to adhere to it. WELP, that part isn't necessary if you sue the right paint. Montana Gold spray paint will adhere to almost anything, and that includes polypropylene. I used black on the inside to stop light from escaping, and the color marble for the base coat of the Falcon. For those who worry over screen accuracy, I use this color on all the Falcons I do. In particular, on the Bandai kit, the colors were so close I could hardly tell where I had and hadn't painted.
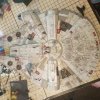
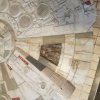
For the base coating of individual panels, I mixed my own paint (always do), and matched it to the colors that were given with the stickers. All I used were basic acrylics mixed with flow improver.

I then (CAREFULLY) painted the panels on with a brush. Thinned down enough, and with the application of 3 to 4 coats, no brush lines were visible in the end. I painted the grey panels first. Once they were done I did the red, but before that, I applied small amounts of rubber cement to the panels. Once I was satisfied with red, I then rubbed the cement off, creating the chipping effect you usually see on these panels.


Once that was done, came the loooooooong process of weathering this massive thing. I mixed brown and black ink together with some water and did an ink wash. I used my heat gun to speed up the process, drying it for a few seconds before I wiped away the ink. It left a very satisfying grungy look. Once that was done came the very slow task of applying pastels. Just normal, cheap, pastels ground up on sandpaper and applied with make up applicators. I rubbed dark grays into the cracks of the panels, and used a mixture of yellow orcher, burnt sienna, and dark brown to create streaks of rust. For the open panels and the darker spots, I used a mixture of the pastels and dry brushing. Laying down a coat of black paint, I then went over it with black pastels, creating a smokey look that I couldn't be happier with. on the open panels I also dry brushed chromatic silver and added my rust mixture to create an old metal look. When I was all finished, I then misted the pastels with alcohol, which then sealed them to the model.
part 1 of 2
Attachments
-
 falcon28.jpg13.7 KB · Views: 147
 -
 falcon21.jpg15.2 KB · Views: 166
 -
 falcon16.jpg16.7 KB · Views: 144
 -
 falcon14.jpg17.9 KB · Views: 171
 -
 falcon13.jpg15.5 KB · Views: 155
 -
 falcon12.jpg14.9 KB · Views: 134
 -
 falcon11.jpg13.5 KB · Views: 132
 -
 falcon10.jpg19.9 KB · Views: 131
 -
 falcon9.jpg15.6 KB · Views: 140
 -
 falcon8.jpg17.4 KB · Views: 147
 -
 falcon7.jpg16 KB · Views: 172
Last edited:
