You are using an out of date browser. It may not display this or other websites correctly.
You should upgrade or use an alternative browser.
You should upgrade or use an alternative browser.
OP, I got a whole lot of nothing except your work so far is great, amazing even. Please keep on posting updates as its an inspiration for many to keep on creating.
On the paint cracking issue, it boils down to a couple of issues: Cold temps or contamination or unrelated mediums. When Im painting a piece I follow this recipe: Warm environment, wash the object thoroughly in Dawn to rid of grease and finally buy primer-paint-clear coat that is from the same brand or family. Cold temps will cause paint to cure all wonky. If you have finger grease or chemicals on the piece it will cause the paint to act wonky. If you try to mix Urethane primer with another family of paint................it will act wonky. Just like if you try to put Epoxy paint on a ZZZ primer....they wont play nice.
When I repainted a near studio scale Millennium Falcon, I put in the bath tub with some Dawn Dish soap and scrubbed. Rinsed and did it all over again. Man made plastics, foams, resin, foams, all off-gas certain chemicals. The trick is to find what the chemical is and how to neutralize it. Then you can paint over it with the appropriate primer and paint without any reservations.
I have limited experience with plasti dip but I know it can be tinted and airbrushed with good results.
Bla Bla Bla....Im droning on. Good work kiddo, keep it up.
amuelb
Active Member
HELLO EVERYBODY!
I'm back after yet another prime and paint. And I'm happy to announce that the painting job for the arms is finally done!
Now I just need to get back to work on the head, body, legs and hands... no pressure right?
I did take a day off from painting to do a little Ardunio Uno coding. After hours of cursing and keyboard mashing, I finally got my two servos to do the movement I was looking for! I'm excited to show you guys next steps for that part... Perhaps I'll keep it a secret for now")
Some details such as the flag on the right arm, the round dummy logos on the left arm, etc are not complete yet but will be added once I get all my vinyl stickers printed.
Blue Arm (right):


Orange Arm (left):


The set (front and back):


Excuse the lighting and the colours... my cellphone cannot process that orange correctly for some reason, and all my photos are taken at night time so my lighting is really bad... I hope you guys like it — I'm excited to get moving on the rest!
I'm back after yet another prime and paint. And I'm happy to announce that the painting job for the arms is finally done!
Now I just need to get back to work on the head, body, legs and hands... no pressure right?
I did take a day off from painting to do a little Ardunio Uno coding. After hours of cursing and keyboard mashing, I finally got my two servos to do the movement I was looking for! I'm excited to show you guys next steps for that part... Perhaps I'll keep it a secret for now
Some details such as the flag on the right arm, the round dummy logos on the left arm, etc are not complete yet but will be added once I get all my vinyl stickers printed.
Blue Arm (right):
Orange Arm (left):
The set (front and back):
Excuse the lighting and the colours... my cellphone cannot process that orange correctly for some reason, and all my photos are taken at night time so my lighting is really bad... I hope you guys like it — I'm excited to get moving on the rest!
Last edited by a moderator:
mcoractual
Well-Known Member
Your work is incredible as always. You should be really proud of this as you have inspired others. I can't tell you how excited I am to see your project finished? Somehow I feel that if I ever encountered you at a con while in my Titanfall Cosplay, the photos would end like this. ��
(Timestamp: 1:30)
(Timestamp: 1:30)
Last edited by a moderator:
amuelb
Active Member
Your work is incredible as always. You should be really proud of this as you have inspired others. I can't tell you how excited I am to see your project finished? Somehow I feel that if I ever encountered you at a con while in my Titanfall Cosplay, the photos would end like this. ��
(Timestamp: 1:30)
https://youtu.be/oai5F7e3DXk
I would Love to run into you at a con! hahahha are you implying you'd just run at me? or jump on me? lol you'd likely pancake me...
I am glad people are feeling inspired — Im getting more and more messages from people who are now building their own
exciting!- - - Updated - - -
Thank you so much! I'm about to upload some more painting progress!beautiful paint work
let me know what you think!mcoractual
Well-Known Member
I would Love to run into you at a con! hahahha are you implying you'd just run at me? or jump on me? lol you'd likely pancake me...
I am glad people are feeling inspired — Im getting more and more messages from people who are now building their own
- - - Updated - - -
Thank you so much! I'm about to upload some more painting progress!
Hahahaha! I'm implying I would hafta do the hack on you since you're a robot. LOL I don't wanna pancake you. I am a rather large guy, that wouldn't be nice. I only pancake bad people. You should be! I'm so proud You have been a supporter of yours from the start. Ya do excellent work. I think the part that boggles the mind is the lettering you put in foam. How did you actually do that...? It legit looks machine stamped.
amuelb
Active Member
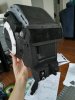
HELLO EVERYBODY! I spent my entire weekend locked inside my house hard at work, never even stepping outside to see the sunlight (it's winter, no big loss there) I am still missing some pieces off the head, but they wont be added until I get all my wiring done (I need space for my hands to get in there) — but thats enough talking for now! GET SCROLLING!
.png")
And then I decided to start with my plastidip and paint. Some parts would need to be added after I did the initial coat of paint either because they were black or they would obstruct my hand movement when I started getting into the wiring. (so don't worry, I'll be adding the brow, mouth and chin bars soon and haven't forgotten the back radio or ear supports )
First coats of paint (thankfully there was NO paint issues!) :
After I had the first coat of paint down, I decided to move onto the weathering process.


And finally with everything mounted:


And a sneak preview of the lights and ears!

And then I decided to start with my plastidip and paint. Some parts would need to be added after I did the initial coat of paint either because they were black or they would obstruct my hand movement when I started getting into the wiring. (so don't worry, I'll be adding the brow, mouth and chin bars soon and haven't forgotten the back radio or ear supports
) First coats of paint (thankfully there was NO paint issues!) :
After I had the first coat of paint down, I decided to move onto the weathering process.
And finally with everything mounted:
And a sneak preview of the lights and ears!
Attachments
Last edited by a moderator:

amuelb
Active Member
nice paint job and weathering
Thank you very much! I'll be doing some building on the legs this weekend, I hope I can show you further progress soon!
Until then... Cats.
Last edited by a moderator:
mcoractual
Well-Known Member
Thank you very much! I'll be doing some building on the legs this weekend, I hope I can show you further progress soon!
Until then... Cats.
https://youtu.be/940q6xSi1fU
"mum wut r dis...? how it move...? ACK!" :lol
amuelb
Active Member
Hey everyone,
I've been away for a while dealing with some landlord/tenant issues but I'm back and we've got the CHAPPiE progress moving again!
Since I was gone I started working on my leg pieces. These are the mid thigh parts, though they look small they do fit and will look a lot less stubby once the upper thigh has been built (they will be built into the cod piece).
They are made entirely out of foam floor mats and 2mm craft foam. They open and close at the back with some industrial strength Hook n' Loop velcro. All rivets are made with googley eyes (I think I've used over a hundred so far on this build). These will be plastidipped and painted once the weather warms up past -20°c.
We are officially 52 days away from the Ottawa ComicCon so the pressure is on!


Though it's not finished, I was doing a little photo/fitting test to see how well my paint job would come out on a proper DSLR camera (Canon 6D Mark ii - 24-105mm).
I used a remote shutter on my phone so that I could see all the different angles... the result made me laugh so I thought I'd share.

I've been away for a while dealing with some landlord/tenant issues but I'm back and we've got the CHAPPiE progress moving again!
Since I was gone I started working on my leg pieces. These are the mid thigh parts, though they look small they do fit and will look a lot less stubby once the upper thigh has been built (they will be built into the cod piece).
They are made entirely out of foam floor mats and 2mm craft foam. They open and close at the back with some industrial strength Hook n' Loop velcro. All rivets are made with googley eyes (I think I've used over a hundred so far on this build). These will be plastidipped and painted once the weather warms up past -20°c.
We are officially 52 days away from the Ottawa ComicCon so the pressure is on!
Though it's not finished, I was doing a little photo/fitting test to see how well my paint job would come out on a proper DSLR camera (Canon 6D Mark ii - 24-105mm).
I used a remote shutter on my phone so that I could see all the different angles... the result made me laugh so I thought I'd share.
mcoractual
Well-Known Member
Hey everyone,
I've been away for a while dealing with some landlord/tenant issues but I'm back and we've got the CHAPPiE progress moving again!
Since I was gone I started working on my leg pieces. These are the mid thigh parts, though they look small they do fit and will look a lot less stubby once the upper thigh has been built (they will be built into the cod piece).
They are made entirely out of foam floor mats and 2mm craft foam. They open and close at the back with some industrial strength Hook n' Loop velcro. All rivets are made with googley eyes (I think I've used over a hundred so far on this build). These will be plastidipped and painted once the weather warms up past -20°c.
We are officially 52 days away from the Ottawa ComicCon so the pressure is on!
View attachment 803636View attachment 803637View attachment 803638View attachment 803639View attachment 803640
Though it's not finished, I was doing a little photo/fitting test to see how well my paint job would come out on a proper DSLR camera (Canon 6D Mark ii - 24-105mm).
I used a remote shutter on my phone so that I could see all the different angles... the result made me laugh so I thought I'd share.
View attachment 803641
Looking great as always! Keep up the good work. How much more do you have to build? What is left to complete? I know you talked about a rubber chicken, any other props? Are you going with anyone else? Any plans for a group-centric collaboration?
amuelb
Active Member
Looking great as always! Keep up the good work. How much more do you have to build? What is left to complete? I know you talked about a rubber chicken, any other props? Are you going with anyone else? Any plans for a group-centric collaboration?
Hey Mcoractual welcome back!
I have quite a bit left. I just completed one and a half calves yesterday and I'm onto one of the knees.
I still need to build the feet, hands, cod piece, knees, and mount my chest piece to my back piece.
I have been holding out on the rubber chicken for a bit... and stumbled across a toy gun at the dollarama by my house. I'm tempted to paint it with a pink (like the guns used by CHAPPiE's mum) and use it as a backup if I cant find myself a rubber chicken in time! We will have to see!
mcoractual
Well-Known Member
Hey Mcoractual welcome back!
I have quite a bit left. I just completed one and a half calves yesterday and I'm onto one of the knees.
I still need to build the feet, hands, cod piece, knees, and mount my chest piece to my back piece.
I have been holding out on the rubber chicken for a bit... and stumbled across a toy gun at the dollarama by my house. I'm tempted to paint it with a pink (like the guns used by CHAPPiE's mum) and use it as a backup if I cant find myself a rubber chicken in time! We will have to see!
I had to google what Dollarama was... :lol
It wouldn't be hard to do! Be sure to sand off all the "made in china" or brand stuff.
amuelb
Active Member
I had to google what Dollarama was... :lol
It wouldn't be hard to do! Be sure to sand off all the "made in china" or brand stuff.
Haha yes, sorry, a Dollarama is a dollar store here in Canada.
Amazingly this gun doesn't say "made in China" anywhere on it! It had no logos or anything. It did make a horrible "pew pew" sound, but I cut out the speaker already... the gun rumbles when you pull the tigger and the end of the gun flashes. It's totally cheesy... but really, it's only a minor prop
So, also — this is a calf, it fits very snuggly! The knee (seen in the 6th photo) will sit just above with some design elements going around the sides, it will be strapped around my knee with an elastic strap.


and here is the gun so far — it was pulled apart and sprayed with primer and now I'm painting it pink with acrylics. It will then be black washed and worn to look a bit more real. YES, I know its not the gun she actually used in the movie... I just don't have time to make my own. I also really don't think anyone at the Ottawa con will know or care.


mcoractual
Well-Known Member
Haha yes, sorry, a Dollarama is a dollar store here in Canada.
Amazingly this gun doesn't say "made in China" anywhere on it! It had no logos or anything. It did make a horrible "pew pew" sound, but I cut out the speaker already... the gun rumbles when you pull the tigger and the end of the gun flashes. It's totally cheesy... but really, it's only a minor prop
So, also — this is a calf, it fits very snuggly! The knee (seen in the 6th photo) will sit just above with some design elements going around the sides, it will be strapped around my knee with an elastic strap.
View attachment 803886View attachment 803887View attachment 803888View attachment 803889View attachment 803890View attachment 803891
and here is the gun so far — it was pulled apart and sprayed with primer and now I'm painting it pink with acrylics. It will then be black washed and worn to look a bit more real. YES, I know its not the gun she actually used in the movie... I just don't have time to make my own. I also really don't think anyone at the Ottawa con will know or care.
View attachment 803892View attachment 803893 View attachment 803894
It actually looks pretty good honestly! You turned a cheap toy into a decent quality prop. Not bad! So when you finish all the armor, I imagine you have some kind of undersuit you will wear? Have you made that yet? If so, I apologize for not noticing.
Last edited:
amuelb
Active Member
It actually looks pretty good honestly! You turned a cheap you into a decent quality prop. Not bad! So when you finish all the armor, I imagine you have some kind of undersuit you will wear? Have you made that yet? If so, I apologize for not noticing.
Glad you think so! I know it's not exactly accurate... but I doubt anyone will say anything.
I will upload some photos when I have it finished. It takes SO many layers of pink acrylic to get a solid pink colour... maybe 5-7 coats per piece plus drying time! I will need to clear coat the pink before black washing in order to ensure the pink acrylic doesn't start to lift. Once I have it all finished, I don't think it will look too bad, right now it just reminds me of peptobismol.
I do have an under suit, but its just black. It's a two piece instead of a one piece to allow for bathroom trips (you wouldn't believe how much thought went into just figuring out how to go pee). Since the suit is pretty boring, I haven't posted any photos. I'll need to make a turtle neck like thing to cover my neck when I'm finished, no need for a full cowl though because I have a female crew cut!
mcoractual
Well-Known Member
Glad you think so! I know it's not exactly accurate... but I doubt anyone will say anything.
I will upload some photos when I have it finished. It takes SO many layers of pink acrylic to get a solid pink colour... maybe 5-7 coats per piece plus drying time! I will need to clear coat the pink before black washing in order to ensure the pink acrylic doesn't start to lift. Once I have it all finished, I don't think it will look too bad, right now it just reminds me of peptobismol.
I do have an under suit, but its just black. It's a two piece instead of a one piece to allow for bathroom trips (you wouldn't believe how much thought went into just figuring out how to go pee). Since the suit is pretty boring, I haven't posted any photos. I'll need to make a turtle neck like thing to cover my neck when I'm finished, no need for a full cowl though because I have a female crew cut!
Peptobismol sub machine gun! :lol
Neck seal should be easy to make! If you ever need help with design ideas for that, look up "stormtrooper neck seals" or "clone trooper neck seals." That will be more or less an idea of how to make it. I now have this amusing image of someone doing a cosplay of this nature scrambling to get into a bathroom stall with EVA foam armor pieces flying about. LOL
Similar threads
- Replies
- 5
- Views
- 1,374
- Replies
- 21
- Views
- 3,562
- Replies
- 0
- Views
- 113