Hoth Han DL44 - a Denix Story..

grimsheeper

Active Member
This is my first RPF build thread.. so let's see how this goes. I am currently putting together an "as accurate as humanly possible" Hoth Han solo. Snow and all!

My blog for my build will be on Blogger :
https://hoththerecord.blogspot.co.uk/ This will have the full size photos..

So i've been reading thread after thread on here and then managed to find some UK Suppliers of Denix's. I managed to find out if they were the "v2" and ordered 2 (one for a friend).

I was pleasantly suprised when it arrived. There are noticeably better upgrades/fixes on this from the v1.


  • No Denix Diamond logo
  • Plastic grips (downgrade!)
  • No cartridge refill guide cutouts
  • Sight slider was solid and single piece
  • Curve between trigger guard and grip much more curved
  • Less pitting/Better quality


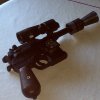
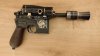
Here is is out of the box

IMG_20180120_223645.jpg IMG_20180120_223656.jpg


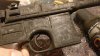
Notice in this pic i started to scrape away at the "paint" on the magazine.. wasn't happy with that! So i went about poking at it and the file came out.. and the sandpaper... oops!

IMG_20180120_224806.jpg
Started to sand down the obvious... but you know what this leads to..

IMG_20180121_213524.jpg
Started to file and sand down the pins. Used 150 grit sandpaper and followed up with 600 grit W&D for the final finish. I have done this for the whole gun so far but used 1200 when getting a final finish.

IMG_20180120_230025.jpg
This was the first attempt using the dremel. Its scary, it shreded the metal and took ages to sand. I will be more careful with it from now on. After some sanding its smooth again... but be warned!

IMG_20180121_213602.jpgIMG_20180121_213616.jpg
Filed down the firing pin to more of a nub

IMG_20180120_223645.jpg


IMG_20180120_223656.jpg


IMG_20180120_224806.jpg


IMG_20180121_213524.jpg


IMG_20180120_230025.jpg


IMG_20180121_213602.jpg


IMG_20180121_213616.jpg
 
Last edited by a moderator:
Day 2

IMG_20180121_213639.jpg
Detailing the "seam" for the clip

IMG_20180121_213646.jpg
Its really hard to do this bit! Tip - score first - file later!

IMG_20180121_213549.jpg
These annoying pin holes will need filling and sanding later...

IMG_20180121_213659.jpg
Its all getting filed and sanded now.. every little groove i can get to (man this hurts your hands)

IMG_20180121_213714.jpg
This will be filled and sanded later..

IMG_20180121_213729.jpg
Barrel sanding starting... This is now 600 then 1200 grit sanded.. its smooth as anything now!

IMG_20180123_230442.jpg
Next up, those pesky little washers that need not be there. This is about 10 mins work with a hand file, then sanded.

IMG_20180123_230449.jpg
Whilst I was there I started to pick out the scope lettering.. really tricky and fiddly so take your time. Its very easy to fly off and scratch the rest..
 
My Epoxy weld turned up from Ebay.. so got started. (Damn that stuff dries SOLID!)

IMG_20180125_222550.jpg
"M96" logo filled in and later sanded. You have to leave it at least an hour but as there's not much it dries quickly. In retrospectI would say squash it in the gaps ASAP and leave it overnight for best results.

IMG_20180125_222556.jpg
Pin hole above Trigger filled. This is after sanding.. its so smooth now you wont tell its there once painted/blued/weathered..

IMG_20180125_222607.jpg
Started to re-shape the trigger but hand filing this was a b***h. So I am going to try dremelling it tomorrow. I figured as its a curved piece the dremel might tackle this quite well

IMG_20180125_222630.jpg
Glued a washer on the bottom and started to score around it for my cartridge seam

IMG_20180125_222636.jpg
I was really tired and accidently started scoring the wrong side at one point!!! DOH! Not that it matters i'll sand it off later..

IMG_20180125_222738.jpg
Started re-shaping the firing hammer. This is not yet complete but looks loads better already....

IMG_20180125_224908.jpg

IMG_20180125_224947.jpg
Re-filed the knurling on the hammer too... this looks and feels so much better now!
 
Looking good.
If you replace the pins with longer ones and then file them back flush with the body, they practically vanish when everything is either blued or painted.

Best of luck.

MARK
 
Looking good.
If you replace the pins with longer ones and then file them back flush with the body, they practically vanish when everything is either blued or painted.

Best of luck.

MARK

This. Then when you decide to do a sound and light install you aren't kicking yourself.

Not sure I'm sold on the v2 Denix. So no diamond and funky burr on the left side. The trigger looks off... not sure I'm seeing the benefit. Plus the whole "made by denix" business on the left side... Meh... :/
 
I think it's better overall [emoji4]

I am not planning on doing a sound/light install in this one. Mauve the next one. In the UK garrison/Rebel Legion there's a lot more focus on accuracy and canon then cosplay fun. You would get less respect here if the gun actually pew pew pews.....

The trigger will look better when I've finished it.. the me by Denix was easily filed away so no issues there
 
Looking good.
If you replace the pins with longer ones and then file them back flush with the body, they practically vanish when everything is either blued or painted.

Best of luck.

MARK
Thanks for your reply.. I'm enjoying this so far as it's my first Denix it DL44 build ever. I will do that next time just so that they are metal.. it wouldn't be too hard to drill the epoxy out if I really really wanted to

Sent from my ONEPLUS A3003 using Tapatalk
 
Nice work!
Thanks Matt. As everyone I'm sure, I'm also following your inspirational guide and tweaks. My hands are killing me..

Progress today :

Completely reshaped trigger and sanded smooth. Finished (ish) magazine seam.. this metal has a tough grain and of you go against it you get jagged edges that I just couldn't reshape... But I'm still working on it.

Release button hole drilled and plastic release button added. I'll add a metal one when I find something better.

Reshaped hammer to look like original. I have a weapons book with original photos in to copy. I also saw that the release button centre lined up with the magazine seam lines centrally so moved mine back a bit. It's not quite central of I'm honest but no one what will know once it's all painted and weathered...
5c4c29878425a3b85d0a71b423e2b8dd.jpg
e132d6072c686d8c6cdb75a8dd6b861c.jpg
63f4e9123f5345fe4a05ac5e116992c6.jpg
89d8beabd5b955502416e7d28baa8543.jpg
2770188d165005a6af1361496b9e91e5.jpg
ebdc646f013ae5c91fe1a9a4ef6b84ab.jpg
32bf18e8f12f0a92eb81297b94d44719.jpg
2b9fd07d534255fda57a28909e58e294.jpg
0b135374bf0fc794defdf7ca71c9b45a.jpg
a2a353506ce753d6eade2be64becf95b.jpg


Sent from my ONEPLUS A3003 using Tapatalk
 
it depends on the Denix, but You could try to find MGC grips to fit, since the original was an MGC. Mine are the red 9s with the number filled in. I had to resculpt the inside of the grips but it made it look very different.
 

Attachments

  • IMG_0776.JPG
    IMG_0776.JPG
    621.7 KB · Views: 169
  • IMG_20170525_145133.jpg
    IMG_20170525_145133.jpg
    481.8 KB · Views: 149
So I have done loads more work so far!

The blaster has been 'blacked'


After a few coats and being left for 10 mins this happens :

IMG_20180131_225133.jpg

Then rub it down with a little gun oil or something and a rag, and it changes completely.

IMG_20180131_232558.jpg

So it's coming along!

IMG_20180131_232534.jpg

IMG_20180131_232544.jpg
 

Attachments

  • IMG_20180131_225133.jpg
    IMG_20180131_225133.jpg
    23.5 KB · Views: 152
Last edited by a moderator:
Ok so I found my own info and have finally finished it!

There has been much spraying and weathering done today. I learnt the method of using petroleum jelly.. I am really pleased with the outcome.

The last few days I have :

- Drilled holes for scope mount (massive pain doing this). Note that the metal scope/bracket kit comes with US imperial thread and UK metric doesnt fit
- Bought new M2.5 bolts in the UK with metric thread
- Drew lines on flash hider with Sharpie
- FH given dusting of black then all sealed in with clear lacquer. Worth noting that clear lacquer made the sharpie run and its thickened out the lines.
- Sprayed parts and weathered. Used the method with petroleum jelly in multiple layers. Scope mount was sprayed bronze first then revealed with this techique. Scope mount was sprayed silver first, and disc was sprayed bronze, then silver, then all parts had top coat of black
- painted over small parts which wered blueing (metal weld/Epoxy parts)

This was the goal :

NewDetails.jpg

And this is my final product!

IMG_20180224_191135.png
 

Attachments

  • IMG_20180224_191135.jpg
    IMG_20180224_191135.jpg
    1 MB · Views: 154
This thread is more than 5 years old.

Your message may be considered spam for the following reasons:

  1. This thread hasn't been active in some time. A new post in this thread might not contribute constructively to this discussion after so long.
If you wish to reply despite these issues, check the box below before replying.
Be aware that malicious compliance may result in more severe penalties.
Back
Top