Ikea Death Star Lamp finished

knievel

Active Member
Hi,

been away for some time, other things on my head then modelling.
Been busy with painting the house and redoing the interior.
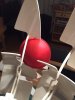
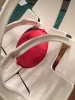
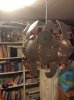
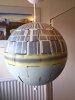
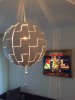
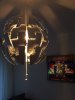
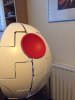
bought a nice lamp at Ikea that that was designed after a certain spacestation...

So the idea started to emerge to buy another one for my sons room and go crazy on it!
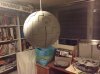
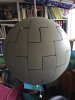
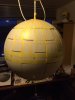
started it a couple of days ago And here are some pictures of the progress.

I found some examples on the internet of people having the same idea. Most of them badly executed.
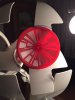
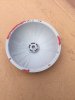
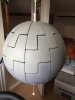
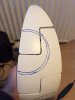
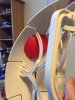
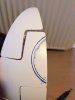
what I missed the most was the laserdisc sphere being drawn ont the ball. I wanted to try to make it 3D.
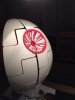
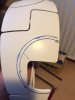
problems are the dimensions and placement, since you’re working with a lamp that has to open and close.
So you have to work around the mechanism arms inside, making sure you don’t cut of the attachementpoint.
Also importent is to place in such a way the other element won’t become to small and weak.
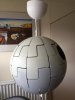
I figured a 9,5 cm disc would be dimensionally the best.
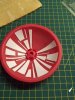
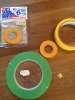
I tried to make some myself, but quickly found it was hard to get the shape right. (Picture 7)
Then I walked through town visiting all kind of shop in the hope to find something made out of plastic that would be round.
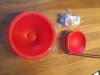
I almost gave up when I found a spoonholder with exactly the right dimensions.
Drew around it with an acrylic marker and made a smaller inner circle to give me some room for error.
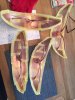
cut it out partially with a jigsaw and the rest with a dremel.

that’s where I’m at now.

I’ll keep you all informed on the progress.
hope you’ll enjoy this build!
 

Attachments

  • 59D9FEB4-465B-411B-9705-EF7EEA4A8BF4.jpeg
    59D9FEB4-465B-411B-9705-EF7EEA4A8BF4.jpeg
    34.4 KB · Views: 410
  • A39262C1-B30E-4A03-96DE-C8095349EB63.jpeg
    A39262C1-B30E-4A03-96DE-C8095349EB63.jpeg
    37.2 KB · Views: 789
  • A0493853-4C3F-4B6A-B838-09D602D68721.jpeg
    A0493853-4C3F-4B6A-B838-09D602D68721.jpeg
    37.2 KB · Views: 576
  • E21CF516-3B2F-48CA-BC0D-E1E7193E6D79.jpeg
    E21CF516-3B2F-48CA-BC0D-E1E7193E6D79.jpeg
    130.8 KB · Views: 441
  • 97EC0D79-4515-462A-A618-E3C9E9B45355.jpeg
    97EC0D79-4515-462A-A618-E3C9E9B45355.jpeg
    49.7 KB · Views: 427
  • 18B9C9A0-81FF-47B7-A87F-739F9BBABC29.jpeg
    18B9C9A0-81FF-47B7-A87F-739F9BBABC29.jpeg
    55.4 KB · Views: 419
  • 715ED419-A77B-4A0E-B927-A8970CD5A663.jpeg
    715ED419-A77B-4A0E-B927-A8970CD5A663.jpeg
    40.2 KB · Views: 445
  • CDF88DF5-97A3-45A7-BE96-9276742EAC29.jpeg
    CDF88DF5-97A3-45A7-BE96-9276742EAC29.jpeg
    34 KB · Views: 862
  • 0FBE1B8A-DB34-4174-94D3-72F17CB51A8C.jpeg
    0FBE1B8A-DB34-4174-94D3-72F17CB51A8C.jpeg
    35.1 KB · Views: 393
  • 9A6B0771-2450-4E71-926E-0C685BA9CB82.jpeg
    9A6B0771-2450-4E71-926E-0C685BA9CB82.jpeg
    30.3 KB · Views: 368
Last edited:
Re: Ikea Death Star Lamp remodelling

Love it! :)
I have to admit whenever I see that in Ikea, I say, "Look honey... wouldn't that make a cool deathstar." Then I get hit on the backside of the head and I am good until the next Ikea visit. :)

How are you planning on attaching the dish part to the lamp? What type of material is the spoon holder part made of? It looks like rubber... if so, you will likely have a hard time fastening it to the lamp. Actually that will be a beast to fasten no matter what type of material. Just a thought, you could always make a silicone mould of it and then cast a replica in resin... wouldn't be any easier to attach, but at least it would be easier to work with.

looking forward to seeing it progress.
 
Re: Ikea Death Star Lamp remodelling

The most fascinating thing is that I probably dont need to fasten it: it has to knobs on the back that held in place on the metal. When I fitted it, and opened, it moves exactly with the other parts! how big are the odds?
The material is a hard plastic. The same plastic kitchen cutting boards are made of.
Only concern now is how the paint holds to it. Afraid it will reject anything trying to stick to it (good for kitchen, not for modelling). Hope tamiya primer will do the job!
 

Attachments

  • D14D5690-BEE2-4553-9C31-84414C29D9ED.jpeg
    D14D5690-BEE2-4553-9C31-84414C29D9ED.jpeg
    36.9 KB · Views: 371
  • 8A8836B1-BE26-4058-8DEE-50A935819343.jpeg
    8A8836B1-BE26-4058-8DEE-50A935819343.jpeg
    36.8 KB · Views: 379
  • EA8D0F8C-D0D2-4E49-82FE-A9BC50ABEE12.jpeg
    EA8D0F8C-D0D2-4E49-82FE-A9BC50ABEE12.jpeg
    30.6 KB · Views: 396
  • C915F4C5-E2F8-4843-8348-FCAFDBF63B59.jpeg
    C915F4C5-E2F8-4843-8348-FCAFDBF63B59.jpeg
    63.9 KB · Views: 365
  • CF2386BF-9BA9-4EAF-B3FE-7120A0609126.jpeg
    CF2386BF-9BA9-4EAF-B3FE-7120A0609126.jpeg
    37.2 KB · Views: 336
Last edited:
Re: Ikea Death Star Lamp remodelling

Where did you find the spoon holder? I just checked amazon and they have quite a few with the same form, but the bowls are all either metal or porcelain.
 
Re: Ikea Death Star Lamp remodelling

I found it at “blokker” here in town. It’s a dutch store. Living in Maastricht, the Netherlands.
think I’m gonna glue two supports left and right to the knobs and use a loom elastic to hold the disc in place.
 
Re: Ikea Death Star Lamp remodelling

Thanks for the tip, doesn't look like they have it in their online shop and I am pretty certain we dont have one of those here in Nürnberg, which is too bad, I was in Rotterdam over the holidays. I will have to check out Woolworths or TKMax, they usually have odds and ends like that.

-- Update --

couldn't find it by googling, but i googled for pictures and this looks to be right on the money. For 3 EUR it does not seem like an investment that can go wrong.
 
Last edited:
Re: Ikea Death Star Lamp remodelling

:thumbsup

can't beat that :)

Really looking forward to watching your Deathstar come alive.


-- update --

I just had a pitiful picture in my head of the Emperor sitting on his dark throne, pulling the string back and forth and saying... "Now it's destroyed... and now it's not. Now it's destroyed.... and now it's not." :lol
 
Last edited:
Re: Ikea Death Star Lamp remodelling

Was right about the surface: it’s tough to glue on and paint on.
the bigger panels bubbled and came loose on the bend surface.
other glue will eat the styreen. Removed the bigger pieces. Still happy with the overall look.

Masking the tape tears off the primer with ease, so its going to be a delicate operation painting this.

thanks for watching
 

Attachments

  • 960391F2-6770-43E3-805F-E81F9918FE5D.jpeg
    960391F2-6770-43E3-805F-E81F9918FE5D.jpeg
    45.8 KB · Views: 340
Re: Ikea Death Star Lamp remodelling

Was right about the surface: it’s tough to glue on and paint on.

yeah, I was afraid of that. You might want to glue everything on the way you want it and then make a mould of it with silicone and cast a resin copy. At least that way, you won't have to worry about all your paint flaking off a month after you are finished.

-- update --

if you do not want or cannot go the moulding/casting route, one other idea just occured to me. I remember a discussion on one of the Hasbro Falcon conversion threads, regarding which primer to use... being actually a toy, the plastic is not really designed to work with the hobby paints and the like. I will try and find it and post the link.
 
Last edited:
Re: Ikea Death Star Lamp remodelling

Found it...

It was John's conversion thread Post #10

Yes,...I'm still using that stuff,...it's great...I'm building a couple of resin kits.....paint would come off parts with masking tape,...but with just the adhesion aid....problem is sorted...

I use it now on any unusual surfaces,....3D printed items also

John
 
Re: Ikea Death Star Lamp remodelling

Thx for the tip,
nice to hear from you again jaitea.

might wanna go to the blokker to get another €0,50 spoon holder holder

Actuall did pay a visit to the car paintshop this week allready: for copper spray paint for the inside and maskingtape.
same quality as tamiya tape, but a lot more on that rol .
also great for sandingpaper by the way!!!

- - - Updated - - -

Sprayed the inside copper. Didnt want it to be gray too, and now it has a reflectif surface. It’s still a lamp
 

Attachments

  • BC65EC29-41E1-4A7B-9BF4-5E4659DDC5F4.jpeg
    BC65EC29-41E1-4A7B-9BF4-5E4659DDC5F4.jpeg
    59.9 KB · Views: 303
  • 58A16CE7-6B1D-4887-B127-750928C115C5.jpeg
    58A16CE7-6B1D-4887-B127-750928C115C5.jpeg
    65.7 KB · Views: 306
Re: Ikea Death Star Lamp remodelling

Temporarily hung the lamp to the ceiling of the attic. It will make the job of masking and paint brushing easier I think.
And workbench is still occupied too... sigh.

Thanks for watching
 

Attachments

  • ED52E668-963A-4823-83EC-5A8FA67F02ED.jpeg
    ED52E668-963A-4823-83EC-5A8FA67F02ED.jpeg
    787.2 KB · Views: 461
  • 61A4C70B-DA85-40EE-8B62-BA576D7CF60E.jpeg
    61A4C70B-DA85-40EE-8B62-BA576D7CF60E.jpeg
    1,017.4 KB · Views: 423
Last edited:
Re: Ikea Death Star Lamp remodelling

thought about leaving the primer as the lightest color, but found it to dark and gray. So I started airbrushing with "aged white" from Vallejo.
Making brushstrokes from top to bottom, so lighter/darker parts in the strokes will blend with the overall look once its finished.

Painting the tophalf is perfect while hanging on the sealing.
The only downside is painting the downside this way is not possible, cause all the paint will run out off my gun.
Solution: flip all the parts upside down and make the downside the upside!

thanks for watching!
 

Attachments

  • IMG_8959.JPG
    IMG_8959.JPG
    713.3 KB · Views: 287
  • IMG_8961.JPG
    IMG_8961.JPG
    685.5 KB · Views: 319
  • IMG_8962.JPG
    IMG_8962.JPG
    828.9 KB · Views: 270
Re: Ikea Death Star Lamp remodelling

Started to mask this beast. I’m trying to follow the contours of the lamp as much as possible for the longtitude and latitude cirkels.
it makes the equatorial trench a bit wider as I wanted to, but I think it will look better than breaking up the dark parts with all the gaps in the lamp.

Anybody has ideas about what vallejo air grey to use? Still have to order it.
was thinking about german grey.

thanks for watching
 

Attachments

  • 77FA36B8-51F6-46C8-9A09-292DFFA7165B.jpeg
    77FA36B8-51F6-46C8-9A09-292DFFA7165B.jpeg
    37.1 KB · Views: 339
Re: Ikea Death Star Lamp remodelling

25% done, quick sneak peak to see if I’m on the right track.
pleased with the overall look.
mask the back tomorrow, then rotate the elements 180 degrees and repeat the whole proces 2 more times.

thanks for watching.
 

Attachments

  • 795422C1-0BFD-4312-BE3B-7DD1F890B100.jpeg
    795422C1-0BFD-4312-BE3B-7DD1F890B100.jpeg
    221.3 KB · Views: 440
Re: Ikea Death Star Lamp remodelling

Have you thought about putting in one of those color changing bulbs? Some have a remote and others have an app that you use to change the bulb color with. I think it would look neat, great job! Looking forward to seeing it all finished.

Sent from my SM-G955U using Tapatalk
 
This thread is more than 6 years old.

Your message may be considered spam for the following reasons:

  1. This thread hasn't been active in some time. A new post in this thread might not contribute constructively to this discussion after so long.
If you wish to reply despite these issues, check the box below before replying.
Be aware that malicious compliance may result in more severe penalties.
Back
Top