Boba Fett Blaster - Custom build

PAULH

Well-Known Member
Just thought I'd document my current build. I bought a resin Boba Fett blaster probably around 10 years ago and finally decided it was time to build it. Rather than aiming at screen accuracy my focus was to take this kit of dubious accuracy and make into a nice prop with found parts and self-made parts.

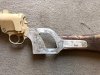
Back when I bought it, I had made a bit of progress. I had ditched the resin stock and remade it in wood, and already ditched the scope with plans to make one from found parts I'd gather over the years. I was also going to remake the part that joins the stock to the gun out of some aluminium plate. Here's the start of making that part alongside the resin equivalent:


BOBA 1.jpg

And here is the scope I put together from found parts, mainly old optical components. All of the finishes were as-found, but I added some weathering:


BOBA 3.jpg

BOBA 4.jpg

And here's a mock-up to show how this thing is taking shape:


BOBA 5.jpg

The sling is from an old leather electrical instrument case. I've also started grinding off the ribs on the front of the gun. Essentially I will sleeve this section with some aluminium tube and then apply some T-track, all courtesy of ebay. I also put a Mandalorian skull on the stock after making a paint mask and spraying it.

I'll put updates here as the project proceeds.

Thanks for looking.
 

Attachments

  • BOBA 2.jpg
    BOBA 2.jpg
    1.2 MB · Views: 181
This is brilliant, I love it when people enter a more nebulous and theoretical area of Star Wars props - instead of slavish recreation all the time, it’s great to imagine the same prop years before or later or after it’s been broken and fixed after changing hands or whatever.
Loving it!

I want to make a stencil like that - how’d you do it?

N.


Sent from my iPhone using Tapatalk
 
I like the idea! Sometimes you need to do something like this just for fun. Sometimes doing exact replicas turns out more stressful than fun!
 
Hello Robertsonick. The stencil was made just by printing an image onto a removable self-adhesive address label, applying it to the stock, and then cutting away the image with a scalpel.
 
Thanks Fettastic. The brass part is from an old microscope and the other parts are from some other optical instruments.
 
I've made some progress with this and so here's an update. The scope is now finished. The front lens assembly shown on a previous photo, that made it look decidedly light saber-ish (as noted by Knullzero) fell off and so I took the opportunity to rummage through my "found parts" bin and use some alternatives. Here it is, in final form, with painting and weathering finished.

EE3 SCOPE 1.jpg

I found some parts to make up this kind of saddle arrangement. Just having fun really to see what looks good and will fit the Star Wars aesthetic!

EE3 SCOPE 2.jpg

EE3 SCOPE 3.jpg

My attention then turned to the front end. I had previously ground down the barrel on the kit with a view to sleeving it with a self-made assembly. So I bought a length of aluminium tubing, and some plastruct to make the fins. The knob and the front nozzle piece are both found parts. My original plan was to use some rubber T-track that I got from ebay. However, I hadn't realised that it's virtually impossible (at least from all the tapes and glues I tried) to get a decent bond between rubber and aluminium. So plastruct was the answer for me, bonded with CA.

EE3 FRONT 1.jpg

After masking and spraying the fins matt black...

EE3 FRONT 3.jpg

The final activity of ths last weekend was to get the scope mounts positioned correctly while bonding so they'd fit into the holes I'd drilled in the scope. So effectively I used the scope as a jig to get everything aligned...

EE3 FRONT 2.jpg

EE3 FRONT 4.jpg

That all went well. And now I've pulled it apart again with the last phase of the project being to sand/fill/paint the remaining resin section of the gun (the only part of this build I haven't re-made!).


Thanks for looking !
 
Just spent the weekend on this and now it's finished. As mentioned before, the aim of this build was not to be screen accurate but to produce as blaster with "found parts" I had to hand. Essentially this was a complete rebuild of an old kit and only the main part of the "flare gun" remains.


BB0.jpg

BB0A.jpg

BB1.jpg

BB4.jpg

BB6.jpg

BB7.jpg

BB10.jpg

BB8.jpg

And lastly, with my DL44 to show what a big lump this thing is:

BB2.jpg

Thanks for looking !
 
This thread is more than 6 years old.

Your message may be considered spam for the following reasons:

  1. This thread hasn't been active in some time. A new post in this thread might not contribute constructively to this discussion after so long.
If you wish to reply despite these issues, check the box below before replying.
Be aware that malicious compliance may result in more severe penalties.
Back
Top