Ideas for getting correct end cap orientation on Graflex 2.5??

rwe626

New Member
Hello,

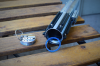
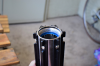
Title pretty much says it. I'm currently setting up a Graflex 2.5 kit and the end cap turns about 90 degrees too far. I was thinking about using teflon tape to get the proper alignment but that means I'd probably lose easy access to the internals from that end. Plus I kind of hate the idea of having gummed up tape in the threads.

I was also debating using loctite and always opening from the clamp for access to the internals but I'd prefer a solution that allows me to screw the end cap on and off whenever I'd like.

Any tips or tricks you've found that work? I'm sure someone has solved this problem.
 
I just bought a Graflex 2.5 kit myself, and was planning on just drilling some new holes.
I haven't done that yet, or even set up the measurements to do so (I'm worried another hole might be semi-in the way, but I'll let you know how that goes when I do.

I'm also open to other ideas if someone else has found a better solution.


I hadn't thought of that. It may be possible depending on where your end cap stops. If it works maybe I'll try that and pick up an accurate pommel cap to finish it off.

Any other ideas out there?
 
H0llyw00d, here are several photos of where my end cap stops when the threads bottom out. I may try using an o-ring like xl97 suggested if I can find a properly sized one around the house. I know I have a number of smaller o-rings that I picked up when working on an old surefire light. Maybe one will fit.

DSC_0852.pngDSC_0853.pngDSC_0854.png
 
Here's what I would do:
- Get a cover for the endcap (either from Wannawanga or Etsy. The Wannawanga ones are designed for an actual Graflex, so they're a tad undersized. I've seen ones on Etsy specifically for 2.0s/2.5s).
- Drill new holes for the Kobold d-ring in the correct orientation
- While you're at it, add some additional sound holes underneath the channel of the Kobold.
- Glue the endcap cover to the endcap (I'd recommend spray adhesive for an even, thin application). Drill out the additional sound holes in the endcap cover.
- Attached the Kobold with actual rivets.

I did a similar operation on my TFA 2.0 minus the sound holes, which I may add if I decide to put electronics in it. The added accuracy of the rivets is a nice touch, too.
 
H0llyw00d, here are several photos of where my end cap stops when the threads bottom out...

How does the Graflex 2.5 top and bottom attach? With the 2.0 they are threaded and all you have to do is open the clamp lever, align the bottom the way you want it and close the clamp lever to hold it in place. Do the 2.5 hilts attach like the flash guns where there is only one possible orientation?

I see your concern. Having the Kobold clip oriented like that would bug my OCD no end.

Exactly, I cant look at anything else!

The 2.5 assembles in the same manner as the 2.0. The bottom threads into the top and then the clamp is closed around it. I thought about this solution before posting and there are two issues I'm having. First, the clamp on mine doesn't close tight enough to keep the bottom portion of the tube from spinning. Is there a way to tight the clamp lever? And secondly if the clamp could be tightened to allow for setting the bottom in any orientation the end cap would still be misaligned with the T-tracks. You can see what I mean in the second picture I posted above.

I am leaning more and more towards following MCM and SpiderPhantom5's suggestions. I don't like having all those sound holes... so I may drill new holes in the right orientation, cover the end cap with a pommel cap and hide new sound holes beneath the Kobold.
 
Last edited:
you can also sand down the threaded end(s) A VERY TINY BIT.. then re-fit to see how close/far you are from correct alignment.

sand paper taped to flat desk/table top.. back -n- forth a few times.. re-seat and check.
 
I like MCM’s plan

But you can always remove the threads on the cap. Remove 1 grip, and then the grip opposite to it, insert the cap on the location you want, drill a hole under the t track, and tap it for a grub screw. Then put the track over the grub screw

I have also seen many installers use JB weld on the Threads

The cap will probably never come out again once you do this..

I’m a fan of making all my props reversible, that way if something new comes out I can upgrade it


Sent from my iPhone using Tapatalk
 
Is there a way to tight the clamp lever? And secondly if the clamp could be tightened to allow for setting the bottom in any orientation the end cap would still be misaligned with the T-tracks...

With the 2.0 clamp the lever-side washer needs to be slightly ground out in the center to allow the post to rotate - allowing the lever to be tightened more than it otherwise could be and creating a very snug fit. I would at least try that first and then give it a week to see if the grip orientation still bothers you. If you ever decide to go full internals you will want that endcap to function as intended.
 
With the 2.0 clamp the lever-side washer needs to be slightly ground out in the center to allow the post to rotate - allowing the lever to be tightened more than it otherwise could be and creating a very snug fit. I would at least try that first and then give it a week to see if the grip orientation still bothers you. If you ever decide to go full internals you will want that endcap to function as intended.

After seeing this I did a search... just watched Episode VI of "Let's Build a Graflex" on YouTube and modified the clamp in this manner. I can get the bottom much closer to where it needs to be now. The Kobold is still about 15 degrees off but the entire saber feels more solid now. Thanks for the heads up on this mod... the clamp actually functions as a clamp now.
 
Well I was throwing around ideas in my head and came up with this. I made a spacer from a leftover collapsible toy saber blade and used it as a shim between the end cap and the t-track inserts. With careful sanding of the plastic ring I was able to get the end cap to screw down tight exactly where it needed to stop.

Pictures do a better job explaining...


I'll probably still get an end cap cover at some point but now I can stop obsessing over this bit.
 

Attachments

  • DSC_0847.png
    DSC_0847.png
    416.5 KB · Views: 246
  • DSC_0848.png
    DSC_0848.png
    331.9 KB · Views: 224
  • DSC_0852.png
    DSC_0852.png
    330.2 KB · Views: 201
Excellent fix, brother! Isn't it weird how the shim piece coming from another saber toy makes it feel just... right? I could do a dissertation on that effect... :)
 
Excellent fix, brother! Isn't it weird how the shim piece coming from another saber toy makes it feel just... right? I could do a dissertation on that effect... :)

Thanks! And I agree! I thought about using PVC but when I saw the leftover toy blade I said to myself... I have a good feeling about this :D
 
Last edited:
glad you figured it out!! now that have you solved this little puzzle, do you think a rubber O ring would do the same?
 
glad you figured it out!! now that have you solved this little puzzle, do you think a rubber O ring would do the same?

Thanks! I think an O-ring or two may have done the trick. I only had a pack of 12mm ID x 1mm O-rings on hand and those could not be stretched fit the cap, so I have no way to confirm. My only concern is that there is no adjustment with an O-ring... put one one, thread on the end cap and it stops where it stops. Stacking multiple rings may give the desired effect.
 
This thread is more than 6 years old.

Your message may be considered spam for the following reasons:

  1. This thread hasn't been active in some time. A new post in this thread might not contribute constructively to this discussion after so long.
If you wish to reply despite these issues, check the box below before replying.
Be aware that malicious compliance may result in more severe penalties.
Back
Top