After building a couple of Star Wars props for friends on request and seeing a scrap piece of aluminum stock that would be perfect for the job, I decided to build one that I wanted to make: a full metal Rey's NN-14 blaster. This is my first post on RPF, so hopefully you guys will enjoy it! I started the design and build phase about two weeks ago, worked for a few days, and am planning to continue next week and update the thread as it goes along. I based the CAD model off of this picture:

After a bit of time in CREO, this was the result (still haven't modeled the hammer yet):

I decided to make the entire body of the blaster (not including the grips, barrel and the smaller "barrel") out of two mirrored pieces. The main reason for this was it would allow me to make the body in just one single-sided CNC job. The screws make it easy to join them together. Into the CNC goes a 1/2" x 6" x 18" aluminum flat:

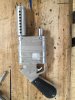
The run time was a little over 4 hours, but that was with pretty conservative feeds/speeds. The brunt of the time was due to the slots and tight corners that had to be milled out with a 1/16" endmill with slow feeds/speeds. In the future, I'd probably optimize the toolpath a bit and use a grooving tool for the slots that ended up giving me a similar result (the four slots arranged in a square in the picture below) much quicker, so I could cut that milling time by an hour or so. After cutting the two halves out of the stock and cleaning it up on a deburring wheel:

The barrel was made on a manual lathe (don't have any pictures at the moment, but I'll try to get some when I can). I tapped the bottom and plan to attach it to the body with a threaded rod. The coloring on the end of the barrel looks very similar to how parts with Dykem paint on them look after welding, so the plan will likely be to paint the end with Dykem and heat the back side of the barrel, and then quench it after the color gradient looks similar to the real thing.
Next steps:
Tap the holes in the two halves
CNC the grips out of some black ABS
Make a fiberglass mold out of the halves and the grips to resin cast a plastic replica for a friend
After a bit of time in CREO, this was the result (still haven't modeled the hammer yet):
I decided to make the entire body of the blaster (not including the grips, barrel and the smaller "barrel") out of two mirrored pieces. The main reason for this was it would allow me to make the body in just one single-sided CNC job. The screws make it easy to join them together. Into the CNC goes a 1/2" x 6" x 18" aluminum flat:
The run time was a little over 4 hours, but that was with pretty conservative feeds/speeds. The brunt of the time was due to the slots and tight corners that had to be milled out with a 1/16" endmill with slow feeds/speeds. In the future, I'd probably optimize the toolpath a bit and use a grooving tool for the slots that ended up giving me a similar result (the four slots arranged in a square in the picture below) much quicker, so I could cut that milling time by an hour or so. After cutting the two halves out of the stock and cleaning it up on a deburring wheel:
The barrel was made on a manual lathe (don't have any pictures at the moment, but I'll try to get some when I can). I tapped the bottom and plan to attach it to the body with a threaded rod. The coloring on the end of the barrel looks very similar to how parts with Dykem paint on them look after welding, so the plan will likely be to paint the end with Dykem and heat the back side of the barrel, and then quench it after the color gradient looks similar to the real thing.
Next steps:
Tap the holes in the two halves
CNC the grips out of some black ABS
Make a fiberglass mold out of the halves and the grips to resin cast a plastic replica for a friend
Last edited:
")