The Author
New Member
For ages now, I have wanted a three-dimensional chess set as seen in the original Star Trek series.
There is the option of buying one, but I can think of many better ways to spend the five hundred bucks for something that's not even a replica of the screen-used prop.
So, build it is.
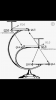
And while researching how to build (and later play) this variation of chess, I found this picture.

This was perfect, not only did it show me the angles and everything, but it also gave a possible explanation to the legendary "Queen to queen's level three" move.
But then I noticed, doesn't that somewhat look like a globe stand?
And sure enough:

That is a globe stand (globe off ebay, about twelve dollars), and some cardboard and tape mock-up.
The next step was to find a suitable third arm to replace the cardboard.
A visit to the store later, I have a flat aluminium profile of 15x2mm, and proceed to bend it in shape with my high-tech bending equipment.

Mounted on the globe stand, it looks like this.

Already looked somewhat like a three-dimensional chess set.
But who wants to play on cardboard?
So I went through my left-over parts from other projects, and dug out enough PVC foamboard to cut into the three main boards

and five attack boards. (Yes, I know there are only four in the picture)

So, how get the attack boards mounted on the main boards?
Personally, I use a brass pipe and those little shelf board holders that are just a 18x5mm piece of steel.

Nice, snug fit.
Followed by the test-fitting of main board, pegs, and two attack boards.

Here's the taped-up chess set with pieces.

But tape will never do, and I had to remove the pieces right after taking the picture due to the boards starting to tilt.
So screws it is.
I used chicago screws to mount the boards on the aluminium, and wood screws to fix the aluminium to the plastic stand.

And final chess set with pieces.

That concludes the construction period.
The chess set is usable, but painting will have to wait until weather warms up and I can use spray paint.
There is the option of buying one, but I can think of many better ways to spend the five hundred bucks for something that's not even a replica of the screen-used prop.
So, build it is.
And while researching how to build (and later play) this variation of chess, I found this picture.
This was perfect, not only did it show me the angles and everything, but it also gave a possible explanation to the legendary "Queen to queen's level three" move.
But then I noticed, doesn't that somewhat look like a globe stand?
And sure enough:
That is a globe stand (globe off ebay, about twelve dollars), and some cardboard and tape mock-up.
The next step was to find a suitable third arm to replace the cardboard.
A visit to the store later, I have a flat aluminium profile of 15x2mm, and proceed to bend it in shape with my high-tech bending equipment.
Mounted on the globe stand, it looks like this.
Already looked somewhat like a three-dimensional chess set.
But who wants to play on cardboard?
So I went through my left-over parts from other projects, and dug out enough PVC foamboard to cut into the three main boards
and five attack boards. (Yes, I know there are only four in the picture)
So, how get the attack boards mounted on the main boards?
Personally, I use a brass pipe and those little shelf board holders that are just a 18x5mm piece of steel.
Nice, snug fit.
Followed by the test-fitting of main board, pegs, and two attack boards.
Here's the taped-up chess set with pieces.
But tape will never do, and I had to remove the pieces right after taking the picture due to the boards starting to tilt.
So screws it is.
I used chicago screws to mount the boards on the aluminium, and wood screws to fix the aluminium to the plastic stand.
And final chess set with pieces.
That concludes the construction period.
The chess set is usable, but painting will have to wait until weather warms up and I can use spray paint.

")


