Officer K's Blaster ( rgriesbeck's version)

wayouteast

Sr Member
As I'm just coming to the end of the build phase of putting together rgriesbeck's beautiful printed model of Officer K's blaster from Blade Runner 2049, and before I start painting tomorrow, I thought I'd start a 'build' thread here to keep everything together (some of these pics and descriptions have already appeared on the Project Run thread for the kit here .

The kit arrived very well packed in a big ziplock bag. The kit comes with 3 red LEDs (2 needed plus a spare), 2 small magnets to hold the removable 'slide' in place (not really needed as the fit of the part is perfect), wiriring for the electrics, a battery holder for a CR2032 3v coin cell, and a small slide switch (which lives in the above-mentioned removable slide. There also a good-sized sheet of carbon fibre vinyl wrap so plenty of opportunities for getting it right if you decide to use the wrap supplied (the actual prop carbon fibre affect seems to be a 'basketweave' pattern rather then the 'herringbone' that all available vinyl wrap seems to come in).

01f26135eb3300318548b3c21966cee24682806534.jpg

The blaster itself comes in 8 parts and is beautifully crisp and cleanly printed, with the serial numbers laser engraved. There's some easily stripped-away support structure that 'hides' the detail at first glance, but once that's been picked off the underlying detail is exceptional. As with any 3D printed model there's some filling and sanding to be done to achieve a really smooth finish and I debated with myself whether to smooth the (already pretty smooth) print with epoxy resin on some of the simpler shapes to speed things up a bit, but in the end I went with the more old-fashioned technique of filling and sanding each part. A few hours of effort should preserve the sharpness and detail of the original print (sometimes lost with the resin technique) and produce a fantastic end result.

01087c2a6ad13d0c0c9969b000c2207a48925af74d.jpg

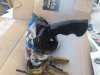
One thing that surprised me slightly was the size of the blaster - it's big! Here it is with my Elfin Knights water gun conversion for comparison. You can see from this how beautifully the 2049 blaster fits together even without any cleaning up or adjustment.

01def41a7eafa05e12898d25fd815ccedefd537bdc.jpg

The first task was to smooth out the fine striations and print lines...
 
Last edited by a moderator:
To smooth the print, I used Perfect Plastic Putty, Squadron White putty and Technik 2in1 spray Filler and Primer (the yellow finish in the pictures). Rather than sand off the raised lines (thus smoothing the surface by 'lowering' it) I like to fill the 'grooves' before sanding, ensuring that the sharpness and detail of the print is retained as much as possible.

I masked off the serial numbers during this whole process so I didn't accidentally fill them or remove them - the area around them is so finely printed that once painted the printing artefacts will be hardly noticeable.

So the first thing to do was to give all the parts a layer of the Perfect Plastic putty. I like this product because it's more 'liquid' than the Squadron putty and so fills fine lines and grooves really well. It also smooths and works well with water, so you can use a paintbrush, cotton bud (Q-tip) or cocktail stick to remove surplus putty in fine detail.

Once the putty had dried, all the parts were sanded several times with progressively finer sandpaper.

When the parts were becoming relatively smooth I gave them all a coat of the filler/primer spray, let it dry and then sanded again. I did this about three times, and at the end of it, the surfaces were really nice and smooth.

IMG_1741 (1).JPG

You can see in this picture, I've already located the red LEDs and run their wires up through the trigger guard ready for later wiring in before gluing the two halves of the guard together with epoxy.

For the sanding, by the way, especially in the detail areas, as well as the various grades of sandpaper I used needle files of various shapes and profiles. I also keep a supply of emory boards (from the make-up aisle of any supermarket or drugstore) around (as you can cut them with scissors into particular shapes as required). For very tiny areas sanding needles are a really good investment.

Altogether, I probably spent a week or so of evenings getting the various sections of the blaster smooth. Inevitably, though, some of the finer detail was compromised along the way. There were also a couple of little enhancements I wanted to make. So the next step was the do some detailing...
 
Last edited:
There are a couple of bits of really fine detail on the original blaster that don't appear on the kit - the greeblies inside the aperture on the side of the gun immediately behind the barrel, and the small horizontal widget immediately above it on both sides.

I used plastic rod of various diameters to create this additional detail. I also replaced the 4 small 'rings' on top of the gun which had suffered a bit from the filling and sanding!

IMG_1792.jpg

One of the first things I noticed about the kit was that the grooves of the ribbed area at the rear of the barrel (the bit that looks like a camera focus ring) were thinner and more numerous than they seemed to be on the original (I don't know it that's the case or not or whether that's just my eye!). Additionally, because they were so fine they were going to be really hard to clean up... and indeed that proved to be the case as even the finest engraving tool on my Dremel was too fat to clean up the tiny grooves. So I decided (rather rashly) that I wanted to replace that whole feature on my blaster. I explored various options for this and in the end I hit upon the idea of using the thin grooved rubber drive belt from a 3D printer - which seemed very apt! :) You can see it in the background of the picture above. All I had to do was to trim about 1mm from the long edge of the belt to make it the right width.

First, I had to go through the rather scary process of grinding out the original ribbed band from the model. I had to go deep enough for the new belt to sit correctly in the barrel while still retaining enough plastic to support it (as it was quite flexible). I did manage it though with some careful Dremel work.

In the course of grinding out the ribbed section, though, I'd also had to damage or remove some of the surrounding detail, especially where it covers the ribs. So I used styrene strip and sheet to replace those areas and to hide the edges of the belt.

IMG_1807.jpg

In the above picture, I've also replaced the small 'candy cane' shaped detail, and the hex nuts. The gun is not assembled at this point, just loosely fitted together. So the next stage was to wire the electrics, assemble and glue the various pieces and fill and sand the seams...
 
Last edited:
Once the blaster was all glued together I wanted to make one more small change. I'd seen a render on Artstation that someone had done of their preferred 'K's blaster' - they didn't like the original very much! To be honest I didn't really like the changed version that much - there was a night-scope screen and a much more conventional trigger guard and handle - except for one thing. The alternate render had several green lights towards the back of the gun. The sheer number of lights was a bit over-the-top but I did like the green illumination at the rear. So as a sort of homage to the green LEDs on the one-and-only Deckard PKD I decided to add a single green LED right at the back of the blaster under the dual 'hammers' or whatever they are.

IMG_1809 (2).JPG

(You can see from that picture how rough the blaster looks after all the sanding and filling... but once it's primed and painted that will all appear nice and smooth)! :)

The wiring of the LEDs is really simple, even with my extra one at the back. All the positive and negative leads were joined and soldered to single wires. The negative wire was soldered directly to the '-' terminal of the supplied battery holder, and the positive wires to one end terminal of the switch. The middle terminal of the switch was then soldered to the '+' terminal of the battery holder. And that was it. The battery holder and wires live inside the main body of the gun (with enough slack to enable the battery holder to be exposed for changing the cell) and the switch was glued into the hollow inside the slide (again with enough slack that it can lift out to operate the switch).

IMG_1810 (2).JPG IMG_1811 (2).JPG IMG_1819 (2).JPG

A bit more detailing, filling and sanding, especially around the seams. and the assembly is all complete. Now going to let it dry completely and set up ready for priming and painting starting tomorrow. Still haven't decided quite how I'm going to do the carbon-fibre effect on the handle; I have got some of the rubber matting that some people use as a mask for the effect, but I think the shape of the grip will make that difficult if not impossible. So it might be a few hours of tedious masking of tiny squares! :)

Anyway, here it is right now... I think it looks pretty good now(!) but it's going to look even better when it's painted and weathered, of course, and I'd like to thank @rgriesbeck for such a great kit!

IMG_1814.jpg IMG_1812.jpg IMG_1815.jpg IMG_1813.jpg
 
Last edited:
Just a quick update today. Last small bits of seam filling, puttying and sanding have been done and the final primer coat applied. LEDs have been masked with little blobs of blu-tack. The primer is just bog-standard grey auto primer laid on in two or three very thin coats so as to not obscure detail.

IMG_1823 (3).jpg IMG_1822 (3).jpg IMG_1821 (3).jpg

Ready to start the actual painting tomorrow! :)

Oh, and as a size reference...

IMG_1824.JPG
 
Hey wayouteast ,

just found this thread . Thanks for sharing this build . I’ve read about this kit and the other one too , but was wondering how much it weighs ( not being familiar with resin first hand ) , also the primer you’ve used is acrylic based ? Could you share the brand please ?
You did a brilliant job on the PKD ( Water ) Blaster - internal lighting and external finishes , so looking forward to how you finish this one up !

:cheersGed

Hey Ged,

Thanks for the kind words!

This blaster is printed plastic rather than resin, so is quite light. I've just weighed it and it's 152g. Unlike the PKD which was reasonably easy to stuff with weights, the structure of this kit makes things a bit less easy, so I didn't bother. You could probably add some weight to the barrel, as it's hollow, but you'd have to be very careful drilling it out to gain access as the printed plastic, while quite robust, is more fragile than moulded plastic or resin might be. Once painted, it'll hopefully LOOK as if it weighs a fair bit even if it doesn't! :)

The primers I used are both acrylic based. The filler/primer (yellow) is E-Tech Technik 2in1 Filler and Primer and the grey is Simoniz Spray Primer Acrylic. I don't know if those specific ones are available in your part of the world, but they're pretty standard auto primers so even if those exact brands aren't around there'll be something very similar.

Cheers

Jon
 
Following. The additional detail is exactly what I was planning to do but the printer drive belt is genius - might have to copy that one.
Thanks for sharing all of this!
 
Last edited:
Another quick update... and a temporary setback! :(

I've given the blaster a coat of satin black all over. Looking at the various parts, it seemed as if the easiest order in which to paint the components was to mask off everything except the grip and complete all the painting of the grip before reversing the masking and painting the rest of the gun in various black / very dark grey tones and finishes.

So I painted the grip gunmetal with AK Interactive Xtreme metal airbrush paint. And it looked great!

IMG_1837.JPG

I let it cure for 48 hours and then started to mask the squares for the basketweave carbon fibre effect. As far as I can judge by eye (from photos of the original prop) the lighter squares are around 3mm wide by 4mm high, so my plan was to take strips of 3mm masking tape and cut them every 4mm.

Well, I'd run out of 3mm masking tape! Damn! I tried cutting strips of 6mm masking tape down the middle, but no matter how careful I was I ended up with different widths. Aha! I did have a roll or two of 3mm trimline tape! So I decided to use that. And that's where it started to go wrong... :)

So many squares!!

IMG_1838 (2).JPG

I'd almost finished one side of the handle when I started to get a bit anxious about how sticky the trimline tape seemed in contrast to masking tape. It was preying on my mind, so I tried to remove a couple of the squares I'd attached first... and all my fears were born out. The adhesive on the trimline tape was so aggressive that it left behind a really thick residue that would be impossible to remove without messing up the underlying metal paint. Disaster! :(

IMG_1839 (2).JPG

Although, one ray of light was that the resulting pattern of horrible sticky patches did show that the size and positioning I'd used for the masking was pretty much spot on. So I'll be more confident with the second attempt! :)

Anyway, to cut a long story shorter I stripped off the sticky residue with adhesive remover, but this, of course ruined my metallic base. Nothing that some gentle sanding couldn't fix, though, and the handle of the gun is now re-painted back a pristine gunmetal.

IMG_1840 (2).JPG IMG_1835.JPG

And that's where I am currently, waiting for an order of 3mm Tamiya masking tape to arrive sometime after Christmas so I can carry on! Live and learn! :)

Have a very happy holidays everyone, and a happy Christmas to everyone who celebrates it!
 
@wayouteast Fantastic job so far. May I ask a few questions about the build please? I'm about to order supplies and am laying out the shopping list now (should also mention this is the first 'proper' 3D kit build for me, so i'm being overly cautious).

Is there a specific 3D printer drive belt make/model you ordered, or are they all roughly the same in regards to groove spacing etc?

How did you shape the 'candy cane' bit? Is this thinly cut plasticard heated around to form the 'hook' at the end?

What size hex nuts did you end up using?

How did you preserve the detail of the serial numbering on the sides? I see you've avoided putty and filler primer in those areas. Is that all there is to it?

Thanks :)


No problem. Thanks for the kind words...

This was the printer drive belt I used...

The candy cane is 1mm square cross section Plastruct styrene strip, heated with a heat gun and bent into the right shape. It's really tricky to get the tight curve, so I built a small jig out of two parallel lollipop sticks glued to a wider piece of wood exacrly the same distance apart as the outer radius of the curve. That way I could force the softened bar into the 'groove' between the lollipop sticks so it held its shape as it hardened again. I trimmed the straight sections to length afterwards. Even then I had to hold it in position while the glue set when I came to attach it to the body of the gun.

To be honest I sized the nuts by eye. I had a whole bunch of different sizes and I just held them up to the printed nuts until I found the one that matched! Off the top of my head I think they were M4's (7mm heads with a 4mm thread diameter). But I'm honestly not sure. Your best bet would be to measure the original nuts on the kit and get the same head diameter.

Yep, I simply masked off the serial numbers before all the sanding, filling and painting. There is a slight 'ridge' left where the masking was, but I sanded the edges of that to try and blend it into the rest of the surface, and it's barely noticeable on the body. I actually liked the way it 'framed' the serial number on the slide... so I left the ridge there. :)

Hope that helps. I'm in a frustrating position with mine due to a bit of idiocy on my part. I completed the carbon fibre underpainting yesterday. But the 3mm masking tape I used was not my preferred brand, which is Tamiya. The stuff I used was Precision. And, just as before, the bloody stuff has left adhesive residue all over the handle. :( Worse still I had a massive lapse of sense and for some reason best known to myself (probably too much Christmas imbibing) I laid the pattern down at completely the wrong angle (with the angle of the handle rather than cutting vertically down from corner to corner). That will teach me to double and triple check the reference material before doing something! What a maroon! :(

IMG_1851.JPG IMG_1854.JPG IMG_1855.jpg

There was SO much cutting and masking too! :(

But the combination of knowing the pattern was wrong AND the residue was too much. So I bit the bullet and spent this afternoon sanding back all my hard work - ouch - and I've gone right back to the beginning - priming and sanding the handle back to a smooth surface ready to do the whole thing again! But I can't do the masking again until some Tamiya masking tape arrives (I've NEVER had residue issues with that brand) - which, it being the New Year, won't be for at least another week... by which time I'll be back at work. [sigh]

I really hoped I might have the blaster finished next week, as the handle is far and away the most time-consuming part of the painting. But it's looking as if it will be a while longer than that... who knows, you may have yours complete before mine! :D

Cheers!
 

Attachments

  • IMG_1853.JPG
    IMG_1853.JPG
    505.6 KB · Views: 359
Last edited:
No problem. Thanks for the kind words...

This was the printer drive belt I used...

The candy cane is 1mm square cross section Plastruct styrene strip, heated with a heat gun and bent into the right shape. It's really tricky to get the tight curve, so I built a small jig out of two parallel lollipop sticks glued to a wider piece of wood exacrly the same distance apart as the outer radius of the curve. That way I could force the softened bar into the 'groove' between the lollipop sticks so it held its shape as it hardened again. I trimmed the straight sections to length afterwards. Even then I had to hold it in position while the glue set when I came to attach it to the body of the gun.

To be honest I sized the nuts by eye. I had a whole bunch of different sizes and I just held them up to the printed nuts until I found the one that matched! Off the top of my head I think they were M4's (7mm heads with a 4mm thread diameter). But I'm honestly not sure. Your best bet would be to measure the original nuts on the kit and get the same head diameter.

Yep, I simply masked off the serial numbers before all the sanding, filling and painting. There is a slight 'ridge' left where the masking was, but I sanded the edges of that to try and blend it into the rest of the surface, and it's barely noticeable on the body. I actually liked the way it 'framed' the serial number on the slide... so I left the ridge there. :)

Hope that helps. I'm in a frustrating position with mine due to a bit of idiocy on my part. I completed the carbon fibre underpainting yesterday. But the 3mm masking tape I used was not my preferred brand, which is Tamiya. The stuff I used was Precision. And, just as before, the bloody stuff has left adhesive residue all over the handle. :( Worse still I had a massive lapse of sense and for some reason best known to myself (probably too much Christmas imbibing) I laid the pattern down at completely the wrong angle (with the angle of the handle rather than cutting vertically down from corner to corner). That will teach me to double and triple check the reference material before doing something! What a maroon! :(

View attachment 783325 View attachment 783328 View attachment 783327

There was SO much cutting and masking too! :(

But the combination of knowing the pattern was wrong AND the residue was too much. So I bit the bullet and spent this afternoon sanding back all my hard work - ouch - and I've gone right back to the beginning - priming and sanding the handle back to a smooth surface ready to do the whole thing again! But I can't do the masking again until some Tamiya masking tape arrives (I've NEVER had residue issues with that brand) - which, it being the New Year, won't be for at least another week... by which time I'll be back at work. [sigh]

I really hoped I might have the blaster finished next week, as the handle is far and away the most time-consuming part of the painting. But it's looking as if it will be a while longer than that... who knows, you may have yours complete before mine! :D

Cheers!

Thankyou so much for this! I didn't expect such an in-depth response :)

I've followed the links and sized up the Hex screws, will be ordering supplies tonight. Believe it or not but I don't have a dremel yet either, so I've ordered one to help with the modifications. I also have some conversions to do on a snow-wolf pulse rifle and a few other bits to modify so I'm certain it will prove invaluable. But I highly doubt i'll finish before you considering i have to wait for that and the extra materials :D

Good luck with the re-masking and painting of the grip. I look forward to seeing the results.
 
Great build :thumbsup I’m loving the in depth details.

as for the screw-up on the masking, you’re preach to the choir. I’ve had so many of those %+$@!! moments, then laughed and said “well, that’s what I get for not checking.” Hahah

that’s what makes the builds and hobby fun/hell lol.
 
Well, here we go again! Third time around for the masking and painting of the handle! :)

blaster_handle_masking_2.jpg

This time with Tamiya masking tape! Once the black coat has been applied I hope to give a subtle shading to the lower edge of the silver squares to give a bit of faked texture. Then a couple of coats of lightly black-tinted Klear (Future in the US) to make the colour difference between the silver and the black less strong and as many coats of clear lacquer as required to give that lovely 'juicy' gloss the original has.

Then I can paint the rest of the gun. I've decided on various levels of 'glossiness' of black for all the parts except the 'slide' and the internal details which will be weathered and dirtied up steel. The main structure may have a graphite sheen added too. Then the 'chips' and weathering will be done with silver/steel dry brushing.
 
Last edited:
So, I'm calling this one done, I think! Since my last post I've completed the painting of the blaster.

I had (yet another!) issue with the painting of the handle. At first all was going really well - the tinted Klear (Future) worked exactly as I'd hoped it would to dull down the contrast between the silver and the black of the 'carbon fibre' weave. I did 2 coats and let it cure for a couple of days before applying the first coat of acrylic lacquer... and the lacquer reacted with the Klear to make the subtle overall tinting go 'blobby' and uneven. I really couldn't face the prospect of removing yet another attempt and doing all that masking and painting for a fourth time(!!) so I waited for the lacquer to dry and then assessed the situation. It wasn't at all what I'd hoped... but it wasn't a complete disaster, and reviewing the photos of the original prop the carbon fibre on that does seem to be a bit distressed under the gloss (though rather less than mine looked). So I swallowed my pride, beat down my OCD about achieving a perfect finish, and carried on applying another 4 coats of lacquer. I'll live with the final result... obviously my blaster has had more wear and tear even than Officer K's!

The handle was then masked off and the rest of the gun was given a coat of matt black all over (Vallejo Acrylic Model Color - Black). This was then covered with a light misting of Vallejo Acrylic Metal Color - Magnesium to just give it a slight dark metal sheen, all except for the texture of the 'muffler' around the barrels, which was kept matt black. Graphite, rubbed into the surface of the gun enhanced this metallic look really nicely. The slide and the little interior 'window' on each side were painted with AK Interactive Xtreme Metal - Steel. The 'ribs' around the muffler were touched in with gloss black (again Vallejo Acrylic).

Finally, the whole gun was given a black wash (black acrylic and water with isopropyl alchohol added). Once this had dried Silver Rub 'n' Buff was used to touch in the exposed metal on many of the edges and just weather the gun further.

Overall I'm satisfied with the result (notwithstanding the handle) and hope I've done justice to rgriesbeck 's terrific kit!

Here is is after the wash has been applied but before the weathering...

right side wash.jpg left side wash.jpg

... and after the weathering...

right side.jpg left side.jpg

With the LEDs lit...

right side led.jpg left side led.jpg green led.jpg

In action!

firing 1.jpg firing 2.jpg firing 3.jpg

And alongside my 'water gun' Deckard's blaster...

Blasters.jpg
 
Last edited by a moderator:
Another beautifully executed and detailed build thread mate . Congratulations and thanks for sharing it all ( the in-depth step by steps ) once again .
I’ve not seen any others ( build threads of this particular model ) so far , but I’m sure you’ve done it proud . By the by , your ‘ conversion ‘ of the water Blaster PKD has to be one of the most ‘ authentic ‘ of the ones I’ve seen so far . From the additional ‘ quarter round piece ‘ on the rear trigger , to the exposed wiring ! Not to mention the outstanding exterior paint and weathering .
What’s next !?

:cheersGed
 
This thread is more than 3 years old.

Your message may be considered spam for the following reasons:

  1. This thread hasn't been active in some time. A new post in this thread might not contribute constructively to this discussion after so long.
If you wish to reply despite these issues, check the box below before replying.
Be aware that malicious compliance may result in more severe penalties.
Back
Top