I started a few weeks ago on the Blue Moon Blockade Runner. This is my first resin kit, so it has been a bit of an adventure so far.

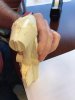
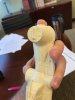
The head section required some careful attention to remove the pour stub.

I used a hacksaw to get rid of most of it, then unrolled an old printer calculator paper roll until I reached the appropriate dimensions, wrapped it in sandpaper, and used that to grind out the curve of the top of the neck attachment.


There was some minimal cleanup on parts, but much less than I expected for a resin kit. I neglected to take any pictures of the cleanup step.
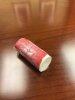
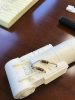
The piping detail for the eleven engines is small and hard to work with, so I found some electrical resistors of similar size and shape, and I am using those instead.

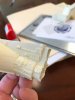
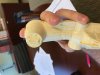
Attaching the forward fuselage part to the middle waist. I used a 1 inch oak dowel wrapped in styrene sheets to get to the appropriate thickness for the internal structure.

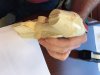
Adding the head section. I think it's straight.

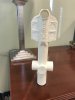
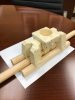
The mounts for all eleven engines attach to the central block, and must be lined up straight. I glued some dowels to a sheet of styrene to make a sort of jig, which will ensure that the engine mounts are lined up with each other.

That's all I have for now. I'm really enjoying working with resin for the first time, and this particular kit seems like a great place to start. The details and mold quality are fantastic, at least from what I can see.
More to come as progress is made.
The head section required some careful attention to remove the pour stub.
I used a hacksaw to get rid of most of it, then unrolled an old printer calculator paper roll until I reached the appropriate dimensions, wrapped it in sandpaper, and used that to grind out the curve of the top of the neck attachment.
There was some minimal cleanup on parts, but much less than I expected for a resin kit. I neglected to take any pictures of the cleanup step.
The piping detail for the eleven engines is small and hard to work with, so I found some electrical resistors of similar size and shape, and I am using those instead.
Attaching the forward fuselage part to the middle waist. I used a 1 inch oak dowel wrapped in styrene sheets to get to the appropriate thickness for the internal structure.
Adding the head section. I think it's straight.
The mounts for all eleven engines attach to the central block, and must be lined up straight. I glued some dowels to a sheet of styrene to make a sort of jig, which will ensure that the engine mounts are lined up with each other.
That's all I have for now. I'm really enjoying working with resin for the first time, and this particular kit seems like a great place to start. The details and mold quality are fantastic, at least from what I can see.
More to come as progress is made.
Attachments
-
 IMG_3543.JPG309.6 KB · Views: 138
 -
 IMG_4261.jpg47.1 KB · Views: 127
 -
 IMG_3602.JPG281.7 KB · Views: 140
 -
 IMG_3602.JPG442.3 KB · Views: 156
 -
 IMG_3601.JPG384 KB · Views: 145
 -
 IMG_3601.JPG599.2 KB · Views: 149
 -
 IMG_4018.jpg1.3 MB · Views: 140
 -
 IMG_4059.jpg1.2 MB · Views: 152
 -
 IMG_4260.jpg419.9 KB · Views: 148


