Iggy
Sr Member
Well, here it goes.
First things first, I sewing everything myself and scratch-building the rest along with some help from my 3d printer.
I purchased the helmet file for the male tusken and found some nice eye/blood spitter files on Thingiverse and began printing.
All of the fabric was purchased in 2 lumps. I found an awesome seller on ebay with a herringbone pattern fabric that will be great for the AOTC tusken. I just love the pattern and look of the AOTC tuskens. The other lump was ordered from fabric.com and I got a bunch of cotton gauze for wraps, natural / darker tan denims, and some monk cloth for the wife's female tusken.
Here is the start to the mask: (Printing in PLA)

All parts printed out:

Taping everything together was pretty easy. I glued using all purpose PVC, ABS, etc. glue used in plumbing which bonds this plastic really well.

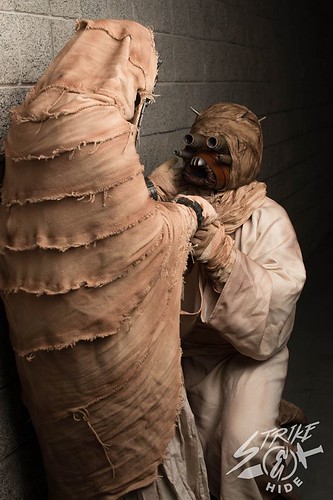
Test fit

I went ahead and glued everything except for the tooth part. That is just sitting there in the photo.

Next up boots!
I shredded up a ton of denim for the boots. I like the look of denim on these and it will hold up a bit better that the cotton gauze on the boots (some AOTC photos show cotton gauze or crinkle cotton used on boots, others seem to show denim based...just depends on which tusken you look at).

I don't like rain boots that much, but I may make the move. I used some inexpensive cloth boots. This took a ton of e6000.

My wife had some rain boots, and I used barge cement which worked a LOT faster for those. Then I weathered them up with some dye left over from dying my gloves.

Robe:
It is hard to see the texture on this, but I tried to capture it. It is a raised texture for the herringbone pattern.

The pattern was going the wrong way on the fabric so I couldn't use just one piece. I had to use the pattern from Studio Creations: ttp://www.studiocreations.com/howto/tuskenraider/main.html

I made a pattern for the custom AOTC pouches and cut enough for 5 of them out for the chest bandolier.
This is what each pouch ended up like:

Helmet in progress:

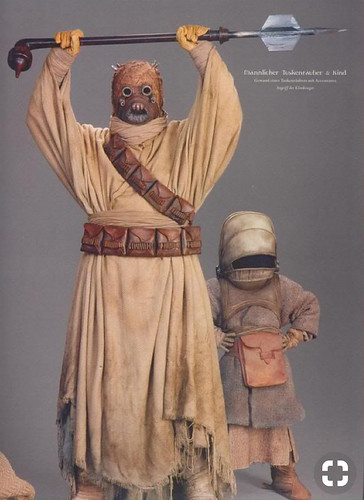
Progress shot. I still needed to cut the length down in this shot and weather the robes but it is coming along!

I trimmed the bottom and airbrushed both my wife's costume and mine. She wore it while I airbrushed the heck out of the robe and all of the parts.
Lastly...We got approved and added DZ designations to our 501st profiles!


Hope you enjoyed this quick build.
Overall it was about 2 weeks worth of building both Tuskens.


First things first, I sewing everything myself and scratch-building the rest along with some help from my 3d printer.
I purchased the helmet file for the male tusken and found some nice eye/blood spitter files on Thingiverse and began printing.
All of the fabric was purchased in 2 lumps. I found an awesome seller on ebay with a herringbone pattern fabric that will be great for the AOTC tusken. I just love the pattern and look of the AOTC tuskens. The other lump was ordered from fabric.com and I got a bunch of cotton gauze for wraps, natural / darker tan denims, and some monk cloth for the wife's female tusken.
Here is the start to the mask: (Printing in PLA)
All parts printed out:
Taping everything together was pretty easy. I glued using all purpose PVC, ABS, etc. glue used in plumbing which bonds this plastic really well.
Test fit
I went ahead and glued everything except for the tooth part. That is just sitting there in the photo.
Next up boots!
I shredded up a ton of denim for the boots. I like the look of denim on these and it will hold up a bit better that the cotton gauze on the boots (some AOTC photos show cotton gauze or crinkle cotton used on boots, others seem to show denim based...just depends on which tusken you look at).
I don't like rain boots that much, but I may make the move. I used some inexpensive cloth boots. This took a ton of e6000.
My wife had some rain boots, and I used barge cement which worked a LOT faster for those. Then I weathered them up with some dye left over from dying my gloves.
Robe:
It is hard to see the texture on this, but I tried to capture it. It is a raised texture for the herringbone pattern.
The pattern was going the wrong way on the fabric so I couldn't use just one piece. I had to use the pattern from Studio Creations: ttp://www.studiocreations.com/howto/tuskenraider/main.html
I made a pattern for the custom AOTC pouches and cut enough for 5 of them out for the chest bandolier.
This is what each pouch ended up like:
Helmet in progress:
Progress shot. I still needed to cut the length down in this shot and weather the robes but it is coming along!
I trimmed the bottom and airbrushed both my wife's costume and mine. She wore it while I airbrushed the heck out of the robe and all of the parts.
Lastly...We got approved and added DZ designations to our 501st profiles!
Hope you enjoyed this quick build.
Overall it was about 2 weeks worth of building both Tuskens.
Last edited by a moderator: