You are using an out of date browser. It may not display this or other websites correctly.
You should upgrade or use an alternative browser.
You should upgrade or use an alternative browser.
Another Blade Runner thread: The Portable Voight-Kampff Scanner
- Thread starter Ein
- Start date
Ein
Sr Member
Maybe you can add the date the test took place? I imagine they would have that recorded for their records
Although I don't know if that info would be in the device itself while scanning
I like the idea, but the device isn't smart enough to know the current date and time. That usually requires some kind of active memory and power.
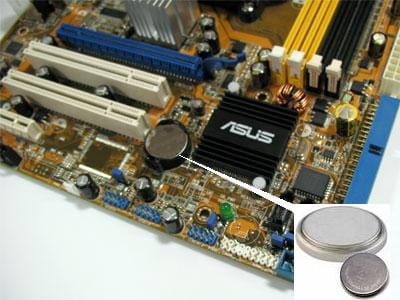
On something like your PC motherboard, there is a spot where there's a coin cell or comparable power source. That's running a clock that is always on, even when the CPU is off, or even when your PSU is unplugged.
I could fake it the same way that I'm faking the "Incept Date" stuff - just generate random numbers (XX/XX/2049) but I don't know that it'd have the intended result.
Actually, I just noticed a bug on one of those screenshots - one of them has the month generated as "00/XX/XXXX". Woops! Fixed that.
Mylodon
New Member
I think if it was randomly generated like the incept date that would be good. It also wouldn't make sense if it was the current date since the incept date for the two example you have are 20ish years in the future!I like the idea, but the device isn't smart enough to know the current date and time. That usually requires some kind of active memory and power.
http://img-16.ccm2.net/B-Q-eExDQ56Z...ad454c9f6733da1/ccm-faq/625-cmos-batt1-s-.png
On something like your PC motherboard, there is a spot where there's a coin cell or comparable power source. That's running a clock that is always on, even when the CPU is off, or even when your PSU is unplugged.
I could fake it the same way that I'm faking the "Incept Date" stuff - just generate random numbers (XX/XX/2049) but I don't know that it'd have the intended result.
Actually, I just noticed a bug on one of those screenshots - one of them has the month generated as "00/XX/XXXX". Woops! Fixed that.
You could have a random month and day picked in the year 2049, I think that would be cool
BruceKenobi
Well-Known Member
This went from "cute prop" to "Wow this actually works! who is the OEM?" in a flash!!! it's amazing! it really looks like it's working now! amazing job!
Borax
New Member
On your screenshots the serial numbers are not correctly generated. Are you using a pool of premade numbers? I guess you could save some memory of they are not preset as you generate all needed information anyway:
For example N7FAC51218:
N7: nexus 7
F: female
A: physical level
C: mental level
5: month
12: day
18: year (2018)
Here is some further info about the serial numbers: http://www.mybladerunner.com/faqs/4-3-2-replicant-information/
For example N7FAC51218:
N7: nexus 7
F: female
A: physical level
C: mental level
5: month
12: day
18: year (2018)
Here is some further info about the serial numbers: http://www.mybladerunner.com/faqs/4-3-2-replicant-information/
Ein
Sr Member
I promise further updates on this, but for now, I'll just say that I was scraping the edges of the available memory on the Pro Trinket...
The Teensy 3.2 microcontroller came today. It's the same size as the Pro Trinket, runs on the same voltage, clocks way faster, and has way more memory. I'm now able to grab portions of the screen, put them into memory, and then use that information to do subsequent calculations. Most importantly, this gives me the ability to scroll text, move bars around on the screen, and include opacity into my graphics. Pretty psyched about this - have a lot more coding to do, but I will do a big encompassing post as soon as possible.
The Teensy 3.2 microcontroller came today. It's the same size as the Pro Trinket, runs on the same voltage, clocks way faster, and has way more memory. I'm now able to grab portions of the screen, put them into memory, and then use that information to do subsequent calculations. Most importantly, this gives me the ability to scroll text, move bars around on the screen, and include opacity into my graphics. Pretty psyched about this - have a lot more coding to do, but I will do a big encompassing post as soon as possible.
Ein
Sr Member
Alright, here is that post I've been owing for a while, and it's going to be as dumb as technical as the rest because I promised that's how I was going to write this up. I mean, technical. If you don't have an interest in programming, a lot of this will be white noise.
CODE TALKING
I'm going to talk about the code running the portable VK screen. I'm not going to post the code running the screen yet. Don't see any point to putting unfinished stuff up, and it's getting pretty long. As of right now, this is close to ~2,400 lines of code, not including the library running the screen, which I have also been making edits and changes to. That number is somewhat misleading, as about 1,000 lines are just graphical data. By way of example, the small Chinese characters in the upper left of the screen are done with hard-coded bitmap data, as there's no font support for non-English characters. That means the visual data is broken up into gross 8-bit byte arrays like this:
These basically tell a drawBitmap() function which regions of the screen are a 0 or a 1 in a compact format. Now, you could totally just encode bitmap data for the entire screen in this fashion and, in a couple of passes, end up with a display that fakes what we're after pretty easily. I didn't do that. As I mentioned, I was using an Adafruit Pro Trinket 3.3v microcontroller at the outset of the project, which has ~27kb of flash memory and ~2kb of RAM, and there was no earthly way it could hold enough bitmap data to cover the whole screen even once and still do anything else useful. Thankfully, we do have another way of approaching the problem - there are other drawing functions. Rather than drawBitmap(), we also have things like drawPixel(), drawLine(), and drawRect(), courtesy of Adafruit's GFX library. These functions take simple parameters (origin X, origin Y, width, height, color, etc) and draw groupings of pixels onto the screen with dramatically less overhead than trying to interpret the above arrays.
With those tools in mind, I set about creating a UI layout that would be easy to work with if I wanted to make changes later. It would be pretty simple to hard-code all of the positions - i.e. "Draw a line from X10Y10 to X220Y10" - but the end result of all of that would be that if I needed to modify something in the layout I would have to hunt and peck all of the scattered integers throughout the code until I finally got everything in order. That sucks. That's no way to program.
Instead, I adopted a CSS-esque approach to the UI here, where I defined a few simple values and calculated almost every other position based off those values. We start by setting up variables for screen width and height (240 and 320 respectively, based on the screen we're using), a margin value (for around the outside of the main UI area), and calculate a number of other figures from there:
There are a few other hard-coded values in there (like the size of the eye grid area), but you get the idea. This hopefully prevents total disaster if I ever decide I want to move things around later. Or worsens it, because a change in one value might propagate to others in ways I don't anticipate. I don't know! It just seemed like a smarter way to approach the problem.
Everything has been broken into constituent functions so I can hopefully call on things individually if I need to redraw a particular region of the screen. These functions all get wrapped into parent functions, like the following:
I have been commenting the daylights out of my code so I can follow it later, as I have a tendency to get really into these sorts of things, finish them, and forget everything by the time I look at it a few months down the line.
These parent functions are themselves wrapped into classes (the one above, for example, is part of the UI.c class), which helps keep all of the information organized. At this point I have 5 separate object types for running the screen:
Now, all of this is great, and helps me stay organized, but I was right up against the limits of what the Pro Trinket could do in terms of memory, and I still had a lot more that I wanted the device to be able to do. I could have probably left it alone, but that's not in my nature. Enter: Teensy 3.2.
Teensy is like the Arduino I had been using, but on steroids. Way more memory, way more CPU cycles. They even make a ******* prop shield, which is an add-on chip designed to extend its capabilities for propmakers. It adds motion sensors, an audio amplifier, even more flash memory for storing audio files, and some 5V buffered output. There's a slightly cheaper version without the motion sensing capabilities called the "LC" (for "Low Cost") I am literally the target audience for this and I had no idea it existed. I wish I had known about this thing before - I probably could have done some fancier stuff with my Titanfall Data Knives.

The Teensy 3.2 in particular is nearly the exact same footprint as the Pro Trinket I had been using, and also operates with 3.3V logic, which means it is natively suitable for the ILI9341 displays I have been working with. There's very little here I'm not a fan of. If I had to point at some things I'd change, it'd be the fact that the Pro Trinket actually clearly labels the pin designations on both sides of the board, whereas the Teensy only has the labels on the bottom. Makes wiring a bit more obnoxious. Also, the Trinket has mounting holes, whereas the Teensy does not. I can live with that - I get extra pins on the Teensy for the trouble.
The Teensy generally can run most Arduino code directly, though there are some small differences. Paul Stoffregen, the brains behind PJRC, which is the company that makes the Teensy, has actually made a Teensy-specific library for the ILI9341 display called, well, "ILI9341_t3". I've spent time looking through this library, as well as the ridiculously long datasheet from the Chinese supplier for the ILI9341 displays, and come away from both feeling a lot smarter than I did before. I've actually gotten to the point where I started making changes to Paul Stoffregen's library (though I haven't forked anything on GitHub, this is purely a local thing for me). I've been able to modify his code to start permitting opacity arguments on certain drawing functions so that I can draw things with transparency if I want to. This usually takes the form of an additional, optional argument at the end of something like drawBitmap() which includes an integer for opacity meant to represent percent, from 0 to 100. To use that function as an example:
If an opacity value isn't specified, it is defaulted to 100, which just draws the pixel per normal. If the opacity value is specified, it then reads data back from the screen at the pixel location (which is something the Pro Trinket could not have done easily) and uses another function I've written (blendTwoColors) to average the color to be drawn against the base color already on the screen.
An interesting note about the color data for these screens. The default way of handling colors is with a uint16_t variable, which is an unsigned integer that stores a 16-bit value; the 'unsigned' bit simply means it only stores positive values. The default color data here seems to be in a format called RGB565, though I couldn't tell you if that's because that's the format the screen hardware specifically wants or if it's because that's how Adafruit ended up writing the initial GFX library that all the others (including Paul Stoffregen) have been building off of. It is actually super obnoxious, in my mind - I'm used to computer graphics like Photoshop where you can reduce a color to a simple R, G, and B value or a hex value.
This article does a pretty good job of explaining what RGB565 format actually is. I'm sure it's a brilliant data format for a variety of reasons I don't understand, but as far as I'm concerned it's obnoxious obfuscation of what I'm actually after. A color of #3b4a4d, or R:59/G: 74/B:77 must instead be expressed as "0x7C52", which at a glance means absolutely nothing to me. You can obtain this value by doing all sorts of bit-shifting logic (which Paul Stoffregen did write functions for in his library) but I went the easy route and used an online calculator to simplify things a little bit for all of the colors I pre-established.
However, this all does precious little good when you're trying to calculate colors on the fly - say, like what you are trying to draw graphics with transparency. The blendTwoColors() function above uses an RGB structure I implemented (basically just a container that holds 3 ints - R, G, and B) and a function called "color565toRGB" which does the reverse bit-shifting calculation to turn the RGB565 data into something we can actually do math with.
Like I said, obnoxious. But, once we have the separate RGB values, we can calculate things out and actually arrive at correct colors to draw transparency, which really nice when you're trying to draw higher-fidelity graphics.
GETTING INTO THE ALGORITHM
So, that describes some of our drawing functions. But what about the actual data on the screen? For that, I made a class called "Profile" which basically generates and stores all of the random data about a scanned target. It is procedural in nature and does the following steps:
Right now, I only have eye graphics for one eye, but the final version will have hopefully at least 5 different sets. Each eye is basically 3 bitmaps and a background color that are laid down in series:


Each EYECOLOR# has a different uint16_t color value, so it draws the layers in progressively lighter colors. This all happens basically instantly (at least on the Teensy, which runs very fast), so you don't see it happening on the screen. I may actually slow it down and animate the effect because I thought the way the pixels populated from top-to-bottom on each pass was neat when the Pro Trinket was doing it, though that was a product of its microcontroller struggling to do everything fast enough.


The text fields all get populated with the information we generated with the Profile class earlier. The functions are flexible and will move the text around to make sure left- and right-alignment is maintained regardless of how long the text is. That means that whether the target's name is 10 characters or 7 or 18, it'll still be positioned correctly. The "gender" boxes on the UI fill in appropriately - F or M - and light up. The word "Match" simply appears beneath the thumbprints for the moment, though I am considering putting in a small percentage chance of having no records match and changing the output accordingly (no thumbprints, error text).

The DNA analysis bars are drawn out and randomly marked up. If the target is a Replicant (remember, we're generating this property randomly per-scan), some of those marks are highlighted in red, to indicate synthetic markers. If the target is a Human, only normal markers will show.
This is one of those areas I'm least satisfied with. I like the "GCAT" marker display - it reminds me of my high school biology classes, where we got to do some rudimentary gel electrophoresis to read and interpret DNA. I'm less certain about the DNA helix graphic - I feel like that would maybe be beyond the ability of the device to display, and breaks up the flow of the read-out. I may remove the DNA helix entirely and simply put some generic "tech" readout stuff, maybe to indicate focal or photographic information. By way of example:


I actually had way more going on with this UI on earlier implementations, but it starts to look way too busy on the small screen. I think this strikes a better balance, as I doubt the device K actually has is enormously sophisticated.

The field of 'blips' is done in a class called "Analysis" which I wrote just to keep things organized. It basically just takes some arguments and populates an array with visibility and color data. If the target is a Replicant, it'll go back through the array and pick two of those blips, and flip them to red to make them "synthetic" markers, to show something aberrant or non-organic. I'm still working on this part, but I want it to then draw two target icons on spots on the eye and draw lines out from those blips to the eye graphic, to highlight where it's picking up a replicant serial number embedded on the target's sclera.
As above, I'm not sure if this Analysis Array detail is too much. I like it and I like the idea of drawing the lines onto the eye from it, but at the same time it starts to make the interface for the device look increasingly high-tech, while a lot of Blade Runner is this pseudo-analog look. 2049 certainly has a more futuristic look - after all, it's 30 years after the original movie, and more than 25 years after the "blackout" - but I'm not sure if I'm overdoing it. I would very much value feedback on this point, especially if anyone has ideas for substitute info to display.
RESULTS - AKA THE PRETTY PICTURES
OK, you've toughed it out long enough. Let share what we've actually got at this point, shall we?
The 'start screen' displays for a brief period. I've got it set to one second at the moment before moving along. I will absolutely change this for the final product, as I want it to do a screen-accurate white flash first when the top slide pops out, then brighten to the start screen from black.

I can dim the glow on the "LAPD" text in code, but I like it in person. It is photographing pretty intensely with my camera phone, though.
The "waiting" screen is next. This would be the idle screen until a scan is done. The screen dims by about 1/2 for this while waiting for action.

And here are some sample screens with sample output.


The screen shows blues a bit more intensely than I'd like - my mock-up designs have been fairly desaturated - but that's something I can tweak color values for after everything else is done.
WHERE TO FROM HERE?
I'm going to be working on getting some animations and other UI stuff implemented - the battery meter, for example, is right now only a graphic, but I want it to do some internal voltage measurements and show what the LiPo battery state is actually at (approximately).
Moreover, I wanted to add an extra 'personal' page. The portable VK has a bunch of buttons, and I figured I should make them do something other than the 'scan' button and the one that pops out the slide. I'm thinking I'm going to set up a separate page on the display that will show on one of these button presses that will show the VK user data. I'm still conceptualizing the layout for this, but here's the gist of what I'm thinking:

Side note: I pulled K's address together from a couple of sources. The IMDB page for the movie lists that K's apartment building is called "Mobius 21". In reviewing a bunch of poor-quality, low-resolution footage of the film, I think I have spotted an apartment number outside his door - 111:

The LA zip code (90013) is actually the one for the Bradbury Building, which was a location prominently used in the original Blade Runner movie. Best I had to go on there.
I think the default for the device should be Officer K's profile, but I'm doing this with a certain angle in mind. Just like I custom-engraved pilot callsigns onto my Titanfall Data Knives, I'd like to be able to personalize these for their ultimate recipients. If someone sent me a name, photo, and whatever other info they wanted on the page, I'd be able to alter the information that displays here for them.With that said, I'm not sure if I want to actually show the owner's address on the profile page? That seems like something that might not be wise. Don't know. I need to figure out what other information this page can display. I'd like to be able to make readouts for Replicant and non-Replicant Blade Runners - some of you might want to be skinjobs, some might want to be the real thing (or at least think you are).
That's enough of a rant for now, but I'll have more in the next few days. I know this is taking a long time, but I've been basically teaching myself all the necessary coding to do this stuff, so if nothing else I consider this a valuable learning experience that should help me improve my future projects as well.
Edit: The BBcode on the forums keeps adding extra code tags after some of the function declarations, but even when I manually remove them they reappear, so I may not be able to fix that. Whatever, you get the gist.
CODE TALKING
I'm going to talk about the code running the portable VK screen. I'm not going to post the code running the screen yet. Don't see any point to putting unfinished stuff up, and it's getting pretty long. As of right now, this is close to ~2,400 lines of code, not including the library running the screen, which I have also been making edits and changes to. That number is somewhat misleading, as about 1,000 lines are just graphical data. By way of example, the small Chinese characters in the upper left of the screen are done with hard-coded bitmap data, as there's no font support for non-English characters. That means the visual data is broken up into gross 8-bit byte arrays like this:
Code:
const unsigned char iconLAPDChinese [] PROGMEM = {
Code:
  0x49, 0x00, 0x20, 0x7d, 0xe7, 0xff, 0xd7, 0x44, 0x01, 0x74, 0x81, 0xd6, 0x0f, 0x67, 0x4a, 0x00,
  0x02, 0x87, 0xff, 0xe7, 0x70, 0x00, 0x00, 0x00, 0x7f, 0xc3, 0xfe, 0x40, 0x41, 0x24, 0x7f, 0xc6,
  0x62
};
These basically tell a drawBitmap() function which regions of the screen are a 0 or a 1 in a compact format. Now, you could totally just encode bitmap data for the entire screen in this fashion and, in a couple of passes, end up with a display that fakes what we're after pretty easily. I didn't do that. As I mentioned, I was using an Adafruit Pro Trinket 3.3v microcontroller at the outset of the project, which has ~27kb of flash memory and ~2kb of RAM, and there was no earthly way it could hold enough bitmap data to cover the whole screen even once and still do anything else useful. Thankfully, we do have another way of approaching the problem - there are other drawing functions. Rather than drawBitmap(), we also have things like drawPixel(), drawLine(), and drawRect(), courtesy of Adafruit's GFX library. These functions take simple parameters (origin X, origin Y, width, height, color, etc) and draw groupings of pixels onto the screen with dramatically less overhead than trying to interpret the above arrays.
With those tools in mind, I set about creating a UI layout that would be easy to work with if I wanted to make changes later. It would be pretty simple to hard-code all of the positions - i.e. "Draw a line from X10Y10 to X220Y10" - but the end result of all of that would be that if I needed to modify something in the layout I would have to hunt and peck all of the scattered integers throughout the code until I finally got everything in order. That sucks. That's no way to program.
Instead, I adopted a CSS-esque approach to the UI here, where I defined a few simple values and calculated almost every other position based off those values. We start by setting up variables for screen width and height (240 and 320 respectively, based on the screen we're using), a margin value (for around the outside of the main UI area), and calculate a number of other figures from there:
Code:
  screenWidth = 240;
 screenHeight = 320;
Code:
  margin = 10;
  width = screenWidth - margin*2;
  height = screenHeight - margin*2;
  topMargin = margin;
  leftMargin = margin;
  bottomMargin = screenHeight - margin-1;
  rightMargin = screenWidth - margin-1;
  topGutterY = topMargin+18;
  vertGutterWidth = 9;
  vertGutterLeft = leftMargin + 90;
  vertPrintBar = (vertGutterLeft-leftMargin)/2+leftMargin;
  horizPrintBar = topGutterY+62;
  summaryFieldTop = margin+188;
  topLeftHeight = 81;
  gridBottomY = margin+138;
  gridSide = 121;
  gridOriginX = vertGutterLeft + vertGutterWidth;
  gridOriginY = topGutterY;
  genderLeftX = vertGutterLeft-35;
  batteryOriginX = rightMargin - 30;
  batteryOriginY = topMargin + 5;
There are a few other hard-coded values in there (like the size of the eye grid area), but you get the idea. This hopefully prevents total disaster if I ever decide I want to move things around later. Or worsens it, because a change in one value might propagate to others in ways I don't anticipate. I don't know! It just seemed like a smarter way to approach the problem.
Everything has been broken into constituent functions so I can hopefully call on things individually if I need to redraw a particular region of the screen. These functions all get wrapped into parent functions, like the following:
Code:
void UI::drawMainUIGrid() { drawOuterUIBorder();
Code:
  //  Multiple individual dividing lines
  tft->drawFastHLine(leftMargin, topGutterY, width, color); //Horizontal line beneath LAPD Text
  tft->drawFastHLine(leftMargin, gridBottomY, width, color); //Horizontal line even with bottom of grid
  tft->drawFastHLine(leftMargin, topGutterY + topLeftHeight, vertGutterLeft - margin, color); //Horizontal line 2/3 down eye grid
  tft->drawFastHLine(leftMargin, summaryFieldTop, width, color); //Horizontal line above text summary field
  tft->drawFastVLine(vertGutterLeft, topGutterY, summaryFieldTop - topGutterY, color); //Left vertical gutter line
  tft->drawFastVLine(vertGutterLeft + vertGutterWidth, topGutterY, summaryFieldTop - topGutterY, color); //Right vertical gutter line, should be even with grid edge.
  tft->drawFastVLine(vertPrintBar, topGutterY, horizPrintBar-topGutterY, color); //Dividing line down left top to separate the fingerprint region.
  tft->drawFastHLine(leftMargin, horizPrintBar, vertGutterLeft-margin, color); //Horizontal line under the fingerprint area.
  tft->drawFastVLine(genderLeftX,horizPrintBar,topGutterY+topLeftHeight-horizPrintBar, color);
  tft->drawRect(gridOriginX, gridOriginY, gridSide, gridSide, color); // Rectangular outer border for eye scan area.
  //  Draws the region for the "L" and "R" fingerprint tag letters
  drawFingerprintTagBox(leftMargin, topGutterY, color);
  drawFingerprintTagBox(vertPrintBar, topGutterY, color);
  //  Renders a backlight glow on the bottom Summary field
  drawInnerFieldGlow(15, leftMargin, summaryFieldTop, rightMargin-leftMargin, bottomMargin-summaryFieldTop, GLOWEDGECOLOR, BACKGROUND);
  //  Fills a grid pattern in on the eye scan area
  drawEyeGrid(color);
  //  Corner dots on main UI elements for aesthetics
  drawCornerUIDots(WHITE);
  //  LAPD logo and chinese text in the top left
  drawLAPDTopLeft();
  //  "Greyed-out" gender boxes - barely visible until scan is done, to light one or the other of them up.
  drawGenderUIBoxes();
  drawRecordBox(vertGutterLeft - 15, summaryFieldTop-15, false, DARKBLUEUI);
}
I have been commenting the daylights out of my code so I can follow it later, as I have a tendency to get really into these sorts of things, finish them, and forget everything by the time I look at it a few months down the line.
These parent functions are themselves wrapped into classes (the one above, for example, is part of the UI.c class), which helps keep all of the information organized. At this point I have 5 separate object types for running the screen:
- A TFT object for actually drawing data to the display;
- A UI object for doing the basic layout and lines;
- A Profile object for generating, storing, and writing data about a scanned target;
- An Analysis object for generating and showing a bunch of the pseudo-science-bull**** readout data;
- A Battery object for reading and displaying the LiPo battery status.
- A 'dialog' file, which contains all (most) of the text for the display in a format that can easily be edited later. This includes lists of first names, last names, jobs/functions, crimes, and various UI text ("WARRANT NO" or "MATCH", for example). Almost all of the readouts that pull data from this dialog file are responsive, meaning if I change the text from "MATCH" to "MATCHED", it'll adjust the position on the UI to make sure it fits the larger text accordingly.
- A 'graphics' file, which contains all of the 8-bit 'pre-baked' graphics arrays for things I can't easily draw out of graphical primitives, like the eye images, thumb prints, LAPD logo, etc. Also contains a lot of color definitions, which means that if I want to tweak the color of the UI (say, from blue to green) or other particular graphical elements, I can do so easily in one spot, rather than hunting through all my files and updating the values.
Now, all of this is great, and helps me stay organized, but I was right up against the limits of what the Pro Trinket could do in terms of memory, and I still had a lot more that I wanted the device to be able to do. I could have probably left it alone, but that's not in my nature. Enter: Teensy 3.2.
Teensy is like the Arduino I had been using, but on steroids. Way more memory, way more CPU cycles. They even make a ******* prop shield, which is an add-on chip designed to extend its capabilities for propmakers. It adds motion sensors, an audio amplifier, even more flash memory for storing audio files, and some 5V buffered output. There's a slightly cheaper version without the motion sensing capabilities called the "LC" (for "Low Cost") I am literally the target audience for this and I had no idea it existed. I wish I had known about this thing before - I probably could have done some fancier stuff with my Titanfall Data Knives.
The Teensy 3.2 in particular is nearly the exact same footprint as the Pro Trinket I had been using, and also operates with 3.3V logic, which means it is natively suitable for the ILI9341 displays I have been working with. There's very little here I'm not a fan of. If I had to point at some things I'd change, it'd be the fact that the Pro Trinket actually clearly labels the pin designations on both sides of the board, whereas the Teensy only has the labels on the bottom. Makes wiring a bit more obnoxious. Also, the Trinket has mounting holes, whereas the Teensy does not. I can live with that - I get extra pins on the Teensy for the trouble.
The Teensy generally can run most Arduino code directly, though there are some small differences. Paul Stoffregen, the brains behind PJRC, which is the company that makes the Teensy, has actually made a Teensy-specific library for the ILI9341 display called, well, "ILI9341_t3". I've spent time looking through this library, as well as the ridiculously long datasheet from the Chinese supplier for the ILI9341 displays, and come away from both feeling a lot smarter than I did before. I've actually gotten to the point where I started making changes to Paul Stoffregen's library (though I haven't forked anything on GitHub, this is purely a local thing for me). I've been able to modify his code to start permitting opacity arguments on certain drawing functions so that I can draw things with transparency if I want to. This usually takes the form of an additional, optional argument at the end of something like drawBitmap() which includes an integer for opacity meant to represent percent, from 0 to 100. To use that function as an example:
Code:
 void drawBitmap(int16_t x, int16_t y, const uint8_t *bitmap, int16_t w, int16_t h, uint16_t color, int opacity = 100);

 void ILI9341_t3::drawBitmap(int16_t x, int16_t y, const uint8_t *bitmap, int16_t w, int16_t h, uint16_t color, int opacity) {
   int16_t i, j, byteWidth = (w + 7) / 8;
   for(j=0; j<h; j++) {
     for(i=0; i<w; i++ ) {
       if(pgm_read_byte(bitmap + j * byteWidth + i / 8) & (128 >> (i & 7))) {
         if(opacity >= 100){
           drawPixel(x+i, y+j, color);
         } else {
           uint16_t baseColor = readPixel(x+i, y+j);
           uint16_t newColor = blendTwoColors(baseColor, color, opacity);
           drawPixel(x+i, y+j, newColor);
         }
       }
     }
   }
 }
If an opacity value isn't specified, it is defaulted to 100, which just draws the pixel per normal. If the opacity value is specified, it then reads data back from the screen at the pixel location (which is something the Pro Trinket could not have done easily) and uses another function I've written (blendTwoColors) to average the color to be drawn against the base color already on the screen.
Code:
uint16_t ILI9341_t3::blendTwoColors(uint16_t colorStart, uint16_t colorEnd, int opacity){
   RGB color1 = color565toRGB(colorStart);
   RGB color2 = color565toRGB(colorEnd);
   RGB deltaColor = {uint8_t((color1.r-color2.r)*opacity/100), uint8_t((color1.g-color2.g)*opacity/100), uint8_t((color1.b-color2.b)*opacity/100)};
   //Serial.println(printf("DR: %u, DG: %u, DB: %b", deltaColor.r, deltaColor.g, deltaColor.b));
   return color565(color1.r-deltaColor.r,color1.g-deltaColor.g,color1.b-deltaColor.b);
}This article does a pretty good job of explaining what RGB565 format actually is. I'm sure it's a brilliant data format for a variety of reasons I don't understand, but as far as I'm concerned it's obnoxious obfuscation of what I'm actually after. A color of #3b4a4d, or R:59/G: 74/B:77 must instead be expressed as "0x7C52", which at a glance means absolutely nothing to me. You can obtain this value by doing all sorts of bit-shifting logic (which Paul Stoffregen did write functions for in his library) but I went the easy route and used an online calculator to simplify things a little bit for all of the colors I pre-established.
However, this all does precious little good when you're trying to calculate colors on the fly - say, like what you are trying to draw graphics with transparency. The blendTwoColors() function above uses an RGB structure I implemented (basically just a container that holds 3 ints - R, G, and B) and a function called "color565toRGB" which does the reverse bit-shifting calculation to turn the RGB565 data into something we can actually do math with.
Code:
 //color565toRGB  - converts 565 format 16 bit color to RGB
  static void color565toRGB(uint16_t color, uint8_t &r, uint8_t &g, uint8_t &b) {
   r = (color>>8)&0x00F8;
   g = (color>>3)&0x00FC;
   b = (color<<3)&0x00F8;
  }
Like I said, obnoxious. But, once we have the separate RGB values, we can calculate things out and actually arrive at correct colors to draw transparency, which really nice when you're trying to draw higher-fidelity graphics.
GETTING INTO THE ALGORITHM
So, that describes some of our drawing functions. But what about the actual data on the screen? For that, I made a class called "Profile" which basically generates and stores all of the random data about a scanned target. It is procedural in nature and does the following steps:
- Generate an incept date or birth date. (Month, Day, Year). The overall valid year date range is from 2017 through 2042 for now.
- Coin-toss to determine if the target is a human or a replicant.
- Coin-toss to determine target's gender.
- Determine the target's physical and mental state letters. 90% chance of the letters being "A, B, or C"; 10% chance of "S, D, or F" to keep them as outliers. If the target is a human, list "N/A" instead, on the assumption the device can't determine these stats.
- If the target is a Replicant, generate their ID number based on this logic (Thanks @Borax). Format is N#-CCCMDDYY.
- Generates a name for the target. I have separate tables of male first names and female first names, and it'll pick based on the above-generated gender. I also have one big table of last names that it'll pick from. [Firstname] [Lastname].
- Coin-toss to determine if the target has a criminal history. If so, coin toss to figure out if the history should be one crime, or two. Pick names for said crimes from a table ("THEFT (DATA)" or "ARSON", etc.)
Right now, I only have eye graphics for one eye, but the final version will have hopefully at least 5 different sets. Each eye is basically 3 bitmaps and a background color that are laid down in series:
Code:
void drawEye(int xPos, int yPos){
   tft.fillRect(xPos+1, yPos+1, 119, 119, EYECOLOR1);
   tft.drawBitmap(xPos+1, yPos+1, eye2Bitmap1, 120, 120, EYECOLOR2);
   tft.drawBitmap(xPos+1, yPos+1, eye2Bitmap2, 120, 120, EYECOLOR3);
   tft.drawBitmap(xPos+1, yPos+1, eye2Bitmap3, 120, 120, EYECOLOR4);
   drawEyeGrid(MEDBLUEUI);
 }
Each EYECOLOR# has a different uint16_t color value, so it draws the layers in progressively lighter colors. This all happens basically instantly (at least on the Teensy, which runs very fast), so you don't see it happening on the screen. I may actually slow it down and animate the effect because I thought the way the pixels populated from top-to-bottom on each pass was neat when the Pro Trinket was doing it, though that was a product of its microcontroller struggling to do everything fast enough.
The text fields all get populated with the information we generated with the Profile class earlier. The functions are flexible and will move the text around to make sure left- and right-alignment is maintained regardless of how long the text is. That means that whether the target's name is 10 characters or 7 or 18, it'll still be positioned correctly. The "gender" boxes on the UI fill in appropriately - F or M - and light up. The word "Match" simply appears beneath the thumbprints for the moment, though I am considering putting in a small percentage chance of having no records match and changing the output accordingly (no thumbprints, error text).
The DNA analysis bars are drawn out and randomly marked up. If the target is a Replicant (remember, we're generating this property randomly per-scan), some of those marks are highlighted in red, to indicate synthetic markers. If the target is a Human, only normal markers will show.
This is one of those areas I'm least satisfied with. I like the "GCAT" marker display - it reminds me of my high school biology classes, where we got to do some rudimentary gel electrophoresis to read and interpret DNA. I'm less certain about the DNA helix graphic - I feel like that would maybe be beyond the ability of the device to display, and breaks up the flow of the read-out. I may remove the DNA helix entirely and simply put some generic "tech" readout stuff, maybe to indicate focal or photographic information. By way of example:
I actually had way more going on with this UI on earlier implementations, but it starts to look way too busy on the small screen. I think this strikes a better balance, as I doubt the device K actually has is enormously sophisticated.
The field of 'blips' is done in a class called "Analysis" which I wrote just to keep things organized. It basically just takes some arguments and populates an array with visibility and color data. If the target is a Replicant, it'll go back through the array and pick two of those blips, and flip them to red to make them "synthetic" markers, to show something aberrant or non-organic. I'm still working on this part, but I want it to then draw two target icons on spots on the eye and draw lines out from those blips to the eye graphic, to highlight where it's picking up a replicant serial number embedded on the target's sclera.
As above, I'm not sure if this Analysis Array detail is too much. I like it and I like the idea of drawing the lines onto the eye from it, but at the same time it starts to make the interface for the device look increasingly high-tech, while a lot of Blade Runner is this pseudo-analog look. 2049 certainly has a more futuristic look - after all, it's 30 years after the original movie, and more than 25 years after the "blackout" - but I'm not sure if I'm overdoing it. I would very much value feedback on this point, especially if anyone has ideas for substitute info to display.
RESULTS - AKA THE PRETTY PICTURES
OK, you've toughed it out long enough. Let share what we've actually got at this point, shall we?
The 'start screen' displays for a brief period. I've got it set to one second at the moment before moving along. I will absolutely change this for the final product, as I want it to do a screen-accurate white flash first when the top slide pops out, then brighten to the start screen from black.
I can dim the glow on the "LAPD" text in code, but I like it in person. It is photographing pretty intensely with my camera phone, though.
The "waiting" screen is next. This would be the idle screen until a scan is done. The screen dims by about 1/2 for this while waiting for action.
And here are some sample screens with sample output.
The screen shows blues a bit more intensely than I'd like - my mock-up designs have been fairly desaturated - but that's something I can tweak color values for after everything else is done.
WHERE TO FROM HERE?
I'm going to be working on getting some animations and other UI stuff implemented - the battery meter, for example, is right now only a graphic, but I want it to do some internal voltage measurements and show what the LiPo battery state is actually at (approximately).
Moreover, I wanted to add an extra 'personal' page. The portable VK has a bunch of buttons, and I figured I should make them do something other than the 'scan' button and the one that pops out the slide. I'm thinking I'm going to set up a separate page on the display that will show on one of these button presses that will show the VK user data. I'm still conceptualizing the layout for this, but here's the gist of what I'm thinking:
Side note: I pulled K's address together from a couple of sources. The IMDB page for the movie lists that K's apartment building is called "Mobius 21". In reviewing a bunch of poor-quality, low-resolution footage of the film, I think I have spotted an apartment number outside his door - 111:
The LA zip code (90013) is actually the one for the Bradbury Building, which was a location prominently used in the original Blade Runner movie. Best I had to go on there.
I think the default for the device should be Officer K's profile, but I'm doing this with a certain angle in mind. Just like I custom-engraved pilot callsigns onto my Titanfall Data Knives, I'd like to be able to personalize these for their ultimate recipients. If someone sent me a name, photo, and whatever other info they wanted on the page, I'd be able to alter the information that displays here for them.With that said, I'm not sure if I want to actually show the owner's address on the profile page? That seems like something that might not be wise. Don't know. I need to figure out what other information this page can display. I'd like to be able to make readouts for Replicant and non-Replicant Blade Runners - some of you might want to be skinjobs, some might want to be the real thing (or at least think you are).
That's enough of a rant for now, but I'll have more in the next few days. I know this is taking a long time, but I've been basically teaching myself all the necessary coding to do this stuff, so if nothing else I consider this a valuable learning experience that should help me improve my future projects as well.
Edit: The BBcode on the forums keeps adding extra code tags after some of the function declarations, but even when I manually remove them they reappear, so I may not be able to fix that. Whatever, you get the gist.
Last edited by a moderator:
Enigmatic
Active Member
WOW WOW WOW. A whole other level.
This is the phrase that always pops into my mind when I think about this project. That or "I need this in my life!!!".
You continue to amaze sir.
Similar threads
- Replies
- 15
- Views
- 886