Thor Ragnarok Build for Halloween

boba86solo

Member
I've been working on this for a month now and figure I should post as this is my first time to work with foam.
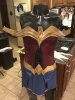
image.jpeg image.jpegimage.jpegimage.jpeg
 
image.jpegimage.jpegimage.jpegimage.jpegimage.jpeg
I started off with the wrong color, was happy with it then realized the actual costume was much darker. True difference... The first picture is of the back. The middle pic is is of that repainted chest piece.
 
Last edited:
This is really great, it looks very accurate. I'm also working on my first foam costume and have a few questions if you don't mind? For the raised edges, did you just cut parallel to the edge and then heat gun it open or some other technique? What did you use for the little metal rivets? And most importantly, how did you get the pecs formed so perfectly?
 
Thank you all for the compliments. The edges were cut and opened up with a heat gun. On the front of the chest plate. Each piece was cut out individually. The rivets, I heated the foam and pressed a small circular center of a metal pen into the foam.

feel free to ask any questions. Today I'm working to get the pants painted up so that they have that dual texture. See attached picture for the part I'm working to accomplish today. I've sectioned off these areas with tape in the pants, as the pants have already been painted with the Rustoleum Dark Walnut. I plan to use Tulip fabric paint with the fine tip to make an edge then paint the center section between the tape with dark walnut gloss. I hope this will create a smoothe leather effect on the pants.

If anyone has some better idea on how to make these sections of the pants look like leather, please advise.
IMG_2183.JPG
 
Very nice! I’m going to add my cheers for the chest armor - super clean work there!

I was looking at your notes on the pants. If you really want to paint onto existing pants, one thing you could try is first stuffing them tightly with packing airbags (if you can lay your hands on lots of them) or plastic drop cloth (just not fabric or shredded stuffing), then coat the parts that are supposed to be leather with Mod Podge or Sculpt or Coat and let it dry. After a couple of coats, you’ll have a thin, fairly flexible surface that you can paint on and have a leather-ish weight and look. Would suggest testing on some similar scrap fabric and seeing how it works.

it’s looking great so far and looking forward to seeing it all together! :)
 
After a test fit, I decided to cut the lower portion of the back off so I had the ability to sit and bend. I plan to add on to the upper skirt armor pieces to cover some of the area. Have also attached some leather like fabric to the area removed. The fabric is the same color as the armor. I sure hope all this works and looks good.
 
That is some damn fine foam manipulation there. And boy howdy good call on trimming the back up. I did not do so and I don't think I sat for over 10 hours the day I wore mine :cry

I did my pants in a very similar fashion to what you suggested. I dyed a pair of khaki pants black, and then brushed gloss black acrylic on with a broad brush. It also is quite easy and Is indicative of a leather surface. Turned out great and cheap as can be :thumbsup
 
PLEASE HELP

I'm close to the end, and trying to figure out how the collar is attached and how to make it. I really do not have the ability of sewing it on. I'm considering making it out of craft foam, but cannot find a template.

IMG_2569.PNG
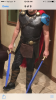
Latest test fitting from last night.
 

Attachments

  • IMG_2562.JPG
    IMG_2562.JPG
    1.6 MB · Views: 463
Last edited:
Think you Sir! I actually put my thick craft foam over a floor mat for harbor freight. I then heated from the inside and shaped it on the edge of a countertop and a washing machine corner to bump out the chest parts.

IMG_2571.JPGIt was tricky as the first go round looked like old man boobs because the granite corners were very rounded. At that point I needed a sharper edge like the washing machine. It took a lot of reheating and shaping to finally get them to look right and fit my body. No more old man boobs like the picture above. Thank God I decided to change the look. Everyone could have remembered me as Utterly Thor. :rolleyes :lol

It has been quite a large project, and I'm looking forward to being done with it soon.

I have also been knocking out a less accurate costume for my wife also. View attachment 768810
 
Last edited:
PLEASE HELP

I'm close to the end, and trying to figure out how the collar is attached and how to make it. I really do not have the ability of sewing it on. I'm considering making it out of craft foam, but cannot find a template.

Should I just attach it to my under altered t-shirt? I'm really lost...
 
What you want to do is base it on a standard collar stand. It's a pretty simple shape but the curve determines how much it fits the neck. Take something like the attached (I just found this image quickly, btw, and claim no rights to it at all) and work it to fit your neck and armor. Then make it in foam if you want and use tabs to attach it to the inside.

Hope that helps!

37ff98f4f4648ce3858373aa247b5fb8.jpg
 
704F8E21-B87A-4F0A-AB04-A8D40DDF9103.png3CEC5662-0C44-4542-AF54-5922F04899F5.jpeg

We we had our Halloween party, and I just realized I forgot to post some final pix. Thank you to all that helped with questions, and thank you for your awesome comments on my first complete build with foam.

Enjoy!

YOU CAN BUILD IT...
 
This thread is more than 6 years old.

Your message may be considered spam for the following reasons:

  1. This thread hasn't been active in some time. A new post in this thread might not contribute constructively to this discussion after so long.
If you wish to reply despite these issues, check the box below before replying.
Be aware that malicious compliance may result in more severe penalties.
Back
Top