Amazing build. Do you plan to light it?
You are using an out of date browser. It may not display this or other websites correctly.
You should upgrade or use an alternative browser.
You should upgrade or use an alternative browser.
5 Foot Falcon Replica - ANH
- Thread starter t2sides
- Start date
t2sides
Master Member
Thanks again Fellas!!
Faustus100 - Yes, I think the beginning of this thread shows the light tests. It's going to be exactly the same lighting look/diffuser as the original filming miniature.
NKG - Thanks, that part, thanks to Tsophika, is the Nichimo Elefant.
Dan - You guys are welcome ANYTIME again, love having you over!
Jamie! Much appreciated - and yes, I've already got the Star Destroyer started - just stalled it for this baby! Looking forward to restarting and finishing that replica!
Here's a quick paint update. I'm still working through 'experimenting', and right now, just the rear damage quadrant is getting close. I still have lighter filters to apply, much more weathering, and techniques to tone down the contrasts and bring it all together. But, at least you can see how it's starting to come together.")
Working through the battle damage weathering. This is the first layer.


A wider shot with most of the area still working on to blend together and weather panels.

The right side with just a few streaks, but haven't done much over there yet.

And the full shot, the entire upper side needs filters/layers. Also tested out dirtying up one of the maintenance pits, this will get refined to bring it a little 'cleaner' and contrasty.

Faustus100 - Yes, I think the beginning of this thread shows the light tests. It's going to be exactly the same lighting look/diffuser as the original filming miniature.
NKG - Thanks, that part, thanks to Tsophika, is the Nichimo Elefant.
Dan - You guys are welcome ANYTIME again, love having you over!
Jamie! Much appreciated - and yes, I've already got the Star Destroyer started - just stalled it for this baby! Looking forward to restarting and finishing that replica!
Here's a quick paint update. I'm still working through 'experimenting', and right now, just the rear damage quadrant is getting close. I still have lighter filters to apply, much more weathering, and techniques to tone down the contrasts and bring it all together. But, at least you can see how it's starting to come together.
Working through the battle damage weathering. This is the first layer.
A wider shot with most of the area still working on to blend together and weather panels.
The right side with just a few streaks, but haven't done much over there yet.
And the full shot, the entire upper side needs filters/layers. Also tested out dirtying up one of the maintenance pits, this will get refined to bring it a little 'cleaner' and contrasty.
Loops Amazing! How much so you recon she weighs?
Man! I'd give anything for a pair of those seats!
t2sides
Master Member
Thanks much everyone!!
Faustus100, I think I mentioned this before, but she 'might' be around 60-80 lbs at this point?
Another brief paint update today. Making progress on the bottom rear half. Still not done in this area, quite a bit more paint 'speckling' to do, and some more filters and oily areas, then it'll be on to refining the top half of the underside. The photos' colors are not quite as warm and show more contrast than in person, but you get the idea. One interesting thing that really shows off here, the gun platform and the jawbox are still completely base coat paint. You can see how adding the weathering and filters tone down the pure off-white, and makes the final base color that nice warm grime/gray color. It's really neat to see the color transform like that. Also added some of the under hull damage areas.
blackeagles
New Member
Hello,
very very nice.
But I have questions,
what is the internal diameter, because 3inch it is impossible for me to put the greeblies, it's too small...
And what the ID's part tank.
Thank you in advance for your answer
very very nice.
But I have questions,
what is the internal diameter, because 3inch it is impossible for me to put the greeblies, it's too small...
And what the ID's part tank.
Thank you in advance for your answer
t2sides
Master Member
Hi Blackeagles,
The internal diameter is closer to 3.5", the opening is 3". This will give you the extra diameter you need to make the greeblies fit!
Thanks
Sean
The internal diameter is closer to 3.5", the opening is 3". This will give you the extra diameter you need to make the greeblies fit!
Thanks
Sean
Hello,
very very nice.
But I have questions,
what is the internal diameter, because 3inch it is impossible for me to put the greeblies, it's too small...
And what the ID's part tank.
Thank you in advance for your answerView attachment 849441
t2sides
Master Member
Hello,
Sorry for the delay in updates. Been busy with life and work, but getting progress in between.
Finished up the engine deck plate with the beautiful 3D printed Engine inserts and vintage KoolShade that covers them very much like the original. Also built up the Radar Dish, and got some more sidewall progress done.
First up the Engine Deck - HUGE Thanks to Maruska, he did an Incredible job printing up the 'custom' engine fans, and they fit beautifully in the very well formed engine vent structures, which were mastered by Eagle1, couldn't have made this deck so accurately without their help!
Here are the Engine Fans just mocked up in place (later centered)

Here are all the Fans staged in place to ensure fit

This was cool to see the fans through the Vents from this angle just like the filming miniature.

And all the KoolShade installed with the various 'bent/damaged' vents.

And here's a wide view of the overall rear with the engine plate installed. The whole Engine Plate comes off/on as needed with flush mount screws.
Sorry for the delay in updates. Been busy with life and work, but getting progress in between.
Finished up the engine deck plate with the beautiful 3D printed Engine inserts and vintage KoolShade that covers them very much like the original. Also built up the Radar Dish, and got some more sidewall progress done.
First up the Engine Deck - HUGE Thanks to Maruska, he did an Incredible job printing up the 'custom' engine fans, and they fit beautifully in the very well formed engine vent structures, which were mastered by Eagle1, couldn't have made this deck so accurately without their help!
Here are the Engine Fans just mocked up in place (later centered)
Here are all the Fans staged in place to ensure fit
This was cool to see the fans through the Vents from this angle just like the filming miniature.
And all the KoolShade installed with the various 'bent/damaged' vents.
And here's a wide view of the overall rear with the engine plate installed. The whole Engine Plate comes off/on as needed with flush mount screws.
Attachments
t2sides
Master Member
Next up is the Dish Assembly - It is elegantly designed by Maruska, including hardware in place that allows the base to rotate independently and the dish to rotate to any position desired. Exactly as the Original Filming Miniature. The first set of pics are the most of the raw original kit parts installed on primer, then the black primer, then the base white coat. I have a few additional parts (Vintage Shinano) that still need to go down, and this assembly will soon get the proper weathering and filters. However, as you will see, I completed the Dish with all the final weathering/scratches and finish, so it's nice and dirtied up compared to the A-Frame and Base.
This first one shows the


The Primer added

Rear of the weathered dish, base still waiting for finish.

This first one shows the
The Primer added
Rear of the weathered dish, base still waiting for finish.
t2sides
Master Member
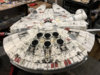
And lastly here's a few overall pics and the starboard side wall with several 'missing' parts on the current model added back in to reflect how this model looked for filming in 1976.
Here's a pic of the underside, it's about 90% complete


Here's where we are at today. The Dish is a good example of what the technique of final finish/weathering that still needs to be applied to the entire model will look like.

Here's a pic of the underside, it's about 90% complete
Here's where we are at today. The Dish is a good example of what the technique of final finish/weathering that still needs to be applied to the entire model will look like.
stevielewis
Sr Member
Spectacular!
SteveStarkiller
Sr Member
absolutely astounding, a dream come true!
Oh My...
Similar threads
- Replies
- 4
- Views
- 575
- Replies
- 207
- Views
- 13,418
- Replies
- 55
- Views
- 7,989