5 Foot Falcon Replica - ANH

Well, here's a few more getting us towards that ultimate paint day!!!

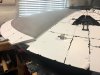
Here we have the top forward recess pit, walls built to conform to the hull

FWDTopPit1.jpgFWDTopPit2.jpg

Just needs the plating to come down and overlap where needed - coming soon!
FWDTopPit3.jpg


Then we get the "8RAD" pit mocked up in place, then settled in to the rear port Pit. Add some side support structure to get the walls the right width, and then bring on the plating to fit it all properly to size.
RearTopPORT2.jpgRearTopPORT1.jpg
Getting the Pit to fit in Just the right spot!


RearTopPORT4.jpgRearTopPORT3.jpg

Start adding plating in all the right spots.
RearTopPORT6.jpg
RearTopPORT5.jpg

And most of the plating is done here.
RearTopPORT7.jpg
 
Just not enough words to convey to you Sean on how mind blowing your build is, loving every update.
I'm dreading the process of installing the pit assemblies, great to see how you are tackling this. That 8-rad pit in place is another milestone, ughhh...running outa words here haha... .
You are nearly there at the end, so cool to have shared this journey with you my friend.
 
I love the updates on this build....it’s not only the accuracy of parts,...but also the accuracy of damage

I could stare at these images forever

J
 
NS4, Stu, joberg, Jaitea, peza, faustus, blastmaster, stevielewis, MUCH appreciated and THANK YOU!!! Very kind and nice of you guys!

She is beginning to come together like any good Hunk of Junk should! I've certainly made some errors here and there along the way. I wish I was patient enough to get all things 'perfect', but for me now, it's just keep putting her together and moving along. I actually really enjoy the 'eyeballing' component of building this. Having some amazing friends/support to help guide things towards perfect dimensions has been tremendously helpful and appreciative for all the intense, years and years of investigation, sleuthing, deconstructing, reconstructing, analysis, etc.... folks have put into this topic!

Faustus - regarding How Much?? I haven't even thought that far ahead, and really have no idea - it always comes down to what someone is willing to pay I guess. That pendulum swings FAR and WIDE on subjects like this.

Laspector - same thing they used back in the day, it's a common 'nibbler' tool, 1/4", all over the place on Amazon, Ebay, etc...

nibbler.jpg
 
Thanks Flimzy!!

Here's a quick update. Mostly completed Starboard Rear Pit panels. I still have a few minor tweaks to make, but it's close. My Plating is not 100% due to some early placement errors that I decided to live with. If I get ambitious enough, I can always pop off the styrene plates and redo them. It's at one of those points where you just decide to live with some compromises and small off-sets rather than laboring over trying to get every little nibble exactly in place. Also started on the side wall damage/weathering near the docking ring. I still have some styrene to chop off to make it look a bit more 'angled' as it goes up. But it's fun to melt the styrene and try to get approximate shapes/deformations.

Piping installed into pit, along with the 'T' channels meeting the 8Rad part (Happy with the way/angle these came out)

TopSTB1.jpg
TopSTB2.jpg
TopSTB3.jpg

Starting on the damaged side wall
TopSTB4.jpg
TopSTB5.jpg

Full view looking down
TopSTB10.jpg

And the long shot, the overlap on the rear quarter is looking just about right!
TopSTB6.jpg
 
A few updates from the weekend. Got started on the rear engine deck cover. Started off with adding the hull extension. It lined up very nicely. Then a modification to the Acrylic 'Lip', custom cut the cutout sections that are there on the original, and added the styrene plating. I haven't decided if I'll also add the taper right in the middle that would have accommodated the mounting pipe. Then placed the Lip on top of the extension, and finished adding the last of the plating. After that, it was on to a good coat of primer, and checking the overall fit on the hull. It's great seeing the side profile, the overhang looks just right! This was a big milestone as the radius and the curve had to be just right to fit the upcoming 'blades' that will go over the edge, and of course all the parts that are next to be added.

Here's the hull extension, nicely lines up with the existing extension.
RearDeck2.jpg
And a full view of the hull extension
RearDeck1.jpg
Here's the 'lip extension' with the plating installed and the 'cutouts' into the acrylic.

RearDeck3.jpg
RearDeck5.jpg
RearDeck4.jpg

The final plating installed on the lip, glued to the engine deck
RearDeck6.jpg

The overhang looks just about right!
RearDeck7.jpg

The Engine deck lip with the plating installed
attachment.jpg


Slapped some primer on the whole engine deck
RearDeck10.jpg
RearDeck9.jpg
RearDeck11.jpg
 

Attachments

  • RearDeck9.jpg
    RearDeck9.jpg
    392.5 KB · Views: 466
  • RearDeck8.jpg
    RearDeck8.jpg
    245.1 KB · Views: 646
  • RearDeck7.jpg
    RearDeck7.jpg
    281.9 KB · Views: 459
  • RearDeck6.jpg
    RearDeck6.jpg
    300.9 KB · Views: 453
  • RearDeck5.jpg
    RearDeck5.jpg
    236.1 KB · Views: 455
  • RearDeck4.jpg
    RearDeck4.jpg
    285.9 KB · Views: 447
  • RearDeck3.jpg
    RearDeck3.jpg
    263.3 KB · Views: 470
  • RearDeck2.jpg
    RearDeck2.jpg
    275.2 KB · Views: 474
  • RearDeck1.jpg
    RearDeck1.jpg
    304.4 KB · Views: 487
  • RearDeck10.jpg
    RearDeck10.jpg
    241.2 KB · Views: 440
  • RearDeck11.jpg
    RearDeck11.jpg
    255.5 KB · Views: 443
Unbelieevable. At first I thought the side walls were a tad to tall, but nope. Once the plating is on, it closes the gap. Nerd porn like finding your first Playboy.
 
THANKS much Fellas!! Yeah, it's also a bummer that the phone cam distorts it all a bit, looks really good in person, especiially those overhangs. They look even tighter and spot on in person!
So here's a bit more progress. Worked on the hull damage area on the front Starboard Side and some of the plating. I still have some minor tweaking to do in here, like widen up a couple of the holes a little bit and continue shaping to closely match the original filming miniature. It is so much fun melting and shaping the styrene though!

Starting with the thin styrene sheet that gets melted into the holes I pre cut in the acrylic hull.

Damage1.jpg
Damage2.jpg

Hull Plating cut/formed to match over the melted styrene holes.
Damage3.jpg
Damage4.jpg
Damage5.jpg
Damage6.jpg
Damage7.jpg
Damage8.jpg

A few of the side views as the plating and overlaps start coming together.

Side view before engine deck cover in place
Side1.jpg
Engine deck on
Side2.jpg
Side5.jpg
Side view with engine deck on with overhang.
Side3.jpg
 
THANKS much Fellas!! Yeah, it's also a bummer that the phone cam distorts it all a bit, looks really good in person, especiially those overhangs. They look even tighter and spot on in person!

Something that helps with the wide angle distortion of your camera is to step back with your phone/camera and zoom in a bit. 70mm focal length is a sweet spot and provides the least distortion.

Makes my day every time I see one of your updates. You're living the dream for so many of us mate!
 

Your message may be considered spam for the following reasons:

If you wish to reply despite these issues, check the box below before replying.
Be aware that malicious compliance may result in more severe penalties.
Back
Top