2018 Hasbro Marvel Legends props?...

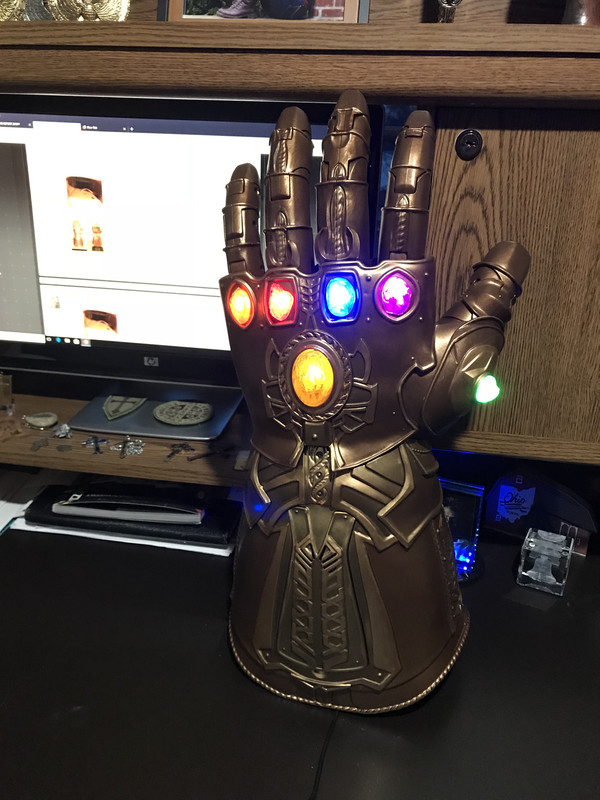
Just got mine today. It's great. Manipulating the fingers becomes kind of second nature after a while. I think for a child it may be too big. I just wish it had an on/off switch or a lights-only mode. The sound effects haven't become annoying to me yet though. As soon as you move a finger it turns back on. I think the battery cover should be on the inside, but it's not as big of a dealbreaker as it was for me on the Hasbro Stormtrooper helmet.

This may not be a smart idea, but I actually clipped the speaker from mine and the lights still work. The teardown is easy compared to the Star-Lord mask when people started modding those.

Sent from my SM-G935P using Tapatalk

I added a basic SPST rocker switch for the speaker. Simple to do:
1) Remove six screws from the electronics cover inside the gauntlet.
2) Remove two screws for the speaker hold down and lift the speaker up.
3) Desolder one of the wires going to the speaker and splice about 6" extra wire onto it (just to reach the switch).
4) Mount the switch on the electronics cover just off the side of the battery pack (there's plenty of room beside it).
5) Run a second wire (~6") from the switch and land it on the speaker terminal that you just removed the original wire from earlier.

Now you're able to use the lights without the sounds (reminded me of the seven dwarves mine train at disney). But if you still want to turn the sound on for whatever reason, just flip the switch.

While I was in there, I also put together a simple circuit to allow it to be ran from the batteries or one of the small 12V wall warts, only required a 78L05 regulator(since I used a 12v supply) and a couple of diodes. The female jack is inside the gauntlet, so not seen. I don't plan to wear it around, more of a display piece, but just like with the sounds, nice to have the option.

Here's a shot inside the gauntlet to give an idea on the switch placement (still need to put a grommet into the hole for the wire).

Gauntlet interior.JPG

Here's a quick before and after.
Gauntlet.png
 
Last edited:
Here's a shot inside the gauntlet to give an idea on the switch placement (still need to put a grommet into the hole for the wire).

View attachment 807635
Cool! I came with the same idea, but found a different place for my switch. I thought it was the most natural looking place to install it.
IMG_3846.JPG
Love your paint application, btw! I wish I had the skills to end up with anything similar. What kind of product did you use to get that metallic shine?
 
I like it, that is a natural looking spot. My main thought was just making sure the depth of the switch wouldn't cause it to hit, so went to the deepest area.

Didn't use any paint at all actually. After wiping it down with alcohol, I used different colors of Rub n Buff. I had gotten this 12 pack a couple years ago: http://a.co/cMCHBmk
Used mostly the gold colors, with the darker ones at any crevice and lighter ones on top surfaces. The Rub n Buff is easy to use, just go light on the coats, don't have too smooth of a base surface, and remember a little bit goes a long way (even using the 12 pack for multiple projects and the entire gauntlet, I've still got plenty left). Did the gauntlet in different sections and polished with a dry cloth.

After that, I used stove black polish (it darkens it slightly, polishes it some more, and acts as a wash). http://a.co/09quRmQ I put a somewhat heavy coat on, then wipe it with a wet cloth. Follow that up by polishing with a dry cloth. If there's too much black, use a wet cloth to wipe more off or if there's not enough, just do another coat. The stove polish is something else I've had and used multiple times.

Sidenote, I did find that powdered graphite works even better for polishing silver leaf rub n buff, but found that out after I did the gauntlet, so not sure how it works on the gold (though I assume would work well, but probably wouldn't provide the wash the stove polish does).

Cool! I came with the same idea, but found a different place for my switch. I thought it was the most natural looking place to install it.
View attachment 807950
Love your paint application, btw! I wish I had the skills to end up with anything similar. What kind of product did you use to get that metallic shine?
 
Last edited by a moderator:
I added a basic SPST rocker switch for the speaker. Simple to do:
1) Remove six screws from the electronics cover inside the gauntlet.
2) Remove two screws for the speaker hold down and lift the speaker up.
3) Desolder one of the wires going to the speaker and splice about 6" extra wire onto it (just to reach the switch).
4) Mount the switch on the electronics cover just off the side of the battery pack (there's plenty of room beside it).
5) Run a second wire (~6") from the switch and land it on the speaker terminal that you just removed the original wire from earlier.

Now you're able to use the lights without the sounds (reminded me of the seven dwarves mine train at disney). But if you still want to turn the sound on for whatever reason, just flip the switch.

While I was in there, I also put together a simple circuit to allow it to be ran from the batteries or one of the small 12V wall warts, only required a 78L05 regulator(since I used a 12v supply) and a couple of diodes. The female jack is inside the gauntlet, so not seen. I don't plan to wear it around, more of a display piece, but just like with the sounds, nice to have the option.


is it possible to make a switch just for the LEDs so that they are always on? if so how?

Are the LEDs 5v? Can I just resolder them to a new parallel circuit with a switch using the batteries?

7055bd12f8cd948b3b1ced2c64df2d3d.jpg
 
Last edited:
I didn't take mine that far apart, so I didn't get a look at the circuit inside. From the pic, I'm guessing the battery pack feeds a timing circuit, which feeds the LEDs (they look like they are in parallel).

First thing, find the output of the timing circuit (it looks like it might be right above the oval).
When you find it, then check the voltage there (might be a voltage drop after the timing circuit).

If you get 4.5V (or very close), then run a wire/switch from the battery pack positive to that point.
If there's a voltage drop, then drop the same amount and run the wire/switch.

is it possible to make a switch just for the LEDs so that they are always on? if so how?

Are the LEDs 5v? Can I just resolder them to a new parallel circuit with a switch using the batteries?
/QUOTE]
 
I ended up repainting mine too. After the sound switch modification, I had that feeling that I could do more with it. This is how it turned out.

IMG_4204.JPGIMG_4109.JPGIMG_4200.JPG
Now I have that small bug in my ear asking me to replace the stones for a better looking ones, but I don't know how to tackle this. Any ideas?

IMG_4204.JPG


IMG_4109.JPG


IMG_4200.JPG
 
I ended up repainting mine too. After the sound switch modification, I had that feeling that I could do more with it. This is how it turned out.

View attachment 810214View attachment 810215View attachment 810216
Now I have that small bug in my ear asking me to replace the stones for a better looking ones, but I don't know how to tackle this. Any ideas?

Take out the current ones, Make molds of them cast them in colored resin maybe do a fine sand over the ridges of each stone to give them a cool look when they're all lit up
 
I ended up repainting mine too. After the sound switch modification, I had that feeling that I could do more with it. This is how it turned out.

View attachment 810214View attachment 810215View attachment 810216
Now I have that small bug in my ear asking me to replace the stones for a better looking ones, but I don't know how to tackle this. Any ideas?
that is such a beautiful paint job with such an amazing finish, so i h =gotta ask what paint you used and how did you achieve that look.
 
I also put a switch to the speakers and I'm glad I can turn it off! I put the switch above the battery pack (where my index finger is)

Next is weathering...
ae0f18871524bbb9b0ae302cbe132897.jpg


FB: facebook.com/ironmarkprops1
IG: instagram.com/ironmarkprops
 
oops! I'll try again

- - - Updated - - -

that is such a beautiful paint job with such an amazing finish, so i h =gotta ask what paint you used and how did you achieve that look.

Looks amazing...I second that, what paint process did you use?
 
These things are impossible to find... I saw one once at a Walmart, couldn't get it at the moment, and now theyre all $200+ on ebay.
 
This thread is more than 4 years old.

Your message may be considered spam for the following reasons:

  1. This thread hasn't been active in some time. A new post in this thread might not contribute constructively to this discussion after so long.
If you wish to reply despite these issues, check the box below before replying.
Be aware that malicious compliance may result in more severe penalties.
Back
Top