You are using an out of date browser. It may not display this or other websites correctly.
You should upgrade or use an alternative browser.
You should upgrade or use an alternative browser.
Fullcock Blade Runner Blaster
- Thread starter Robiwon
- Start date
![20170918_190410[1].jpg](https://therpf-f28a.kxcdn.com/forums/data/attachments/427/427550-bbf47831f443fdfa40a3dbfbd566871d.jpg "20170918_190410[1].jpg")
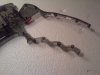
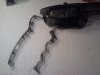
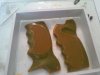
Going to invest in proper mold making compound. While the silicone caulking method worked, I did not get a smooth shiny surface on my parts. I attribute that to the caulking having corn starch in it. This would be good for solid parts but not transparent. They did come out good otherwise. Need to clean up the edges where it ran over. I'll call these Just a test and do another set in a "real" mold.
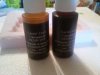
I think for the next set though I'll add a drop or two of red tint to my amber to get a richer color.
I think for the next set though I'll add a drop or two of red tint to my amber to get a richer color.
Attachments

sla73
New Member
Going to invest in proper mold making compound. While the silicone caulking method worked, I did not get a smooth shiny surface on my parts. I attribute that to the caulking having corn starch in it. This would be good for solid parts but not transparent. They did come out good otherwise. Need to clean up the edges where it ran over. I'll call these Just a test and do another set in a "real" mold.
I think for the next set though I'll add a drop or two of red tint to my amber to get a richer color.
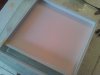
Yea man, good decision. I was blown away with the detail the pink silicon picks up!
Cheers Bryn
renegadecow
Active Member
See if you can just smooth it out with polishing compound. Even the urethane cast ones you get from kit builders come slightly frosted and requires a bit of compound and elbow grease to get it clear.While the silicone caulking method worked, I did not get a smooth shiny surface on my parts. I attribute that to the caulking having corn starch in it. This would be good for solid parts but not transparent.
I had the same issue with another manufacturers clear resin years ago. The area exposed to open air while in the mold cured perfectly, while the side touching the mold never fully cured. That side remained tacky for years.
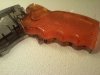
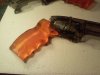
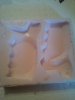
After leaving my grips outside in the sun while at work, I'm happy to report that both grips are fully cured! Mike Salzo posted on my FB page that the mold itself, the silicone caulking, and the fact I didn't let the mold cure and gas out likely caused my issue with the resin not curing.
Lesson learned. Let your molds cure for two days before pouring resin!
Now I need to clean them up and cut out the water tank from the guns frame.
Lesson learned. Let your molds cure for two days before pouring resin!
Now I need to clean them up and cut out the water tank from the guns frame.
sla73
New Member
Robiwon, Did you cut the nibs off the inside of the grips?.. For my mold box I used corrugated cardboard for the base and pushed the grips into the cardboard.. I had a small amount of leakage but the flap that was created was easily removed. Bonus was that This also gave me a fill line for the resin..

Cheers bryn
Cheers bryn
BACABreath
Member
Wow... very nice... I can not wait until the new movie comes out!! ")
Similar threads
- Replies
- 16
- Views
- 1,003
- Replies
- 2
- Views
- 658
- Replies
- 61
- Views
- 5,098