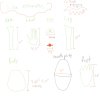
Hand stitched Kermit the Frog puppet replica!! (Early builds/old patterns)

Re: Custom Kermit the Frog puppet replica!!

Awesome, thank you!

I figure I'll do another pass or two at the head, but time to move forward! I cut out the foam today to make the body. The only foam I could find was 2", so I cut out the pieces at the 7.75" size, and found that you were exactly correct - it was WAY too thick. I wound up cutting it in half depth-wise, and then in half AGAIN, so I wound up cementing pieces together that were closer to 1/2" in width. I also wound up using part of one of those cut in half pieces to space out the whole form. I found 6 pieces to be too tight, and adding a 7th made it feel closer to correct...(EDIT: Make that 8 pieces. Once I measured the circumference I found I was at about 19". Adding the 8th piece brought me to about 20.5 which was more in line with the measurements you provided.)

Man that contact cement is no joke...probably shoulda done this part in the summer...even in the garage with a door open its fumes-city.

Few more quick questions for you!
1 - How did you cut the pupils out so cleanly? (also the tongue/throat cutouts). did you scissor cut, or use an x-acto knife? I tried both and with the small nature of the cuts was finding each way to be challenging.
2 - Any lead on where and what color specifically you used for the collar/feet? I've tried my local shop as well as ordered some from a shop on Ebay that seemed to have the right color - but neither are anywhere close to what his collar looks like.
3 - Did you do any trimming to the body form once it was cemented together? Or did the wrapping of the fleece even out any shape imperfections to your satisfaction?

I'm having a ton of fun doing this (and my kids are loving it) - so thanks for inspiring me and others!
 
Last edited:
Re: Custom Kermit the Frog puppet replica!!

Awesome, thank you!

I figure I'll do another pass or two at the head, but time to move forward! I cut out the foam today to make the body. The only foam I could find was 2", so I cut out the pieces at the 7.75" size, and found that you were exactly correct - it was WAY too thick. I wound up cutting it in half depth-wise, and then in half AGAIN, so I wound up cementing pieces together that were closer to 1/2" in width. I also wound up using part of one of those cut in half pieces to space out the whole form. I found 6 pieces to be too tight, and adding a 7th made it feel closer to correct...(EDIT: Make that 8 pieces. Once I measured the circumference I found I was at about 19". Adding the 8th piece brought me to about 20.5 which was more in line with the measurements you provided.)

Man that contact cement is no joke...probably shoulda done this part in the summer...even in the garage with a door open its fumes-city.

Few more quick questions for you!
1 - How did you cut the pupils out so cleanly? (also the tongue/throat cutouts). did you scissor cut, or use an x-acto knife? I tried both and with the small nature of the cuts was finding each way to be challenging.
2 - Any lead on where and what color specifically you used for the collar/feet? I've tried my local shop as well as ordered some from a shop on Ebay that seemed to have the right color - but neither are anywhere close to what his collar looks like.
3 - Did you do any trimming to the body form once it was cemented together? Or did the wrapping of the fleece even out any shape imperfections to your satisfaction?

I'm having a ton of fun doing this (and my kids are loving it) - so thanks for inspiring me and others!


The foam thickness really does "add up" once you start gluing things together! During my research, I know some people suggested 1/2" foam, but I felt it was too thin and would need some kind of internal support, but even the 1" foam I used needed a lot of trimming! But as with the fabric, it's better to have too much than too little, as you can still trim it to shape. The tough part though with such thick foam is that you may need to trim around the openings so that your arm/hand can fit through it, which may be more tricky.

The number of pieces necessary to create the body does seem to change--I noticed that on my builds as well. Could be because of small variations in how they're cut. As long as you're able to get it into shape, it's all good!

Contact cement is VERY strong smelling indeed. I try to make sure the cap is on when I'm not brushing the glue onto the pieces...but even then the smell has a way of getting everywhere haha. Probably a good idea to wear a mask, although I get lazy sometimes and forget.

1: For the pupils, I just cut them out by hand. As you've discovered, they're surprisingly difficult to cut out neatly. A smaller pair of scissors would help. I just cut mine very slowly and carefully. The most difficult areas are the corners around where the circle meets the side rectangle shapes. Even then, I had to cut out quite a few until I got two that I liked. I don't really have any tricks for this part; just cutting very slowly and trying a bunch of times. Although someone with a cricut (decal cutter) machine could do it on that I imagine.

2: I got my felt for the feet/collar from an ebay seller named "overtheriverfelt". I bought the "Lypple" collar. You'd think this color would be fairly simple to find, but I had a hard time during my search. This Lypple color is a bit too green, but the shade is very close. I still had to dye it with a hint of yellow to get it to what I felt was more accurate. They also have another yellow/green color that is close, but I think too yellowish, but I forgot what the name is. That seller has quite a lot of colors available, and the quality of the felt is pretty good.

3: Yes I did do a lot of fine tuning to the body form after it was glued. Mostly because I probably didn't do a great job with that--there were some ridges that weren't smooth enough that I had to fix up with some trimming. The fleece does even out some imperfections though! One thing you could do is prepare the fleece you'll use to wrap the body with and pin it on to get a good look at how the surface is looking. I'm super picky about bumps, etc., so I did a lot of trimming on mine. But generally, it should look fairly clean already.

Glad to help! It is a fun project--even if frustrating at times--but very much worth it! Wait till you start to see his forms coming together! It's a really fun thing to see for sure.


I drew this up last night for the eye assembly in case it was unclear in my earlier drawings. The "expanding" foam is the stuff you can find at the hardware stores (For sealing around doorways, etc.). Very easily trimmed, but expands A LOT, so when using it, just be conservative about how much is sprayed in there. I don't think it's even 100% necessary to use it, but the ping pong is just so flimsy, so this stuff makes the eye feel more solid.

IMG_2290.JPG
 
Re: Custom Kermit the Frog puppet replica!!

Thanks again for all the great tips! I'll go check out that eBay seller now! I have some small scissors...I guess it's just time to get patient!

What I wound up doing was trying the idea from the Tested video of Adam's puppet build of using dress boning to create 3 rings inside the body to help support the form. Seems to have worked very well. Definitely getting ridges around the form once I pinned the fleece on - which I'm not loving - but I'm worried I don't have enough foam in there to trim them too much before I lose structure. As an option, once I have the fleece mostly fitted and partially sewn up, I'm going to try do put small amounts of the synth stuffing in between the foam and the fleece to even out the form. We'll see...otherwise I might try taking another piece of muslin or just a sheet and covering the form first to tighten up the form, then put the fleece over that.

IMG_2183.jpgIMG_2182.jpg
 
Re: Custom Kermit the Frog puppet replica!!

Good idea with the dress boning. I think I saw that same video; it’s very informative. Your idea of adding stuffing between the foam and fleece would work; I’ve done something similar on another build. Looks like you’re making pretty good progress!
 
Re: Custom Kermit the Frog puppet replica!!

Thanks! A lot of the fun is sharing in the process. It was a really amazing project to work on—probably the most fun prop project i’ve ever attempted—and I’m glad I can help others build this amazing character.

I will eventually compile my build diagrams/instructions into a PDF for easier viewing. I’ve been adding a few more here and there as questions arise that I can try and answer so it’s still growing. Sometimes a visual is more helpful than a written description.

V8YpFqM.jpg
 
Last edited:
Re: Custom Kermit the Frog puppet replica!!


I was looking in detail at my MR poser Kermit and noticed this exact technique! Definitely going to use it once the right colored felt shows up! Also I wound up using the stuffing in the body - worked out pretty well. Might have to do a little work to hit any lumpy spots but it looks much nicer and more rounded.

A few more questions!

1 - I'm about to sew my limbs onto the body - did you cut holes in the body to match the limbs, or did you just Henson-stitch them to the body as-is? (I'm also considering making the legs removable since the real Kermit puppets varied as to whether or not they had their legs all the time.)

2 - Did you have a pattern you used for the hand? I looked at the many diagrams and things and I'm not sure I have a "print and cut this out" template - is it the one with the lines drawn over a photo of the hand?

3 - What kind of finishing did you do at the bottom end of the puppet? How did you connect the bottom of the fleece to the foam at the bottom? I'm thinking about having mine attach to a short green fleece sleeve like the original Kermit usually had, which I can then fold up into the puppet when I don't want to use it. I'm also thinking about maybe making a sleeve type liner for inside the puppet anyway. What did you do?

4 - Did you do anything special inside the limbs to help them maintain their joints? Right now I've just sort of pushed the stuffing away from the joint, but I wonder if there is more I should do. The poser obviously had separate stuffed sleeves for each part of the limb, and the wire armature inside, so it's not a huge help on how to configure the puppet. But the arms on yours in photos look just right!

5 - I saw an article about shaving down antron fleece when you're done to give it a more polished, professional look. I'm curios if you attempted this and if so what you thought?

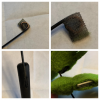
I put the eyes together yesterday - I'm pretty happy with how it worked out. I haven't filled mine with foam, and I wound up using Krazy glue to get the nylon bolt to stay (the 5 minute epoxy hadn't solidified after like 10 minutes and I got impatient :) Please let me know how you think they look?

IMG_2248.jpeg(I have no idea why this is oriented sideways - sorry! It isn't like that on my computer...can't seem to change the orientation in the forum here...)
 
Re: Custom Kermit the Frog puppet replica!!

I was looking in detail at my MR poser Kermit and noticed this exact technique! Definitely going to use it once the right colored felt shows up! Also I wound up using the stuffing in the body - worked out pretty well. Might have to do a little work to hit any lumpy spots but it looks much nicer and more rounded.

A few more questions!

1 - I'm about to sew my limbs onto the body - did you cut holes in the body to match the limbs, or did you just Henson-stitch them to the body as-is? (I'm also considering making the legs removable since the real Kermit puppets varied as to whether or not they had their legs all the time.)

2 - Did you have a pattern you used for the hand? I looked at the many diagrams and things and I'm not sure I have a "print and cut this out" template - is it the one with the lines drawn over a photo of the hand?

3 - What kind of finishing did you do at the bottom end of the puppet? How did you connect the bottom of the fleece to the foam at the bottom? I'm thinking about having mine attach to a short green fleece sleeve like the original Kermit usually had, which I can then fold up into the puppet when I don't want to use it. I'm also thinking about maybe making a sleeve type liner for inside the puppet anyway. What did you do?

4 - Did you do anything special inside the limbs to help them maintain their joints? Right now I've just sort of pushed the stuffing away from the joint, but I wonder if there is more I should do. The poser obviously had separate stuffed sleeves for each part of the limb, and the wire armature inside, so it's not a huge help on how to configure the puppet. But the arms on yours in photos look just right!

5 - I saw an article about shaving down antron fleece when you're done to give it a more polished, professional look. I'm curios if you attempted this and if so what you thought?

I put the eyes together yesterday - I'm pretty happy with how it worked out. I haven't filled mine with foam, and I wound up using Krazy glue to get the nylon bolt to stay (the 5 minute epoxy hadn't solidified after like 10 minutes and I got impatient :) Please let me know how you think they look?

View attachment 783844(I have no idea why this is oriented sideways - sorry! It isn't like that on my computer...can't seem to change the orientation in the forum here...)


Awesome! Your Kermit is looking great! I like where it's going; he's already shaping up nicely. It's Kermit for sure :D

1: I didn't cut any holes in the body to match the limbs, as I found that it's simple enough to just pin the limbs to the body and sew them right on. I believe the MR puppet had holes around these areas, but those had to, for the interior armature to fit through. No idea if the original puppets have holes in these areas, but I didn't see any need for them so left them out. That's quite a neat idea for making his legs removable!! There are indeed Kermits with no legs that were used quite often in the shows.

2. I went ahead and cleaned up the "pattern" for the hand. It's more of a template that you can work directly on. The hand has quite a few parts to it, so this guide will help in its construction. For the armature/jewelry wire, I would recommend getting one that is softer and more easy to bend (some of them are quite stiff). The softer wire will put less stress on the glued part of the wire when bending. This is just what I did for the hand--No doubt there are many other ways to do it!

Here's a pic of an updated hand template:

hand.jpg

hand tips.JPG


3: For the bottom end of my puppet, I used contact cement to glue the part where it folds into the body first. If your fleece doesn't have enough length to fold into the bottom hole, you can sew an inner liner in. I made a kind of "inner sleeve", which was nothing more than slightly rounder looking cylinder tube out of the antron fleece, and sewn it around the bottom opening first, then just pushed the tube inside the body--giving the inside an antron fleece lining essentially. I may need to draw this out as it's kind of confusing in writing. I know on many original puppets there is also an "arm sleeve" that is attached to the bottom which covers the performer's arm. You could do that too, but I decided not to do that on mine since I'm mostly putting mine on display. Basically, I suppose you could say I made a shorter arm sleeve on mine but have it pushed into the body to act as a liner, if that makes sense!

4: I actually didn't do anything around the joints except keep them empty of stuffing while I stuffed the limbs. I had the joints "pinched" with a clip, to keep those areas free of stuffing. I would say to not be afraid to make the joints bigger—visually it’s not obvious, but he’ll be so much more flexible and expressive. You just dont want to end up with stiff noodle limbs haha! So far, the joints on mine seem to be just fine! The stuffing doesn't really move much inside once everything is attached. Even having moved his harms and legs around a lot, the joints on mine are still the same as I made them. On quite a lot of references--especially his arms--kermits arms can look quite flat and flexible, especially around the forearms. Sometimes he looks more "stuffed". It seems this varies some. Personally, I prefer his limbs to look slightly less "full", as in not overstuffed.

5: I've read about the Antron shaving as well! I didn't do it on mine as I actually wanted mine to look slightly ruffled and "worn", because he often looks that way on the originals--having been performed and used so often! As you've probably noticed, the antron does get fluffed up quite a lot just handling it during the building process. I'm curious though how that process works, as it would be a good skill to practice, in case you did want the "as new" look.

- - - Updated - - -

There's something very aesthetically pleasing about this image to me. As a big art nerd, there's something expressionistic, almost Kadinsky-like, about this that speaks to me.


Thanks! I hadn't expected to draw up the diagrams until I realized descriptions can only go so far to explain the build process. It's also surprisingly fun to draw these. I'm using the procreate app on the ipad to do them, which I haven't used much. I'm planning on doing a few more!
 

Attachments

  • hand.pdf
    406.4 KB · Views: 797
Last edited:
Re: Custom Kermit the Frog puppet replica!!

I went ahead and compiled the "notes" I've drawn up so far into a PDF file. Should be easier to look through this way. It's not a comprehensive build tutorial, but helps to illustrate some parts of the build. I'll add to it if I happen to draw up more pages.

PDF can be accessed here (on my google drive). Just download it from here: https://drive.google.com/file/d/1YHMnhu2aQEbUqg92xkbbHC3yyk0jOF9G/view?usp=sharing
 
Last edited:
Re: Custom Kermit the Frog puppet replica!!

This may have been asked before but if I glosssed over I apologize. The red ultrasuede ? Is there a specific color we should be looking for ? Or just any maroon-ish type color ?

I am going to look up felt dying on my own time for the procedure but I'm assuming because you needed more yellow you simply dipped the felt you had in a yellow dye bath for a short period to get the color you needed ? It wasn't like a little yell and some green and purple to counteract the etcetc type of dye bath ? Lol


I pretty just used a standard red piece of ultrasuede, https://rover.ebay.com/rover/0/0/0?mpre=https://www.ebay.com/ulk/itm/182059947305. I figure anything around that color would work (looks straight up red from the references I’ve observed).

The “Lypple” color felt really only needed just a hint of yellow to it. I gave it a quick soak in the yellow dye bath. I suppose one could either do a quick soak in a more concentrated yellow color, or a longer soak in a lighter solution (if you want to give it more time for the dye to get deeper into the fibers). The color of the collar is somewhat hard to pin down, as it can look very different in pictures of the actual puppets. Personally I think a “lime green” with a hint of yellow to it seems to work well enough. Something within that range. For the Lypple felt, only a yellow dye was needed, no other colors.
 
Re: Custom Kermit the Frog puppet replica!!

This feels like a stupid question, but how did you go about printing your patterns ? I've tried straight printing at 100% scale but the printer options don't load a tiling option, I'v tried scaling in microsoft office and printing the collar it try to tell me it'll take 144 pages for the collar.... Would it be easier to send these files to a printer with a plotter and just make sure they're all printed at 100% ?

The files I uploaded were what i used to print directly out of photoshop. I probably should reformat them to fit existing paper sizes though, but not really sure how else to go about it! I printed the larger ones (the ones that don’t fit on standard sized 8.5 x 11 sheets) out on 11x17 paper, and smaller ones on the standard letter sheets. I’m guessing different programs might interpret the sizing in different ways. When I have time I think I can try saving them as PDF files with the page dimensions set...which i hope will make things print more smoothly.
 
Re: Custom Kermit the Frog puppet replica!!

I've uploaded PDF files of the patterns via my google drive link here:

https://drive.google.com/drive/folders/1yORPMoEfYCEfyP7AwcRTB0dFqvEHz3bz?usp=sharing

I made notes on each file which ones should be printed out on 11x17 pages and 8.5x11. Hopefully that works! Also one tip is to print them out on either thicker paper or cardstock--not really 100% necessary--but it'll make them easier to work with when tracing onto fabric. Mainly pertains to the collar graphic, as it tends to move around during tracing.

3sizes.jpg
 
Re: Custom Kermit the Frog puppet replica!!

Wow, thank you. I highly appreciate the PDF files. I was about to take everything into CAD and scale them lol, I really, really appreciate the uploads. I recently got my order of fleece in and the lypple felt. ultra suede is stolen the way. I've never been good at sewing, but I recently moved and no longer have my tools or workshop, so I have been looking for a new project and I figured it was time to learn something new. I've been collecting info over the years for this project but your wonderful tutorial and info have finally pushed me over the line to get this done. I can't wait.

You’re welcome! I imagine these should be easier to print out at the correct scale. Prior to this project, I had very little experience with sewing, but after practicing the Henson stitch for a while, it’s really not all that bad—it seems to be a very versatile way to stitch something together. Also the stitching part is really just repetition after a while, and it has a way of becoming easier the more you do it.

Glad I could help! The fun is really all in the build process, so I’m happy to help motivate people to do this, as I know how much I’ve wanted to make Kermit for years, but never really knew where to start. It was an old thread here on the RPF that sparked my motivation to finally jump into it, so it seems only fitting that I share my experiences here as well!
 
Re: Custom Kermit the Frog puppet replica!!

Hey ecl,

Thanks again for all your efforts in sharing your process, knowledge, patterns, and answering so many questions! I just today put the finishing touches on my Kermit v.1, and while I can certainly see places I'd adjust in v.2, I'm so happy with what I wound up with, and I absolutely couldn't have done it without your inspiration and help!! So THANK YOU!!

A few thoughts from my final steps:

- I found on that same (Over the River Felt) Ebay shop a felt that is a great color for the collar/bottom of the feet. The color is called "Spring Tickle". I just bought another 4 pieces of it for future use cause finding a color you like for that is HARD. Might be a little on the yellower side, but I like it.
- I decided to just sew the legs onto the body. The only way I thought I'd like a removable leg would be using magnets because I didn't want to see the fasteners when they weren't on, and I didn't have the time now to find magnets and work out how to set up the legs to work that way.
- For arm rods, I did a modified version of how they do them at the Henson shop. Used dowels with slots and holes cut and drilled, then used welding rods cut to size and bent. CA glued them into the dowels, painted the whole thing black, and then glued small, plastic "velcro" (much more sturdy then regular velcro) to the top of the arm rod. This part connects to the other half of the velcro hidden inside the hand on the plate of styrene I epoxy'd the finger wires to. I left a slit cut in the hand, so the arm rods are now easily removable. (going to cover the dowels in gaff tape later this week).
- I attached a green fleece sleeve to the bottom of the puppet that can be used to have the performer's arm blend in with the puppet, or can be rolled into the body to be hidden and create a nice inner sleeve depending on how you want to use it.
- I tried a few variations of the hands, including contact cementing the hand as a whole and cutting the fingers afterward, and sewing the fingers together, before finally doing it the way you suggested and contact cementing them together after they've been cut. That worked pretty well. I wound up keeping the thumb as part of the main hand, and then just sewed the palm on near the thumb and fingers, and cut a slit where the arm rod goes.
- I'm finding it a little tricky to keep the collar pointed down after being added to the body, so I think in future builds I might try to iron the lip into the piece before attaching it.

Overall I'm happy. The eyes need some work, and the head shape still isn't 100% where I want it to be. The body needs a little work too - might be TOO big/round...and definitely I want to make the neck a little thinner next time around.

But man what fun!

kermit.pngarm rods.png
 
Re: Custom Kermit the Frog puppet replica!!

Wow congrats!! It turned out awesome, espesically for your first one. I think you’ll find building the second to be so much easier. When I started on my second, and then eventual third, I was able to focus more each time on making refinements and personal touches until I felt most satisfied. Looks like you did really well. Pretty cool to see Kermit come to life isn’t it? Thanks for your suggestions and bits of info that you came up with during your build. I’ll have to keep an eye out for that other green felt. It is surprisingly difficult to find that “just right” color for the collar...which is pretty amazing honestly, as it seems like something that would be common? I even went to crafting shops around here, some with a wall of different felt colors....but nothing close to this color haha. But then again, it’s not easy to get an “exact” color match from references, as the lighting and aging of the pics affect the color. I think the best we can do is come up with an average that looks good with the fleece color.

Kermit’s collar positioning can vary a lot depending on how it’s sewn on the neck. There are some references where the points are pointing all over the place (almost as if the collar curves downward, creating some space between it and the body), and some that appear to “stick” very closely to his body. I think it’s just that every single build, despite beginning with the same patterns, etc., will naturally vary, but it’s worth playing around with to try out a few different looks. Also when stitching the collar on, stay very close to the edge of the collar, and keep the stitches close and tight.

I like your idea for the arm rods...velcro! I hadn’t thought of that! I skipped the arm rod portion on my build (although, as you’ve done, the pattern can definitely be modified to support them). Making the thumb as part of the hand works great too; I believe the MR replica is like that—I can at some point modify the hand template with this construction method to make it easier for future builders too.


Great job—he’s definitely Kermit! Glad to see the thread helped your build; that’s what it’s all about! Definitely update when you start on your next builds!
 
Last edited:

Your message may be considered spam for the following reasons:

If you wish to reply despite these issues, check the box below before replying.
Be aware that malicious compliance may result in more severe penalties.
Back
Top