You are using an out of date browser. It may not display this or other websites correctly.
You should upgrade or use an alternative browser.
You should upgrade or use an alternative browser.
Deadpool 2:Cable
- Thread starter JLeezy23
- Start date


went from this composite panel
View attachment 831535
to this uncompleted BFG
View attachment 831536
Will keep the WIP coming.
It’s looking fantastic Archangel! I look forward to seeing progress pics!
So I took the morning to get more work done on my build. I originally bought 1/4” and 3/8” rods to run the length of the shroud, but neither fit right. This week I just ended up special ordering a 5/16”, which no one seemed to carry around me. It came in yesterday, and fit incredibly well. The fit is important because this method is specifically to massively increase the durability of the prop.


With that squared away (or rounded out... wakka wakka) I grabbed my tools and started filing/sanding the surfaces in preparation. After a thorough job with the file and sand paper, I did a couple quick passes with a brass brush, and started brazing the suckers together.


Still new to the technique, I began brazing the rod into the shrouds. I stared by attatching it to one side, then lined it up with the other. Not the prettiest, but it is strong. Interestingly enough, the heat actaul ended up discoloring the finish of the metal. In the picture before they’re attached, you can see that the top one is still black, but that soon changed.


I’m really happy that I was able to get them together, but still being new to the methods, I didn’t have all of the best tools on hand to ensure the rails would be perfectly lined up. As much as I wish I don’t make mistakes, I’m far from perfect. Figured I would share my f-ups as well as my successes haha


Yuck... luckily once the gun is all assembled, it’ll be such a small imperfection that most normal people won’t notice. That’s not even my biggest f-up today... I am a massive supporter of safety. I constantly wear protective equipment, you’ll probably see my safety glasses and tons of other protective gear scattered all over my work spaces. Safety is INSANELY IMPORTANT while crafting, especially when working with power tools or flame. So I’m always wearing my safety glasses... but for some reason today, I lifted them up on my forhead to look at something and forgot to put them back down. I then proceeded to reapply the flame onto my work. Within a handful of seconds, some moisture in the concrete I was working on blasted 700 degree sand and stone with a pop. A piece of heated debris melted itself into my contact lens. Thankfully that lens acted surprisingly as a protective layer, and I’m fine, but I definitely should have put my glasses back down. That could have ended a lot worse, and is a mistake I hope to never make again. The lens was ruined, but my eye is fine. So safety first fellow crafters!

But that’s not going to discourage ol’ toggle, no sir. I then took the shrouds to the belt sander to prep them for epoxy. I have plans for a much stronger method of attaching the upper and lower shrouds, but I’m only a month out from Chicago Comic Con and have a lot of other things to do before then. This is quick, easy, reversible, and good for the time being.


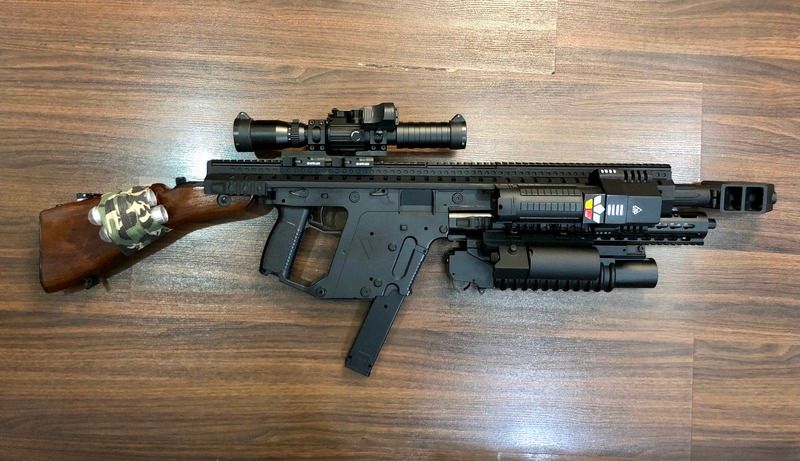
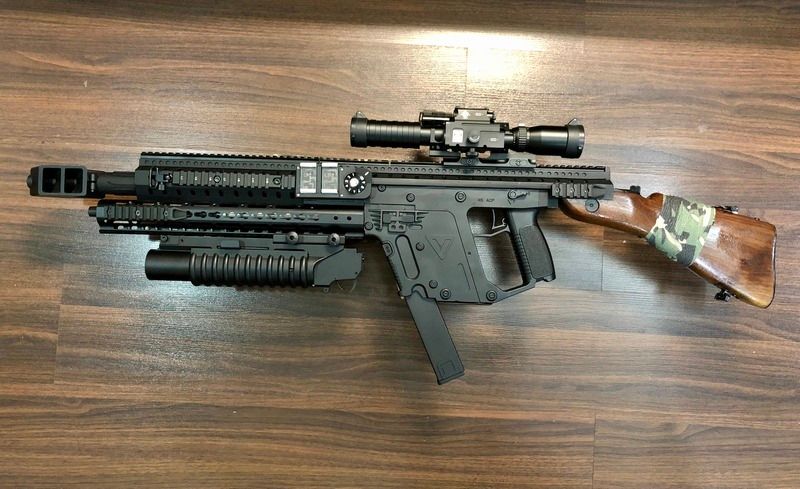
And lastly, I started preparing the upper barrel, getting ready to mount that behemoth. I trimmed it so the flash hider starts at the end of the lower barrel, which looks to be about where the hero from the movie rests in length. But I left a portion of the barrel in tact, so I can drill and tap some mounts that will go directly into the Kris and still be relatively sturdy. That last picture show the whereabouts I’ll be drilling through the mounts.


So now the barrel slides into place. I have a little more touch up to do, and may toy around with the length a little more. Right now I’m also working on my end cap and stock mount, but I’ll show the progress on that when it’s all fabricated and installed. It’s so close I can taste it.. At least now I can pick the whole thing up and play with it, which is super fun haha. Right now it’s just under 15 pounds, and feels amazing.


Dude. picture 22. Dude.......
You and soulinertia are killin the "heavy" builds.
Also i am loving all the arm and BFG entrys, this is all so awesome.
Dude. picture 22. Dude.......
You and soulinertia are killin the "heavy" builds.
Also i am loving all the arm and BFG entrys, this is all so awesome.
Thanks! I'm digging all of the arm and BFG builds, it's so cool to see all the different methods and approaches we all take to replicate the same pieces. So much fun.
Damn @toggle47! So lucky your a contact wearer bro!
https://i.ytimg.com/vi/Far6hbt3CCA/hqdefault.jpg
Seriously, I've never been more grateful for my bad eyesight hahaha
I'll be ordering in my Fenix in the next week or so, what type of mounts did you guys buy to hook on there? I'm kind of leaning towards something like a bipod adapter, which would give me a pretty sturdy hold onto the rail. I guess it also depends on how the weight of the light is distributed to the threaded hole on the back too. Any insight from those of you who already have your lights will be greatly appreciated!
Working on a second one . . .

Some parts are just placeholders. Other parts I still need to acquire.
Some parts are just placeholders. Other parts I still need to acquire.
michaudtime
Well-Known Member
Wow!!! Love this!! Working on my own 3d model right now. One question though, I shave my head (So it looks like a choice rather than my body's cruel joke LOL)and I'm looking for a cable style wig. Anyone got any ideas?
Working on a second one . . .
https://i.imgur.com/3jTD8c4.jpg
Some parts are just placeholders. Other parts I still need to acquire.
Awesome! Looking forward to your next build! Any major changes you’ve decided on since your last build?
Wow!!! Love this!! Working on my own 3d model right now. One question though, I shave my head (So it looks like a choice rather than my body's cruel joke LOL)and I'm looking for a cable style wig. Anyone got any ideas?
As it turns out, I shave my head too, so I don’t look like a balding fuzzy peach. I ended up going for a toupee, which I cut, colored, and styled.

I have a little more work to do on it, but I’m getting better at making it look like real hair and hairline (the picture is from a couple of months ago, and that was my first time ever putting on a hair piece that wasn’t a cheapo wig from the halloween store, so it’s somewhat noticeable). Not sure what you’re looking to spend, but if you don’t mind paying a little more, I’ve included a link to the one I bought. I went with the off black, which I think was a good base color.
Sorry for the bad angle, this is one of the only pictures I have of me in costume, and my short friend (who couldn’t even recognize me without my beard and with a full head of hair) didn’t quite snap the perfect picture to showcase the piece. Maybe tomorrow I’ll snap some more pictureswith my ipad thing for you to get a better idea.
Last edited:
inhumanoidstmd
New Member
Hi! This is my first time to post on the RPF, ive been a member here for a long time. I have to say that everyone here is an inspiration on many of my builds. I finally had the guts to share one of mine because of all the information and the camaraderie of every member in the RPF. Thank you guys, now here is my take on the BFG.
Almost every part is working, the main part is an airsoft gel gun shooter(still shoots), flashlight works(scratch built), laser , scope, sight optics, airsoft grenade launcher , even the amp knob rotates. You can take out the thingies strapped on the buttstock and the two square chips beside the knob.


Almost every part is working, the main part is an airsoft gel gun shooter(still shoots), flashlight works(scratch built), laser , scope, sight optics, airsoft grenade launcher , even the amp knob rotates. You can take out the thingies strapped on the buttstock and the two square chips beside the knob.
Last edited:
Hi! This is my first time to post on the RPF, ive been a member here for a long time. I have to say that everyone here is an inspiration on many of my builds. I finally had the guts to share one of mine because of all the information and the camaraderie of every member in the RPF. Thank you guys, now here is my take on the BFG.
http://i31.photobucket.com/albums/c...oads/161DF13B-7896-446A-836A-88B88FE6B3DC.jpg
http://i31.photobucket.com/albums/c...oads/8DC3BDCF-2164-4E8E-B325-AED9C4F52ED2.jpg
Almost every part is working, the main part is an airsoft gel gun shooter(still shoots), flashlight works(scratch built), laser , scope, sight optics, airsoft grenade launcher , even the amp knob rotates. You can take out the thingies strapped on the buttstock and the two square chips beside the knob.
Awesome work on your BFG! Did you ever figure out what those things wrapped onto the stock are, or just model some accessories based off the photos? And great work on that upper shroud, pretty damn accurate. 3D printed?
inhumanoidstmd
New Member
Hi toggle47! Thank you for the compliment! I have no idea what those things are on the stock but i based mine on the more recent pics of the BFG on the net. They look like round transparent bottomed silver cylinders which I duplicated using glue stick containers hahaha
The upper shroud was made from sintra, pvc tubes and wood which I drilled and shaped everything by hand and was a pain!
The upper shroud was made from sintra, pvc tubes and wood which I drilled and shaped everything by hand and was a pain!
Hi toggle47! Thank you for the compliment! I have no idea what those things are on the stock but i based mine on the more recent pics of the BFG on the net. They look like round transparent bottomed silver cylinders which I duplicated using glue stick containers hahaha
The upper shroud was made from sintra, pvc tubes and wood which I drilled and shaped everything by hand and was a pain!
Great work! I keep thinking they may be morphine vials or something, but the rounded edge keeps throwing me off. Fingers crossed that there’s more information on the Blu Ray next month.
inhumanoidstmd
New Member
Here’s hoping we get more BFG details when the blu ray comes out.
He he.... I know what those “thingies” are wrapped on the buttstock.")
I’m assuming they are covered by NDAs and the like, but any hints would always be welcomed haha.
I never realized there was more to them, but I’m still stumped. Is this going to be one of those “duh” moments when we do figure it out?
kcpstudio
Sr Member
Oooo.... toggle47! So close bro!!!! You got a screen grab. It’s right there in front of you. Okay, clear your head. Don’t think too much into it. Look at the pic. Concentrate on only one of the two. Think. Look at the shape. Look at the details. Get a piece of paper and redraw the thing with every line. And think of anything that would look like that.
Im not going to ruin it for others in the game. There is only one among you i told what it is. Ive asked him to keep it confidential to give the rest of you gents some time to rack your brain around it. Its all in good fun and really enjoy watching you guys pick this **** apart. Its like Dick Tracy kind of ****.
Anyway... do what i told you to do. That pic is the answer my friend. Just clear your mind and dont read into it.
Hint.. 1. “every day item”
Last edited:
kcpstudio
Sr Member
Listen up.... we have a WINNER. Toggle47 has identified the items on Cable’s rifle stock. Nice work mate! I will let him give the news out he he chooses to do so. Or... maybe give the rest of you time to still play the game. Either way... Toggle47 nailed it. Cheers bro
- - - Updated - - -
Im not sure if you guys caught my original post with the hints. I had left the original one up with two hints for a few minutes before editing it out and removing the second hint. I was hoping you guys would be able to see both the original and edited posts. Im not sure if the RPF allows that. This way you could see the second hint.
I missed the second hint, but turns out I didn’t need it. I’ll let some others toy around with it, and let people try to figure it out, then will post the answer in a future update. But if anyone just wants to know without waiting, they can PM me and I’ll let them know right away. Thanks again Kenney!
Similar threads
- Replies
- 17
- Views
- 3,611
- Replies
- 0
- Views
- 1,076
- Replies
- 0
- Views
- 861