Buzz Lightyear Cosplay WIP

rogelio

New Member
BUZZ LIGHTYEAR COSPLAY WIP

Hi,
I have something less than a year working on a Buzz Lightyear Cosplay and it's already taking shape.

I create this thread to upload some of the photos of the process and be able to comment with other people the problems I have had, how I solve them (or not) and ask for help on some points that I have not yet come to work.

I hope to serve other people


This is a wish list with which to start this work:


1) Take the mobility into account
2) To take care of the weight and durability of the traj
3) Find a good scale adjustment of the characters without losing the basic proportions
4) Must have the cupula / canople (to see how I solve it)
5) Must have wings (moviles?)
6) Brightness in the dark and lights on wings and laser on the arm


Estimated time:


- initially I plan the project with a duration of one year. But after being working I see that due to the dedication of time and the complexity of the project it will take me something more than 1 year, maybe 2 before achieving to have all the points of the list. You may be able to have something presentable to bring out an event before.
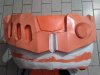

Pictures:

I share some photos that show the current state of some pieces and then make a summary of the process and upload photos of the WIP

IMG_20170513_125249.jpgIMG_20170325_225903.jpgIMG_20170514_202015.jpg
 
Looking great! And yeehhhhh I've learned not to count on deadlines for costmes or suits nymore until I start the work lol.

Sent from my KYOCERA-E6560 using Tapatalk
 
Buzzligthyear has no human proportions, very long arms, short stature, very wide shoulders ... and so on.


In some cases what I see on the internet is that they modify the proportions to make them more "human"


I do not want to lose the proportions but I have to make adjustments and make sure at least that I have some comfort and movement in the arms. For this the separation of the shoulders must be in agreement with mine and this point is the one that is going to define the scale of all my suit.


I hope this finally works ...

proporciones humanas.jpg proporciones buzz.JPG

Model Patron:

Thinking about my item 3 (Find a good scale adjustment of the characters without losing the basic proportions) of the wish list, start the design by looking for some 3D model or BuzzLightyear papercraft.


Elsocraft has a very good design of papercraft
Also he sells the plans to work on cosplay but I can not do this effort right now :(


His model is very good and all the credits are for Elsocraft. A great artist in all your projects

elsocraft.blogspot.com/
elso toy_story_buzz_lightyear_paper_craft_2.jpg

proporciones humanas.jpg


proporciones buzz.JPG


elso toy_story_buzz_lightyear_paper_craft_2.jpg
 
Last edited by a moderator:
Cormac
Yes, I saw it, I like the way I solved the torso and the width of the shoulders.
I already these something advanced, I have several pieces made and I am using another process. I think that for now everything is going well
 
Last edited by a moderator:
Phase 1: Scale Tests


The first phase was to look for the correct scale to expand the papercraft model.


Take some steps to print the model and do a test. To adjust I printed the pieces of the chest that is the one that has more volume.
Work on paper and quite fast just to be able to check the scale.


I repeated this a couple of times until I felt comfortable with the scale.


Always working on paper because the rest of the process I will use other materials to form the pieces, these models will only serve as patterns.

IMG_20160924_103936.jpg IMG_20160924_103950.jpg IMG_20160924_111130.jpg
Cut patterns to assemble the model and test scales

IMG_20160925_145150.jpg IMG_20161002_144431.jpg IMG_20161009_080443.jpg
Models armed and confirmed the scale (after testing several times)
 
Phase 2: Draw up plans


From the model cut and extract patterns to make the piece in a metal mesh frame

IMG_20160916_174520.jpg IMG_20161002_171751.jpg IMG_20161002_174837.jpg
-Cutting patterns in metal mesh


IMG_20161002_182446.jpg IMG_20161009_080634.jpg IMG_20161009_080900.jpg
-Reinforcement of piece with metal mesh
 
BUZZ LIGHTYEAR COSPLAY WIP


1) Take the mobility into account
2) To take care of the weight and durability of the traj
3) Find a good scale adjustment of the characters without losing the basic proportions
4) Must have the cupula / canople (to see how I solve it)
5) Must have wings (moviles?)
6) Brightness in the dark and lights on wings and laser on the arm


Hi Rogelio, great work so far. My buddy Cormac told me there was a new buzz build so I took a look. Had meant to comment earlier but forgot!

I had a pretty similar wish list, but unfortunately I had to compromise along the way as I ultimately ran out of time. Here are some initial pointers that come to mind. If you have any questions, I'll do my best to answer.

1. Mobility - the sizing of the limb pieces and how you attach them to your body is very important for the final mobility. Think about how these will move relative to the other parts. For example, for the arms, I made sure the upper and lower pieces could move over and around the elbow. For my first try wearing the costume, I didn't have the straps properly sized so stairs were initially very difficult. After putting some more time in, this was overcome.

2. My costume was made from foam floor mats (approx 8-10mm thick). While not exactly heavy, when wearing for a few hours, it does become noticeable and increasingly uncomfortable. For my buzz, I had to get rid of the wings. While I was disappointed at first, the wing contraption that I had been working on would have made the costume much heavier and very uncomfortable after prolonged wear.

3. You're absolutely right. Buzz is an awkward shape and not very human. You have to compromise somewhere. I'm looking forward to what you come up with.

4. Be careful regarding the dome. For my design, to achieve the look I wanted, my buzz is wide at the shoulders. I think this drove me to need a 500mm dome or something like that, which I just could not source in my country. If the dome is crucial, I would make sure you can source what you need for it, before you finish the upper body/chest piece.

5. For the wings, I tried to go with wings that pivoted (like the movie) from the corner of the backpack, because I thought this would be simpler than telescopic ones. However, this meant that the wings needed to be separated as they traveled over one another and this created more problems. For the wings, telescopic ones are the ones I'd recommend trying first (like the toy).

6. Brightness in the dark was something I hoped to achieve using this kind of stuff: https://www.amazon.co.uk/gp/product/B00DG6UMVW/ref=oh_aui_detailpage_o04_s00?ie=UTF8&psc=1

However, my plan of applying this powder in a clearcoat over the paint would have ruined the the look of the paint so I decided not too. If I had more time I would have tried some other solutions. I feel that mixing this powder with the final paint and applying with a spray gun could work.

I also wanted lights in the wings. There are a few ways of doing it, but it is an added layer of complexity which will probably take a good bit of time. Any wires can also add to the chances of snagging the wings as they open or close. I think I was playing with the idea of using an arduino, since I already had one, but you could make the lights blink with just circuits.

For the laser on the arm, I was very happy with my final laser, since I could switch it on by flexing my arm and pointing my hand downwards. If you want the laser button on the upper arm to activate the laser in the lower arm, you may need to trail a wire between the pieces. With the movement and twisting of your arm when wearing the costume, I don't think it's a way to go. Also, if your costume ends up like mine, you wont be able to reach that laser button in the upper arm anyway, so there might be no point going that way.
 
Hi Rogelio, great work so far. My buddy Cormac told me there was a new buzz build so I took a look. Had meant to comment earlier but forgot!

I had a pretty similar wish list, but unfortunately I had to compromise along the way as I ultimately ran out of time. Here are some initial pointers that come to mind. If you have any questions, I'll do my best to answer.
...
.

Hello!!
thanks for the interest. I calmly read your experiences and take them into account. This for the moment is the initial plan, the wish list, and surely on the way I will make compromises.
I have a few days without updating the page, soon I will upload more photos. It goes something more advanced than I have shown here and I must update it
 
IMG_20161016_113121.jpg IMG_20161016_113126.jpg IMG_20161016_113553.jpg IMG_20161016_113600.jpg

The front and the back of the torso I am making them as two separate pieces.
Initially I thought this to have some more comfort when it comes to storing the suit.
Not a big problem but this has generated some difficulty in adjusting the edges of the suit.
However I still think that it will be easier to put on the suit.
My intention is to use the back piece as a backpack with a tie that are crossed over the chest. Then place the chest piece somehow hooking the entire system.
 
IMG_20161022_184015.jpg IMG_20161022_184705.jpg IMG_20161022_202548.jpg IMG_20161022_213440.jpg

IMG_20161022_215823.jpg IMG_20161219_150616.jpg IMG_20161220_172408.jpg

In these photos you see the process of building the back piece.
Remove pattern patterns, cut metal mesh, cover with paper and white glue
 
Last edited:
...
I had a pretty similar wish list, but unfortunately I had to compromise along the way as I ultimately ran out of time. Here are some initial pointers that come to mind. If you have any questions, I'll do my best to answer.
...

As I told you above, surely I will have commitments to make. On the fly, we will see that


...
1. Mobility - the sizing of the limb pieces and how you attach them to your body is very
...

One of the issues that most concern me is the width of the shoulders and how it affects the mobility of the arms, I think that I can adjust the scale of the chest enough to not compromise the proportions too much and have movement in the arms, I am not going To be completely secure until you can hook the three pieces (arm + forearm + chest)
If I have any questions:


A) What did you do on the shoulders? The pieces arm - elbow - forearm you have them with moorings inside so that they do not lose position or you take them loose?
I am thinking of making elbows with some spheres that I found to be of good measure but it will depend on mobility. The option to have only something simulated like a small cushion sphere cooked to suit I do not like much (I have seen it in some costumes)


B) did you have problems hiding the straps that join the pieces of the arms?


C) the part of the torso / chest / back as you wear it, as you wear it fixed to the body? Rest on your shoulders


...
2. My costume was made from foam floor mats (approx 8-10mm thick).
...

Nowadays for me it is difficult to find foam floor mats, I am working with the materials that I have available. They are somewhat heavier. I estimate that I can wear the suit no more than two hours in a row without a break.
The chest back and the backpack with the wings are going to be the heavier parts, the rest I am making it as light as possible. In what can weigh the pieces public values.


...
3. You're absolutely right. Buzz is an awkward shape and not very human
...

For the moment what I'm doing is starting with a scale model of papercraft and adjusting the size of the chest to a proportion I feel comfortable with. Then the legs are likely to end up being stretched to fit better.
Really until I can not have several pieces ready and do the first test of cosplay I will not be able to have a real idea of how it is going.
In the waist I hope to be able to place the rings that the character carries but they can not be wider than the chest, it will depend on the tests and see what this piece looks like


...
4. Be careful regarding the dome.
...

The dome I am thinking of thermoforming, I have access to a thermoformer with the right dimensions. I already bought the material and I have a first 3D design of the two dome parts with the adjusted measurements. I must work the mold to thermoform it. A lot of work and it is possible that this piece is discarded at the end. Also because of the weight you are going to add it is possible that you can remove the entire dome from the suit and use it without the dome.


...
5. For the wings, I tried to go with wings that pivoted (like the movie)
...

You're right, the wings really are superimposed on the character. That's why he can not fly !!! The wings are in different planes
I am an engineer which is in part a disadvantage .... I'm trying to make the wings just like the character takes and if there are many problems to solve ...
I hope to have good news soon on this topic


...
6. Brightness in the dark was something I hoped to achieve using this kind of stuff:

https://www.amazon.co.uk/gp/product/...?ie=UTF8&psc=1
...

The link does not work for me. I can not open it.
I did some tests with clearcoat powder on painted parts and did not notice that it changed the overall look of the paint, I think it can be used.
In this topic I have several materials, it is likely to generate a combination.
Part of the problem that worries me here is not the final look of the color, I think that can be adjusted. Is that some of the reactive paints work with uv light and need a continuous light source uv dark in the dark to really work well. Others need to be charged in the sun or with good lighting and then be active in the dark for a few seconds. The two are somewhat complicated to do before a presentation


I like the idea of turning on the laser with a wrist movement, it is simpler and it avoids having to touch the button that is also probably not able to do it
 
IMG_20161221_145614.jpg IMG_20161226_134701.jpg IMG_20161226_193812.jpg IMG_20161229_125253.jpg
I'm redoing this piece to have it without the support of metal mesh,
I want to reduce somewhat the weight and the piece does not need to support weight or be rigid
 
Last edited:
IMG_20161231_111706.jpg IMG_20161231_111803.jpg IMG_20161231_121837.jpg

IMG_20161231_163236.jpg IMG_20161230_194004.jpg IMG_20170101_125435.jpg IMG_20170513_074759.jpg IMG_20170513_074805.jpg IMG_20170513_084736.jpg IMG_20170121_201247.jpg IMG_20170204_131315.jpg


complete process already covered with foami.
the piece seems a bit heavy but remains as firm as it wanted. This way I will have a good support for the wings. I hope....
 
IMG_20170513_125249.jpg IMG_20170513_125256.jpg IMG_20170513_125310.jpg IMG_20170821_140514.jpg

In regard to the chest and back there are many more advances so far, I have the main forms assembled with foam and glued to the structure.
Everything is sealed with several layers of white glue.
Now I'm going to publish photos of the rest of the pieces and the progress.
 

Attachments

  • IMG_20170820_084626.jpg
    IMG_20170820_084626.jpg
    857.9 KB · Views: 467
This thread is more than 5 years old.

Your message may be considered spam for the following reasons:

  1. This thread hasn't been active in some time. A new post in this thread might not contribute constructively to this discussion after so long.
If you wish to reply despite these issues, check the box below before replying.
Be aware that malicious compliance may result in more severe penalties.
Back
Top