You are using an out of date browser. It may not display this or other websites correctly.
You should upgrade or use an alternative browser.
You should upgrade or use an alternative browser.
Salzo V5 X-Wing pattern work
- Thread starter moffeaton
- Start date

dtssyst
Sr Member
Sorry, no build images.
I can try to describe it but do not have any actual photos showing how I did this on any of the builds that I have done.
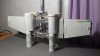
I drilled a hole in the engine. Wired a LED with resistor and ran the wire from the engine to the wing 'can'. Then a hole drilled through the wing to the hole where you can see the wire coming out. Once wire was run I glued the parts together.
My method is not exactly easy but it has worked for me on all the x-wing builds that I have built.
Please see attached image to sort of see what I am talking about.
I can try to describe it but do not have any actual photos showing how I did this on any of the builds that I have done.
I drilled a hole in the engine. Wired a LED with resistor and ran the wire from the engine to the wing 'can'. Then a hole drilled through the wing to the hole where you can see the wire coming out. Once wire was run I glued the parts together.
My method is not exactly easy but it has worked for me on all the x-wing builds that I have built.
Please see attached image to sort of see what I am talking about.
Attachments
dtssyst
Sr Member
Yup, that is my current build. I did get a little bit more done on it. Just so much going on that I don't get to do much modeling as of late. I hope the information I just posted helps a little.
This may help a little. I found this online, I believe it is a V4 build by DTSSYST. Should be nearly identical for the V5. Maybe he can expound on it more.

With the V5, you only need to drill one hole - through the plate/wing as shown here:

Wires go through the central hole in the L bracket, up and through the hole drilled, and back into the engine (which is hollow/accepts lights with a quick drilling)
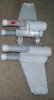
For a bottom mount, wires can meet at the bottom - tie all four together:

AZIZ! LIGHT!

Wires go through the central hole in the L bracket, up and through the hole drilled, and back into the engine (which is hollow/accepts lights with a quick drilling)
For a bottom mount, wires can meet at the bottom - tie all four together:
AZIZ! LIGHT!
scottjua
Master Member

OlivierC
Well-Known Member
weeeeeeeee, I got my Red 2/ Blue 1 today. On valentine's day, and since I paid for it over 3 months ago, it really feels like a present.
Anyway, it's beautiful, my first studio scale xwing (already got a ywing), it's huge, when you're used to the smaller models. I'm not going to start right away because I already have a bwing started, which does not progress very fast
Anyway, it's beautiful, my first studio scale xwing (already got a ywing), it's huge, when you're used to the smaller models. I'm not going to start right away because I already have a bwing started, which does not progress very fast
Wood grain doesn't look quite right
I'm getting there!
Having a blue pylon made to "ILM specs" (measurements off a real one) to boot!
View attachment 795700


Carnet
Well-Known Member
Edit: I re-oriented the armature pic and now it shows up as an attachement too...oh well...
If you edit your post, and then click on "more reply options" then scroll to the bottom, you will see a gray button to "manage attachments" and then you can delete it...if you want to.
mvmagic
Well-Known Member
If you edit your post, and then click on "more reply options" then scroll to the bottom, you will see a gray button to "manage attachments" and then you can delete it...if you want to.
And that did the trick indeed! Thanks!
Had to paint one wing to see the main color...


Similar threads
- Replies
- 2
- Views
- 426
- Replies
- 3
- Views
- 606
- Replies
- 12
- Views
- 1,221