My 31" "20,000 Leagues Under The Sea" Nautilus Build

Howdy fellas...just subscribed to this thread, looks like you guys have a lot of great ideas for this kit! awesome!

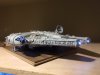
I'm awaiting my kit to arrive from J&S and will be watching this thread carefully. I'm a lighting freak as well. Building this for a friend of mine in CA (I'm in AZ) he sent me the rather lame Pegasus version as that is all he could afford, but after looking at it, and knowing how badly he wanted the movie version, I decided to pony up and buy this one for him, though he won't know whats going on till he opens the box once I send it to him. I originally bought the 16" only to find out it was a one piece cast, no way was that going to work with any lighting. He'll likely pay me back when he can, which doesn't concern me a lot. I wanted to build this one. Anyway, when I asked to return the 16 and reorder the 31", they told me 20% restock fee! I mean come on, really? particularly since I was buying the more expensive one! I talked them into 10%, but still, kinda crappy if you ask me.
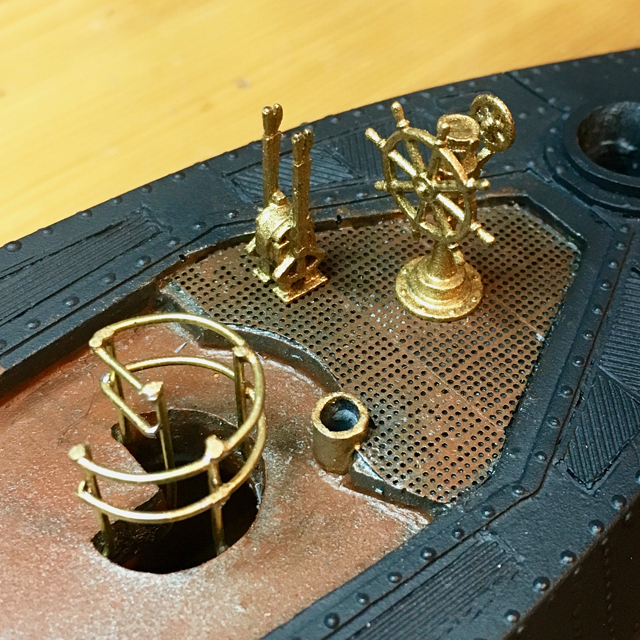
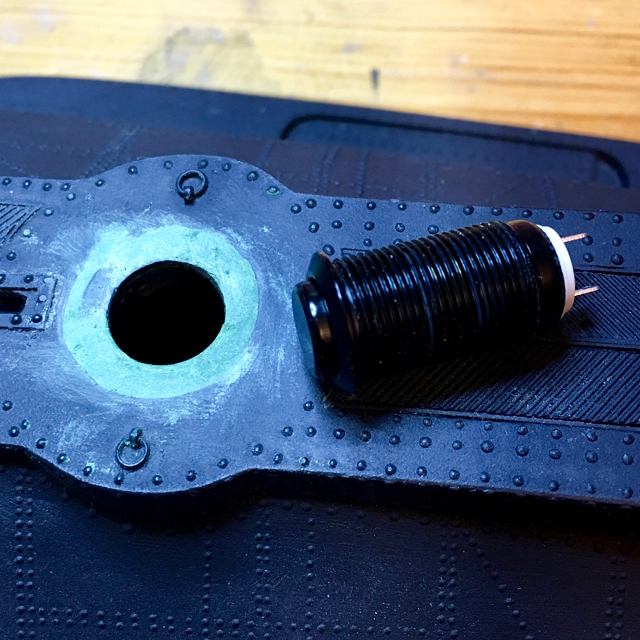
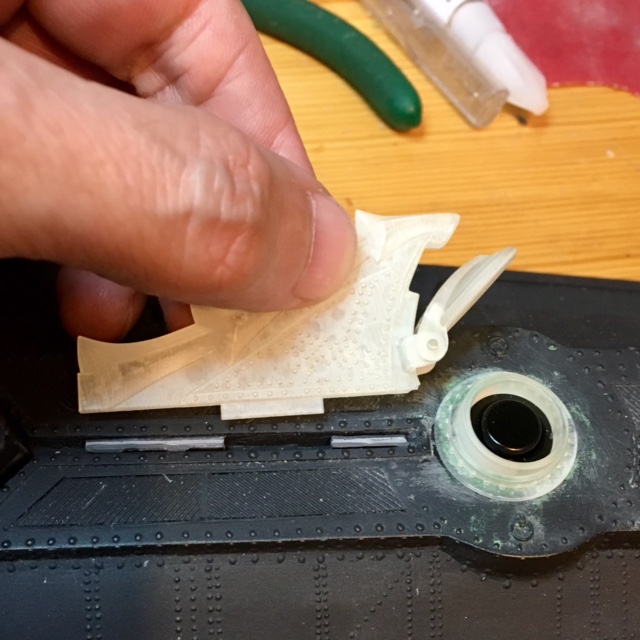
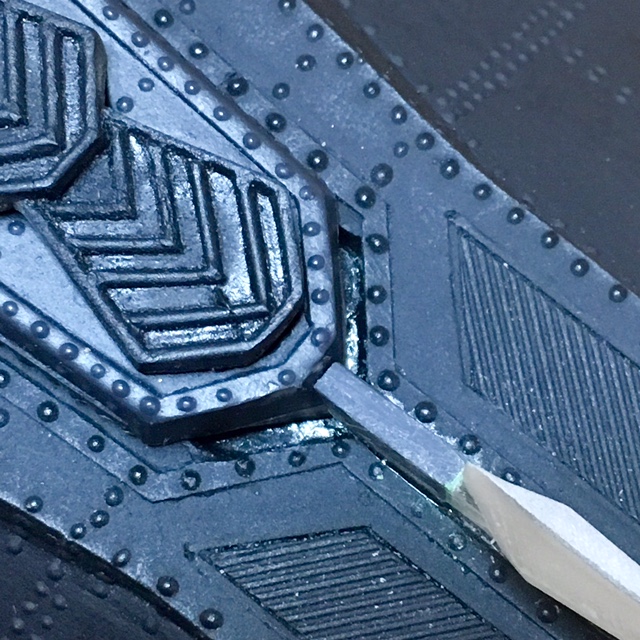
I see Timey is doing some fantastic work with home made upgrades, I will certainly follow suit. I see there has been issues with the brightness of the LED's, I've found that sanding them tones down the light, and if the hue isn't quite right, you can lightly go over them with a Sharpie or other colored markers. I learned this building my MPC Millennium Falcon's with massive amounts of upgrade parts and lighting. I've just in the past year rediscovered modeling after a 10 year hiatus. learning much I didn't know in the past, now I'm going nuts with everything.
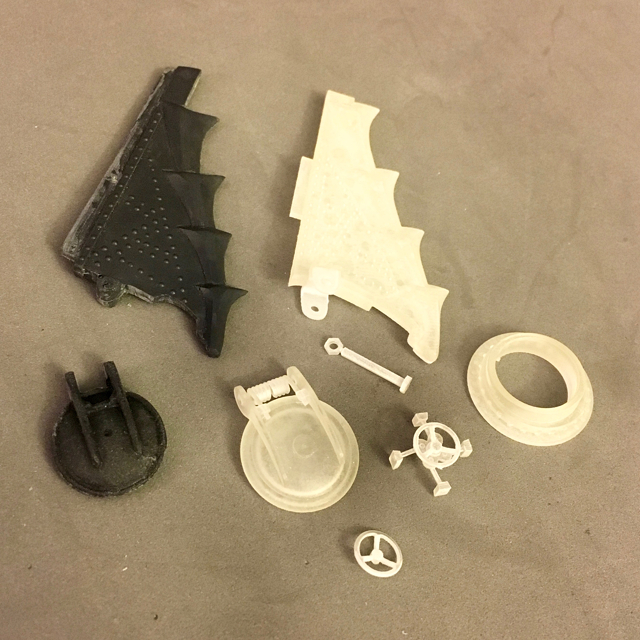
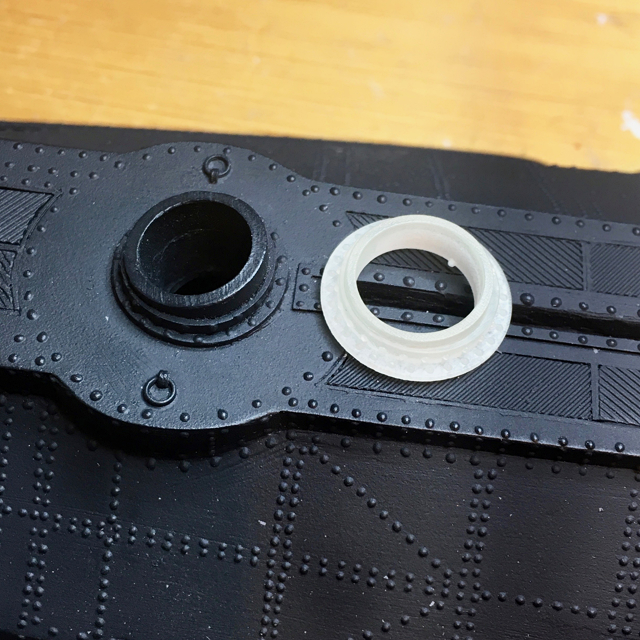
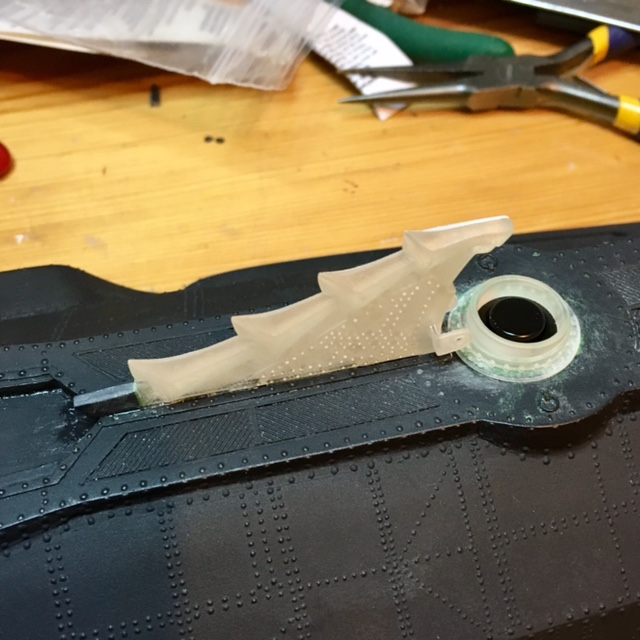
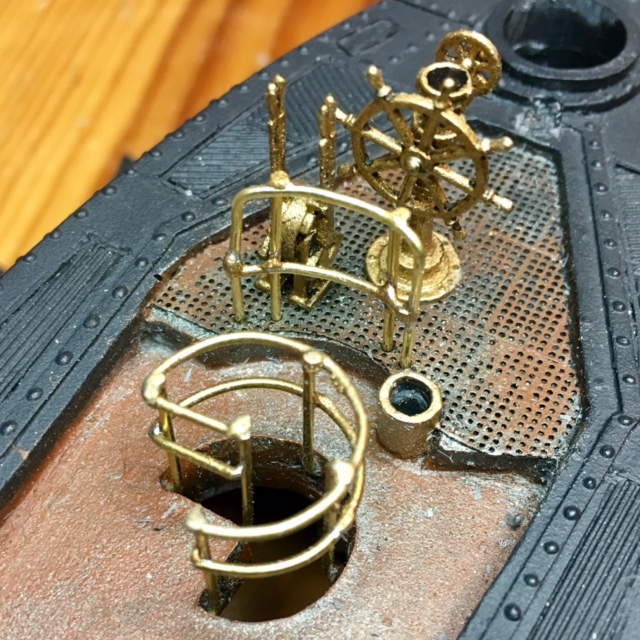
I also use just about everything you can get for these from Shapeways, I'm happy and surprised to know that there is some stuff there for the Nautilus as well and will be getting those items also. I'd like to thank you folks in advance for these posts, lots of stuff that I hadn't considered, let alone thought of to do with this thing and I'm sure it will turn out far better now.
And my buddy that this is for, well he's going to be floored when he opens the box.

thanks!, keep the post coming!! :thumbsup
 
Shapeways order in, Got what I needed to do one side of the interior salon, and everything else they offered that I thought I needed. turned out to be more than half the cost of the kit itself, BUT it will save me having to fashion all the pieces from scratch.
Thanks again for turning me on to these pieces being available. looks like my buddy that this is for will be making installments on the pay back, but the satisfaction factor of how this will turn out just multiplied many times for me if nothing else (y)thumbsup
 
The 3D printed parts arrived, and they're wonderful!


The first is the ship's wheel. The resolution on this thing is incredible.


29.jpg


And here are the dive levers.


30.jpg


The salon window frames that came with the kit are terrible. I started cleaning them up, but they're just really rough and distorted. I ordered these 3D printed frames, which are really intended to be used without "glass", so I'll have to do some rejiggering to make them work with the kit windows - but they'll be an enormous improvement over what I had.


31.jpg


Here are the 3D printed propeller and speed screw next to their respective kit parts. I didn't even bother trying to free the original speed screw from the flash surrounding it.


32.jpg


And this bit is wonderful - a replacement rear fin with a fantastically detailed hatch with a working hinge (complete with simulated spring and internal latch parts).


33.jpg


Here you can see the wheel and levers with their first coat of paint, in their approximate positions. Since this picture I've refined them a bit, with some weathering and additional detail paint. I know a lot of it won't really be visible through the bubble windows, but the impression will be very good.


34.jpg


Here's the replacement rear hatchway next to the one on the kit.


35.jpg


I removed the old hatchway and embedded a fiber washer with an appropriately sized hole for this push-on push-off switch.


36.jpg


Here's the switch and new hatchway installed. To turn the lights on and off, you'll raise the hatch and push the button.


37.jpg


I epoxied this battery holder into the lower hull.


38.jpg


I drilled out the back of the new propeller to fit onto a 3/32" brass rod, which basically replaced the back portion of the 3D printed part, except for the rear ring. The trickiest part besides getting the propeller exactly straight was getting the hole in that ring opened up exactly right to slip over the rod and be glued in position just behind it.


39.jpg


Here's the completed propeller assembly next to the same assembly from the kit. I happened to have some styrene tubing the same size as the original's shaft, and I glued a piece of 1/8" diameter brass tubing inside it, into which the brass rod fits perfectly. The propeller spins like a pinwheel when you blow on it, without any lubrication. I had thought about motorizing it, but I decided to just make it spin-able.


40.jpg
 
The 3D printed parts arrived, and they're wonderful!


The first is the ship's wheel. The resolution on this thing is incredible.


http://stevedockery.com/nautilus/29.jpg


And here are the dive levers.


http://stevedockery.com/nautilus/30.jpg


The salon window frames that came with the kit are terrible. I started cleaning them up, but they're just really rough and distorted. I ordered these 3D printed frames, which are really intended to be used without "glass", so I'll have to do some rejiggering to make them work with the kit windows - but they'll be an enormous improvement over what I had.


http://stevedockery.com/nautilus/31.jpg


Here are the 3D printed propeller and speed screw next to their respective kit parts. I didn't even bother trying to free the original speed screw from the flash surrounding it.


http://stevedockery.com/nautilus/32.jpg


And this bit is wonderful - a replacement rear fin with a fantastically detailed hatch with a working hinge (complete with simulated spring and internal latch parts).


http://stevedockery.com/nautilus/33.jpg


Here you can see the wheel and levers with their first coat of paint, in their approximate positions. Since this picture I've refined them a bit, with some weathering and additional detail paint. I know a lot of it won't really be visible through the bubble windows, but the impression will be very good.


http://stevedockery.com/nautilus/34.jpg


Here's the replacement rear hatchway next to the one on the kit.


http://stevedockery.com/nautilus/35.jpg


I removed the old hatchway and embedded a fiber washer with an appropriately sized hole for this push-on push-off switch.


http://stevedockery.com/nautilus/36.jpg


Here's the switch and new hatchway installed. To turn the lights on and off, you'll raise the hatch and push the button.


http://stevedockery.com/nautilus/37.jpg


I epoxied this battery holder into the lower hull.


http://stevedockery.com/nautilus/38.jpg


I drilled out the back of the new propeller to fit onto a 3/32" brass rod, which basically replaced the back portion of the 3D printed part, except for the rear ring. The trickiest part besides getting the propeller exactly straight was getting the hole in that ring opened up exactly right to slip over the rod and be glued in position just behind it.


http://stevedockery.com/nautilus/39.jpg


Here's the completed propeller assembly next to the same assembly from the kit. I happened to have some styrene tubing the same size as the original's shaft, and I glued a piece of 1/8" diameter brass tubing inside it, into which the brass rod fits perfectly. The propeller spins like a pinwheel when you blow on it, without any lubrication. I had thought about motorizing it, but I decided to just make it spin-able.


http://stevedockery.com/nautilus/40.jpg

Timey,

that's top shelf work, very impressive.
I got my kit USPS Friday, and as expected I found it having every problem you had previously stated. I'm glad the Shapeways parts are available and thanks again for mentioning it in your posts. Also had the same ugliness with the lower hulls tail. I wrote John at J&S and told him they seriously need to address that issue if nothing else. I also suggested that they get their own 3D printer and start making these problem child pieces on their own so they could offer a better product. They did however, supply an upgrade wheel so they did realize they needed to do something there. But I'll have the Shapeways wheel, so no matter there.
I did also write to the Shapways designer of the upgrade parts and asked if he had ever thought about doing the figures, Nemo, Ned, the professor, etc. haven't gotten a reply yet, and may not. There are figures available from Total Immersion, but they are cast resin, and the one's the show on their website don't look so great. They don't show the Ned, professor, or the Peter Laurie one's at all, but I can't imagine they look good either.
So, there we are, just getting started with mine, flash trimming will go on for a while but I'm really excited to be building this kit. I just wonder that when I'm finished if I'll be able to give it up to my friend I'm building it for! But...can always build another, and as I've found with my Millennium Falcons, each successive build is better than the last.

thanks again for the valuable info you're providing to the rest of us who have taken up this project.
:thumbsup
 
f5-12.JPGfalcon 5 lighting.JPGfalcon 5 final pic 2.jpgAlmost got...I think I'm going to fashion a base piece that will house the battery and switch as I am going to also install a recordable sod module in it as well. I've already recorded on my phone, the last words of Nemo at the very end of the movie..."all this will someday come to pass, in God's good time" paraphrased of course. the module only holds 20 seconds and the whole line of monolog is just about that, 20 seconds. I do this with my Falcons as well, housed in the left side of the hull. and the removable rear center cargo door underneath is the access to the battery.

everytime I load a phot from my laptop...upside down...from my work PC, not problem...argh!
 

Attachments

  • falcon final 2.JPG
    falcon final 2.JPG
    39.9 KB · Views: 311
Last edited:
I tried splitting the googley eyes too, I was for the most part successful, but not really sure I want to use them either. Thanks for posting about the acrylic hemispheres, I'm on the hunt for those...much better solution. The googley things are too flimsy...if you dent one in, there's no fixing it.
I tried a different approach to the salon lights. I've decided it's a sure thing to put an LED in the larger spots on either side, but the two smaller at the top and four at the bottom I tried a .50mm fiber optic and mushroomed it, then sanded the mushroom so as to make the flattest and largest light point possible. I took a googley (just the clear top) and frosted it with white primer, the Citadel stuff, and it does work, but pretty dim. then I painted the area in the frame gloss white hoping to get a bigger spread, but it didn't work.
I'm confident that the FO will do the job, just got to figure out what to coat the inside of the hemisphere and the base with for maximum light. I can't see using a separate LED for each one. I'm using pre-made pigtail LED's that are resisted for 9V. I did my first M/Falcon like you do your lighting, I decided it was too much work figuring out the right resistance for the lighting required and volt usage.
come to think of it, and you probably know this...can't you change your resistors to drag down the brightness of the LED?
 
Re: My 31" "20,000 Leagues Under The Sea" Nautilus Build

Been working out my wheel house wiring for a couple days, decided to delicately hog out a trench for the green LED wires. it was tricky to go enough for the wires to allow the 2 side/ceiling panels to fit right...and not go through the outside
I also decided to leave the baffle plates piece that covers the main hatch loose so it can be slid back to expose an extended staircase, the entry landing and chart room. of course I will only detail what can be seen. I also started my spiral staircase railing, no pics yet...and figured I had better build the whole thing because you can see the base of where it will go looking down the main entry. Also going too have hatches able to open with brass rod ladders going down and ambient lighting in the hatch wells.
I'm really excited about this build. I'm not sure I'll want to part with it. My buddy just may get his ole' Pegasus sub back as he expected. LOL20k sub1.JPG20k sub2.JPG20k sub3.JPG20k sub4.JPG20k sub5.JPG20k sub6.JPG

- - - Updated - - -

Been working out my wheel house wiring for a couple days, decided to delicately hog out a trench for the green LED wires. it was tricky to go enough for the wires to allow the 2 side/ceiling panels to fit right...and not go through the outside
I also decided to leave the baffle plates piece that covers the main hatch loose so it can be slid back to expose an extended staircase, the entry landing and chart room. of course I will only detail what can be seen. I also started my spiral staircase railing, no pics yet...and figured I had better build the whole thing because you can see the base of where it will go looking down the main entry. Also going too have hatches able to open with brass rod ladders going down and ambient lighting in the hatch wells.
I'm really excited about this build. I'm not sure I'll want to part with it. My buddy just may get his ole' Pegasus sub back as he expected. LOL20k sub1.JPG20k sub2.JPG20k sub3.JPG20k sub4.JPG20k sub5.JPG20k sub6.JPG
 
oops, don't know how that happened...
oh well, Hey Timey...you know how you were talking about the acrylic hemispheres...did you get those from Kit Kraft? I see where they have the 7/16 but not a 1/4...do you reckon you could get the 3/8 and shave the edges? not like it would bee seen I don't think. I think I'm going to try it.
Thanks for the heads up on that, those google eyes are for krap.
Had another thought on the spheres and light diffusion...sanding the inside of the domes with super fine grit to haze the light? I ordered the stuff just now from Kit Kraft, going to have one extra of each to experiment with
 
Last edited:
oops, don't know how that happened...
oh well, Hey Timey...you know how you were talking about the acrylic hemispheres...did you get those from Kit Kraft? I see where they have the 7/16 but not a 1/4...do you reckon you could get the 3/8 and shave the edges? not like it would bee seen I don't think. I think I'm going to try it.
Thanks for the heads up on that, those google eyes are for krap.

I got them from Kit Kraft. I got 7/16" ones for the big lights and discovered they were too small - they need to be closer to 1/2" but since the holes in the kit were out of round I got a smaller dimension on the one I measured. I'm going to get 1/2" ones for the big lights and shave them down if necessary, and probably get 3/8" for the smaller ones, and just grind down the back until they fit (they'll end up a bit shallower than hemispheres would be, but not by a lot).
 
I got them from Kit Kraft. I got 7/16" ones for the big lights and discovered they were too small - they need to be closer to 1/2" but since the holes in the kit were out of round I got a smaller dimension on the one I measured. I'm going to get 1/2" ones for the big lights and shave them down if necessary, and probably get 3/8" for the smaller ones, and just grind down the back until they fit (they'll end up a bit shallower than hemispheres would be, but not by a lot).

ah, good to know...I'm sure I have time to change my order. thanks for the heads up!!:thumbsup
 
Hey Timey,

Not sure how far you're going with yours, but have you seen the stuff available on "nautilus dry docks.com"? you probably have and I'm sure you've done your homework and research on this project. pretty nice salon package, and they have a decent group of figures, albeit a bit spendy.
I did get the couch, curtain and iris lever from Shapeways along with the other stuff you bought, but I think I'm going to pull the trigger on the salon kit.

I'm not going to do the salon interior, I'm just going to do a bit more detailing in the wheelhouse (barely visible, I know) and add the lighting. If I go too far into the weeds adding extras to this, I'm afraid I'll lose steam and get derailed onto another project (which I have a tendency to do). I have a pretty short attention span for a modeler. :)
 
I'm not going to do the salon interior, I'm just going to do a bit more detailing in the wheelhouse (barely visible, I know) and add the lighting. If I go too far into the weeds adding extras to this, I'm afraid I'll lose steam and get derailed onto another project (which I have a tendency to do). I have a pretty short attention span for a modeler. :)

I completely understand,
I know what you mean, however when I get into a build my mind is racing with all kinds of modification ideas, some feasible, some not.
I was just taking a rest before I clutter the kitchen table fir the evening...check this out. You know how I said I build all these Falcon's? well what I've done as far as the upgrade parts is make silicone molds so I can duplicate stuff without having to spend 100 plus dollars one upgrade parts for every build.
Sorry, got off track...back to my point...the nose piece in front of the wheel house, too short...mine too. I'm going to make a mold of it and add a chunk of plastic roughly shaped at the too short end of the part. Then, when I cast the new piece it will be longer and can be trimmed and sanded till it fits.
the pic I posted of my last falcon...80% of that ship is duplicated parts!
If I am successful, which I'm sure I will be, I'd be happy to crank one out for you, that is if you haven't already come up with a solution for yours.
No charge, put it in the USPS for you.
I've duplicated a few things for a fellow Falcon builder, easy peasey. SinceI subscribed to this thread and we're sorta in contact on this build, you've provided me with ideas I hadn't and probably wouldn't have thought of, I'm more than happy to do it, if you're interested. my feeling won't be hurt if you aren't. all good brother:thumbsup
 
I was getting my casting stuff out and took another look at this thing...I worked the top end down with a tiny file, got the angle right, and though it gets into that little rivet slightly I think I'm good with it. your opinion?Nautilus nose.JPGI really hate that my laptop does this...I can rotate it in my pics, and they STILL do this! Unbelievable...:facepalm
 

Attachments

  • Nautilus nose.JPG
    Nautilus nose.JPG
    77.6 KB · Views: 294
Re: My 31" "20,000 Leagues Under The Sea" Nautilus Build

Installed the rear fin!


The 3D printed part had only a small tab at the bottom, so I had to cut some pieces off the bottom of the kit part to fill the rest of the slot.


41.jpg


I grafted a bit of the straight end of the original fin onto this one, to fill in the gap between it and the wheelhouse.


42.jpg


Speaking of the wheelhouse, lining up the front edge of it properly (so I don't have to fill any more space that absolutely necessary when fixing the raker arch) leaves a bit of the gap at the rear. If I do this properly, I should fill the gap, remove the existing riveted strip along the edge, and replicate it up against the wheelhouse. I haven't decided yet if I'm going to go to that much trouble, but otherwise it will end up with a weird gap between the rear of the wheelhouse and that strip.


43.jpg


- - - Updated - - -

I was getting my casting stuff out and took another look at this thing...I worked the top end down with a tiny file, got the angle right, and though it gets into that little rivet slightly I think I'm good with it. your opinion? I really hate that my laptop does this...I can rotate it in my pics, and they STILL do this! Unbelievable...:facepalm

That already looks closer than mine gets. I'll have another look at mine soon and see what I can cook up.
 
yep, I was looking at the gap in the rear as well. when I shove the wheel house forward to meet the Arch, (thanks for reminding me of the proper term) it messes with the alignment of my stair steps I added. so, it's cast a new piece and fit it so the wheel house goes back...or I got goofy steps and a gap in the rear. If I don't do it, I'll wish I had later... I may cast this thing anyway this weekend and play around with a new piece. takes 4 hours for the silicone to set and dry and you can only do one half at a time...then there's the time to set up the mold box prior, and then placement of the pour and vent tubes...it's a process. If I pour the first half Friday night, I could have a new arch to work with by Saturday afternoon. I have been using old cleaned out hypos from my weekly injections to inject the liquid plastic. toss the needle and it works pretty good, pushes the air out much better. Got to move fast though, I have one kind that starts setting in 3 minutes!

the rest of yours is looking really good. USPS tracking has my Shapeways arriving Friday. Do you mind me asking what sort of paint process you intend for this? I watched Mr. Martin's youtube vid on painting this fish, so I thought I'd try that...looks fairly easy

Back to the table now...and a cocktail :cheers

Cheers brother.
 
Another quick update:


I realized there's another railing right behind the wheel, so I soldered some brass wire together to make one. Then I attached the wheel (I drilled a hole in the bottom of the wheel stand and glued in a piece of brass wire to go in a hole in the floor, to make sure it was secure), and glued in the dive levers.


It's all bit of a tight fit. I should probably have attached the railing slightly farther aft, since I ended up moving the wheel slightly back to make sure it had good clearance at the front, but I think it's fine - everything in the wheelhouse is crammed much closer together than it should be anyway - the old interior-larger-than-the-exterior thing we see so much in films. I test fit the wheelhouse on top a few times to make sure everything fits, and it looks good through the bubble windows.


44.jpg
 
Another quick update:


I realized there's another railing right behind the wheel, so I soldered some brass wire together to make one. Then I attached the wheel (I drilled a hole in the bottom of the wheel stand and glued in a piece of brass wire to go in a hole in the floor, to make sure it was secure), and glued in the dive levers.


It's all bit of a tight fit. I should probably have attached the railing slightly farther aft, since I ended up moving the wheel slightly back to make sure it had good clearance at the front, but I think it's fine - everything in the wheelhouse is crammed much closer together than it should be anyway - the old interior-larger-than-the-exterior thing we see so much in films. I test fit the wheelhouse on top a few times to make sure everything fits, and it looks good through the bubble windows.


http://stevedockery.com/nautilus/44.jpg

Yeah, how funny...I was working on my spiral railing last night, got a pic on my phone for reference and I noticed that too, was going to say sumthin to you but you beat me to it!
I tried putting the vertical posts just outside the staircase opening and found that it makes it way to large. I'm going to have to do it like yours, posts inside the opening. see...it looks way to big around, which at the same time makes it look too short...well, now the site isn't letting me load a pic, it did this before once. gotta log out and start fresh, see if that fixes it. this site is awful goofy sometimes :behave
 
spiral railing.JPGthere we go...nothing yet secured, just fitting things together. Going to the hobby shop at lunch to get what I need to do the Bob Martin paint process. May try getting that done this weekend too...depends on how much honey-do the wife has lined up for me :lol:(
 
now no editing...geeeez...anyway, I forgot to say, your additional railing looks great, I'll be attempting to duplicate what you've done, thanks dude! :thumbsup
 
This thread is more than 5 years old.

Your message may be considered spam for the following reasons:

  1. This thread hasn't been active in some time. A new post in this thread might not contribute constructively to this discussion after so long.
If you wish to reply despite these issues, check the box below before replying.
Be aware that malicious compliance may result in more severe penalties.
Back
Top