Brian's Blade Runner Builds

It would seem the one with the indicator and rivets is somewhat of a rarity. Cant find it at all.

Well, if anyone reading this thread is interested I just posted my rare correct one for sale in the junkyard (I'm really only interested in building pistols).
 
Last edited by a moderator:
@Candykiller / anyone - any ideas on how to remove the grips on the water blaster without damaging the body?

Update : looks like it's best to just tape it up before painting based on other members advice.
 
Last edited:
@Candykiller / anyone - any ideas on how to remove the grips on the water blaster without damaging the body?

Update : looks like it's best to just tape it up before painting based on other members advice.

It would be hard to take it apart without causing damage. I made a point of keeping the grips intact and using masking tape to do my mods.
 
A bit of Sunday progress on my 2049 radio-phone. I completed the symbols, painted the serial number, and did a little weathering test on the top corner. I also built the winged cap that’s shown on the original prop but wasn’t included on my model.

rt08.jpgrt09.jpg

rt08.jpg


rt09.jpg
 
Last edited by a moderator:
No problem. just let me know which measurements you require and I'll get them off to you. (it will have to wait until tomorrow though)

- - - Updated - - -

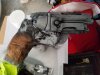
Cheers guys. For those asking, here is my method for creating the gun metal paint job. After masking the grips, I gave it two coats of mid grey primer. I used Hycote Grey Plastic Primer, but I’m not sure about the availability of this spray paint outside of the UK.

View attachment 750491


Next I painted the whole thing with black fast drying oil paint (I used Winsor & Newton Griffin Alkyd Fast Drying Oil Colour) then wiped as much of it off as possible with a soft cloth. You will begin to see the gun metal effect at this point, and it also creates nice dark tones in the recessed areas that you can’t reach.


The final step is to rub graphite powder into the surface with a soft cloth. This is where it really takes on a gun metal effect. You can buy graphite powder, but I prefer to go for the home-made method of scraping the lead off a pencil with a scalpel. You can vary the intensity of the shiny metallic effect on selected areas by adding more graphite powder and buffing it more thoroughly. (on edges, screws etc)


And that’s about it.


For the darker areas, I used Hycote Extreme Heat Black spray paint, and simply polished the surface with a soft cloth to achieve the desired level of shine.


If you have any further questions, feel free to ask.

Which Winsor & Newton black did you use, Ivory Black or Lamp Black ?
Again, great work. I'm excited to do this on mine.
 
Last edited by a moderator:
Your paint work on the water pistol is amazing.

When wiping off the oil paint you're revealing some of the grey primer yes? To provide a lighter base colour (not black) for the graphite?

Also did you dull down the grips at all? They seem less shiny/glossy than when new.
 
Your paint work on the water pistol is amazing.

When wiping off the oil paint you're revealing some of the grey primer yes? To provide a lighter base colour (not black) for the graphite?

Also did you dull down the grips at all? They seem less shiny/glossy than when new.

Yes, that's right, the grey primer is basically providing the base colour. I dulled down the grips with a piece of Magic Eraser sponge. You can then polish it up again with a soft cloth, and I find that it helps to take away the cheap plastic shine.
 
Messing things up a bit. Next step is to add weathering to the lower black section.

I’ve also added the Kanal plate, and decided to make a raised channel indicator rather than drilling a hole into the piece. It’s not quite the same as the original prop but I think it looks the part, and I’m not too concerned about total accuracy.

rt10.jpgrt11.jpgrt12.jpgrt13.jpg

rt10.jpg


rt11.jpg


rt12.jpg


rt13.jpg
 
Last edited by a moderator:
Messing things up a bit. Next step is to add weathering to the lower black section.

I’ve also added the Kanal plate, and decided to make a raised channel indicator rather than drilling a hole into the piece. It’s not quite the same as the original prop but I think it looks the part, and I’m not too concerned about total accuracy.

View attachment 752128View attachment 752129View attachment 752130View attachment 752131

Bro the radio looks awesome. Just got mine through the post today :D
 
Last edited by a moderator:
Started work on my water gun. The first step for me was to give it some weight, so I filled the grip area with clear amber resin, and the main body with fine sand, and then sealed it off with epoxy glue. It feels nice and solid now and has a nice hefty weight to it. I’ve sanded all the seams and generally tidied things up a bit. Next stage, primer!

View attachment 749949View attachment 749950

Mind if I ask what brand of resin you used? I want to make sure I don't accidentally melt my gun using a resin that heats up too much while curing...
 
Last edited by a moderator:
Mind if I ask what brand of resin you used? I want to make sure I don't accidentally melt my gun using a resin that heats up too much while curing...

I used a product called Amazing Clear Cast. It did get very hot at one point while curing and I was concerned about the gun melting, but I got away with it. If I was to do it again, I think I would fill it up in two or three layers to be on the safe side.
 
Last edited by a moderator:
Here’s a quick demo of the technique I used for the metallic finish on my water blaster, if anyone is interested.

1 - Original piece. (just a couple of random plastic parts I had lying around)
2 - Apply two coats of grey primer, allowing to dry between coats. (I use Hycote Grey Plastic Primer)
3 - Paint the whole piece with fast drying oil paint straight out of the tube, without using thinners. (I use Lamp Black Winsor & Newton Griffin Alkyd Fast Drying Oil Colour)
4 - Immediately wipe off as much of the oil paint as possible with a soft cloth. This stains the surface of the primer while creating darker tones in the recessed areas that you can’t reach.
5 - Scrape some powder off the lead of a regular drawing pencil and rub the resulting graphite powder into the surface with a soft cloth. (you can buy graphite powder if you wish)
6 - If you want a lighter, slightly worn metal effect, an optional final step is to dry-brush a little silver Rub ’n Buff over the piece, slowly building it up until you achieve the desired look.

paint stages.jpg

paint stages.jpg
 
Last edited by a moderator:
20170817_093530.jpg

So I used this same method as described above and this is where I'm at. So now do I need to mask the metallic portions and apply black spray paint to the areas that are supposed to be darker? I want it to look like yours now. lol
 

Attachments

  • 20170816_182354.jpg
    20170816_182354.jpg
    3.1 MB · Views: 371
So I used this same method as described above and this is where I'm at. So now do I need to mask the metallic portions and apply black spray paint to the areas that are supposed to be darker? I want it to look like yours now. lol

Yes, I masked the metallic areas and grip and then applied the black spray paint.
 

Your message may be considered spam for the following reasons:

If you wish to reply despite these issues, check the box below before replying.
Be aware that malicious compliance may result in more severe penalties.
Back
Top