Today I finally got my hands on something that i've been waiting a very long time to get my hands on... a Tomenosuke.
If you live in the UK you'll know that there's always a risk importing one of these due to our Customs setup; it had always put me off ordering one before but luckily i've finally been lucky enough to source one from the UK thanks to a member on this forum. Thanks pal :thumbsup.
To say i'm excited is an understatement. Initially I had in mind to buy an assembled version but now I have the kit I'm really happy I chose to go down this route. I love the idea of assembling it myself and think i'll enjoy the piece even more once i've completed it.
I also love how everyone seems to build theirs slightly differently; we all like the idea of getting as close to the original hero prop, although at the same time people sometimes like to make some small changes. For instance, I do not wish to rust the edges on mine, which some people would choose to do to theirs to be totally 'Hero-prop' accurate. Instead I prefer the idea of mine being of-the-time where the gun would be well looked after and oiled regularly. Plus I prefer the cleaner look. It's these subtle differences (including slight natural variations from one build to another such as sanding, and choice of finish) that make each blaster unique to the owner; something I find oddly satisfying.
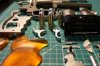
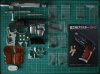
I'd love to document each part of the build so thought i'd start off with a couple of pics. I know i'm not close to being the first person to do this but i'll enjoy the process and hopefully you guys will enjoy the read.
Oh and, always be Knolling.
Bash


If you live in the UK you'll know that there's always a risk importing one of these due to our Customs setup; it had always put me off ordering one before but luckily i've finally been lucky enough to source one from the UK thanks to a member on this forum. Thanks pal :thumbsup.
To say i'm excited is an understatement. Initially I had in mind to buy an assembled version but now I have the kit I'm really happy I chose to go down this route. I love the idea of assembling it myself and think i'll enjoy the piece even more once i've completed it.
I also love how everyone seems to build theirs slightly differently; we all like the idea of getting as close to the original hero prop, although at the same time people sometimes like to make some small changes. For instance, I do not wish to rust the edges on mine, which some people would choose to do to theirs to be totally 'Hero-prop' accurate. Instead I prefer the idea of mine being of-the-time where the gun would be well looked after and oiled regularly. Plus I prefer the cleaner look. It's these subtle differences (including slight natural variations from one build to another such as sanding, and choice of finish) that make each blaster unique to the owner; something I find oddly satisfying.
I'd love to document each part of the build so thought i'd start off with a couple of pics. I know i'm not close to being the first person to do this but i'll enjoy the process and hopefully you guys will enjoy the read.
Oh and, always be Knolling.
Bash
Attachments

Last edited:

")