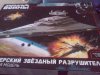
After building my first SD I wound up selling it. Now, I'm starting my 2nd SD, but this one I'll keep for myself. I'll be adding some 3D printed parts, lighting with warm white LEDs for the windows and whites for the engines. I'm throwing in a surprise or two on this build. A hint is shown below. Of course I'll document the full build like I did on the first one, so follow along....
You are using an out of date browser. It may not display this or other websites correctly.
You should upgrade or use an alternative browser.
You should upgrade or use an alternative browser.
Zvezda SD build number 2
- Thread starter Robiwon
- Start date
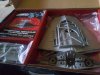
Spent the day Sunday building sub assemblies. Finally got to use my 3D printed garbage chute from TonyRR. He released this while I was working on my first SD and I had already scratchbuilt my own garbage chute. Its a nice little piece and definitely worth it.


INVAR
Sr Member
That's nice to see in position. I ordered that from him shortly after he put it up on Shapeways. So I have that and the radar globes Niart created. I haven't ordered the engine bells because everyone that has them on Shapeways have them bundled with another garbage chute and/or radar domes. I also just saw that Tony has that entire section with ILM model accurate greeblies AND the garbage chute in place: Zvezda Star Destroyer Neck Back with Chute.
Since I've been busy greebling up mine from scratch outside of those two AM parts, I'll probably continue to do that detailing myself.
However, as fast as you work Robiwon, I have a suspicion that I'll pick up a few new ideas from this current build of yours while I am still adding details to mine. Looking forward to your WIP pics.
Attachments
Hm. I have to say that those single-purpose electronic drivers seem kind of expensive for what they are. I researched a whole bunch of different ones for the Falcon I'm working on and in the end decided to go for a microcontroller. You can program in all kinds of flash combinations. Much more flexible and not that expensive.
Now I have a whole pile of 555 boards and decade counters and other crap that I don't need.")
- big
Now I have a whole pile of 555 boards and decade counters and other crap that I don't need.
- big
So I picked up from Age of Plastic on Shapeways his Tantive and two pack of Falcon's. Thanks to Shapeways, they actually sent me three Falcons and then the Mouse slammed his fist down and the Falcons got removed from the site. I think mine were the last to make it out alive.
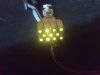
The Tantive is a marvel of miniature 3D printed engineering being design to be lit. And that's what I did. Each engine tube is hollow to accept 1mm fiber. The main body of the ship is also hollow to run a 1mm fiber up to the open cockpit window. To light this little beastie I solder up two Pico LEDs and glued them back to back. The forward facing LED would light the fiber for the cockpit and the rear facing would light the 11 fibers for the engines. Each of these fibers were mushroomed and then pushed into the engines. I gave the rear LED a few coats of Tamiya clear Yellow.
This will be mounted on the base with the Zvezda giving chase. In the pictures below you can see how tiny the Tantive is.


An early lighting test of the cockpit and engines.


After some light blocking and primer coats.


And yes, the tiny, tiny Falcon is being lit as well. I drilled a groove in the bottom hull to accept a Pico LED. This was epoxied in place. Its hard to get good pictures of this as it's so dang tiny!!!


A coat of black and then grey primer followed up by Tamiya AS-20.


I sanded the engine panel after final paint to reveal the semi transparent print material. I also did the same for the cockpit. And of course, the camera couldn't focus well and over exposed the light. It's not that bright in person. I'll try and get some better pics today.

The Tantive is a marvel of miniature 3D printed engineering being design to be lit. And that's what I did. Each engine tube is hollow to accept 1mm fiber. The main body of the ship is also hollow to run a 1mm fiber up to the open cockpit window. To light this little beastie I solder up two Pico LEDs and glued them back to back. The forward facing LED would light the fiber for the cockpit and the rear facing would light the 11 fibers for the engines. Each of these fibers were mushroomed and then pushed into the engines. I gave the rear LED a few coats of Tamiya clear Yellow.
This will be mounted on the base with the Zvezda giving chase. In the pictures below you can see how tiny the Tantive is.
An early lighting test of the cockpit and engines.
After some light blocking and primer coats.
And yes, the tiny, tiny Falcon is being lit as well. I drilled a groove in the bottom hull to accept a Pico LED. This was epoxied in place. Its hard to get good pictures of this as it's so dang tiny!!!
A coat of black and then grey primer followed up by Tamiya AS-20.
I sanded the engine panel after final paint to reveal the semi transparent print material. I also did the same for the cockpit. And of course, the camera couldn't focus well and over exposed the light. It's not that bright in person. I'll try and get some better pics today.
Harblar
New Member
I need something that will pulse rapid three times and then pause for a bit and then repeat....
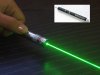
Have you considered using an Arduino UnoR3? They can be had for <$10 on Amazon and could be easily programmed to do that. In fact, that's what I'm planning to do with my ISD. I've got several neopixel sticks as well as neopixel through holes for the engines. I plan to drive everything off from the arduino, which should allow to add blinking lights/strobes, engine flare and fading/color changing fiber optic windows. I'm new to it and that will take a bit of learning for me to get right, but just pulsing an led (or laser) would be really easy.
Harblar
New Member
Coding/programming something like is beyond me sadly...
I hear ya. I've got a ton to learn about coding before I get where I want to be. That being said, Adafruit has a great tutorial series on the Arduino and the very first 2 lessons (with a few minor tweaks) would do exactly what you're looking to do.
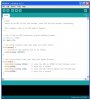
Basically you'd just take the prewritten code below:

and then change the "void loop" section to something like:
digitalWrite(led, HIGH);
delay(250);
digitalWrite(led, LOW);
delay(1000);
digitalWrite(led, HIGH);
delay(250);
digitalWrite(led, LOW);
delay(1000);
digitalWrite(led, HIGH);
delay(250);
digitalWrite(led, LOW);
delay(5000);
That would flash the led/laser (I'm guessing hooking a green laser diode to the arduino wouldn't be all that much different than hooking up an led) 3 times with 1 second between each flash and a 5 second pause at the end before repeating the sequence. The delay's are just in milliseconds and would only need to to be tweaked to get the timings the way you want.
Definitely worth reading through the first two tutorials and maybe giving it a try.
Either way, I'm definitely looking forward to seeing how yours comes together, as I'm trying to figure my own build out as well and you're already giving me some neat ideas! ;-)
Attachments
HughB
Active Member
There are also ways to write the code without delays if you want to have multiple things running simultaneously, I've done that on a few builds now (engines flickering at the same time as running lights blinking or fading etc). If you use delays then it completely stops the program running while the delay is happening. It's not hard to do, give me a shout if you're interested.


Similar threads
- Replies
- 14
- Views
- 2,403