imnotahero
Active Member
It's always been something I had to build. I remember making paper versions of the Jumanji board back in kindergarten. So once I got some basic wood working tools, I knew what I had to make. I've been working on this on and off since Christmas and I've been documenting the whole process through timelapse to eventually make into a video, but I only just realized I hadn't stared a build thread here. So it's going to be a front heavy thread; Lots of catch up and then regular posts as I wrap this up:

The wood part of the board is made of poplar and plywood from Home Depot. The paths for the tokens is cut from a thin sheet of wood from Michael's. Getting the wood hinges to work was a nightmare:


The chisel work on the edges is all hand done; Time consuming, but not the worst part of the build. The leaf pattern on the token compartment lids was done with a Dremel:

There are many long hours of photoshopping the lettering for the rules that are getting glossed over here, lol:

I made silk screens for the instructions and printed them on thin wood inserts:


Used a Varathane wood stain called Carrington:

The face of the board is sculpted in monster clay on a sheet of plastic over a print-out of a 3D render of a production made casting of the relief sculpture. See Audrey2's thread about a 3D printed Jumanji board for the 3d render I used:


Cast in Smoothcast 300 and a channel routed into the wood:

Painted to match the film board. A trick I found was that the whole piece needs the golden yellow base coat and then washes of a burnt umber to get the landscape and weathering:


Where I am so far:

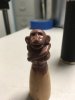
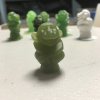
It feels close to done, but I still need to make the interior; the paths, the center dial, and the tokens. Please leave any questions you guys have since I glossed over months of progress.
The wood part of the board is made of poplar and plywood from Home Depot. The paths for the tokens is cut from a thin sheet of wood from Michael's. Getting the wood hinges to work was a nightmare:
The chisel work on the edges is all hand done; Time consuming, but not the worst part of the build. The leaf pattern on the token compartment lids was done with a Dremel:
There are many long hours of photoshopping the lettering for the rules that are getting glossed over here, lol:
I made silk screens for the instructions and printed them on thin wood inserts:
Used a Varathane wood stain called Carrington:
The face of the board is sculpted in monster clay on a sheet of plastic over a print-out of a 3D render of a production made casting of the relief sculpture. See Audrey2's thread about a 3D printed Jumanji board for the 3d render I used:
Cast in Smoothcast 300 and a channel routed into the wood:
Painted to match the film board. A trick I found was that the whole piece needs the golden yellow base coat and then washes of a burnt umber to get the landscape and weathering:
Where I am so far:
It feels close to done, but I still need to make the interior; the paths, the center dial, and the tokens. Please leave any questions you guys have since I glossed over months of progress.


")


