3D Printed Blaster Build (Glie-44)

Marvin3242

Member
Hi there!

So I've been itching to build a prop from the new trilogy, and decided that Poe's blaster would be a great place to start. Rey's blaster just isn't as interesting to me, and when I saw a kit for the GLIE-44 on Etsy for $50 I figured it would be a good place to start.

This is actually my first time working with a 3D print, first thread/build, and, while I've built some models when I was younger, my first serious undertaking in a while. So cut me some slack ;)

Anyway.

After 3 weeks in transit the kit arrived in the mail. The print lines were much more defined than I thought they would be and there was one delaminated spot, but nothing unfixable or unusable. And the bag was a nice touch
IMG_8658.JPG
Before I jumped into priming I decided I'd do a quick mock up to see where I was going with it.
IMG_8661.JPG
And then went to town with filler primer and wet sanding it up to 320
IMG_8663.JPG
IMG_9165.JPG
I also began filing in the grip detail. You can see the part that I've done (top) vs the part that I haven't (bottom).
IMG_9169.JPG
At this point I'm thinking to myself "Wow, this is going pretty smoothly! I mean sanding sucks but this is pretty neat!"

And then karma caught up with me, in the form of improperly mixed bondo.

I didn't mix the hardener well enough, and as a result I was left with sticky putty that, even after smearing on extra and waiting a week I couldn't sand.

So I scraped it all out with a toothpick by hand. All of it. 3 hours. Mishap #1

IMG_9172.JPG
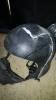
After that ordeal I hit it with a coat of regular primer in a different color and some bondo spot putty, and started wet sanding that to 800 grit. The color contrast really helped me keep track of my sanding depth.

IMG_9187.JPGIMG_9188.JPGIMG_9183.JPG

Which brought me to this point:

IMG_9191.JPG

Still with a ways to go and many more mishaps!
 
Last edited:
Hello there I've been doing 3D printing and making 3D printer props for about 5 years almost now and look at the photos I've attached to this response this is before and after my process I do there's no print lines and the object looks nothing at all as if it was never 3D printed which is what I personally go for. If you would like any help with any kind of advice or support I got you covered just message me with any questions regarding anything.

Sent from my SM-G920P using Tapatalk
 
Sorry here is the before and after photos I do not know why in my last response they did not post but if you would like some tips and tricks on what I do to make my 3D printed props to make them look as if they are not 3D printed and see no 3D printed lines at all I am more than welcome to help you out just message me with any questions regarding anything. Thanks
6b3c87ae2cacc607c3db36678c8ac73e.jpg
0a591a003008b72950e9237fd03bd873.jpg
790dcbbc0b9d7ee2401012753f6d93e9.jpg
a41063cc3ecad8fc4af3ecbff41bbf3c.jpg
12ec7fcb2f61cc098d7d17f9efa8addf.jpg
92f7d49e9931732260a310d41f00c23e.jpg


Sent from my SM-G920P using Tapatalk
 
Thanks all!

So I left off in the midst of the sanding process, with it sanded up to 800 grit, including in all the details with sanding sticks and small files (not shown)

IMG_9190.JPG

And then it was time to start painting. So I hit each respective part with Rustoleum Matte Nickel and Anodized bronze.

IMG_9200.JPGIMG_9199.JPGIMG_9197.JPG
IMG_9196.JPGIMG_9194.JPGIMG_9193.JPG

And at this point I was pretty happy with it. The finish was perfectly flat and smooth, except for a few hard to reach problems, but I knew it would actually end up helping me in the weathering process. That's where I'll pick up tomorrow.
 
Last edited:
And thus began the first shot at weathering process.

I started using a mix of watered down brown/black acrylic paints, applied with a toothbrush. I went one face at a time, scrubbing in the paints and letting them sit for 2 or so minutes and wiping it off.
IMG_9206.JPG
IMG_9216.JPG

And it was going well!

IMG_9204.JPG
IMG_9208.JPG

And then I did the other side, aka Mishap #2
IMG_9245.JPG

Looking back on it now it doesn't look nearly as bad as I thought it did, but I was far from pleased and decided that I would try it again using a different approach. Which stinks, because I really like how the other side looked, especially in hindsight. Oh well. Hindsight is 20/20

So back to the beginning.

IMG_9246.JPG
 
Last edited:
Marvin3242 I'm just letting you know a really good method for filling holes and stuff instead of using Bondo is baby powder and super glue just giving you a tip.

Sent from my SM-G920P using Tapatalk
 
Last edited by a moderator:
Marvin3242 Brother man I can tell you this much it's magical. Lol. Here's a picture of my kylo ren black series helmet I worked on for a customer and you can see that it's done it's job more than perfectly. Also just letting you know a good tip of advice is to test it on a piece of foam board or styring of some sort to just see how fast it hardens and test different mixtures because there's no guide book out there that tells you the amount of super glue and baby powder that's needed so it's all on eyeball and how you want it and what not if you wanted to be real pasty and not necessarily liquidy but pasty you can do that or if you want it real thick like cement you can also do that. Hope this helps out!!
e69a8e560557052a140da1d61ae58833.jpg


Sent from my SM-G920P using Tapatalk
 

Attachments

  • e69a8e560557052a140da1d61ae58833.jpg
    e69a8e560557052a140da1d61ae58833.jpg
    56.8 KB · Views: 95
Last edited by a moderator:
Annnnd we're back :D

So when I left off I had a failed weathering pass and decided to start over. So I followed a different approach and tried my hand at using Citadel Shades. I tried Agrax Earthshade, but I really didn't like how heavy and uneven the created effect was. I was looking for more of a weathered patina'd look, rather than caked mud.
IMG_9249.JPG

Mishap #3 So I started over again
And this is where I found an approach I like. I started by going one face at a time, brushing on watered down acrylic with a thicker brush.
IMG_9261.JPG
I let this sit for exactly 2 minutes, then began to blot the surface with a clean brush. This removed the brush strokes and gave me a more consistent patina surface. Then, after 4 minutes I dabbed the excess off with a paper towel and then followed it again blotting with the clean brush. I repeated the process for all the faces
IMG_9265.JPGIMG_9262.JPGIMG_9266.JPGIMG_9267.JPG
At this point I was very happy and moved on to the tip and the power cartridge (I think thats the name, correct me if I'm wrong). The tip has a weathered look that fades at the top where the heavy fire has prevented corrosion and has some slight bluing. I don't have an airbrush so the bluing is a bit out of reach, but I did water down my acrylics and then apply them in then passes to create a very convincing fade look. I was really pleased with how this came out.
IMG_9274.JPG

The power cartridge was painted with rustoleum anodized bronze. Afterwards I washed the entire gun in Agrax shade Nuln Oil, followed by a quick application of Rub 'N Buff. Which got me to this point.
IMG_9272.JPGIMG_9270.JPGIMG_9269.JPG

Which leaves only the grips, final touchups, and topcoat till picture time!
 
Last edited:
Hey what's up man Marvin3242! Looking good so far! Also are you mixing colors when weathering I'm just curious because if so you'll be able to achieve that weathered look you're going for. Also I'm just wondering do you do your weathering by hand brother man? If not it'll just look like like something or someone put it on. But doing it by hand you'll create an uneven weathered surface. Therefore you will create a naturally weathered looking blaster with a surface finish of your liking =)

Sent from my SM-G920P using Tapatalk
 
Last edited by a moderator:
Hey what's up man @Marvin3242! Looking good so far! Also are you mixing colors when weathering I'm just curious because if so you'll be able to achieve that weathered look you're going for. Also I'm just wondering do you do your weathering by hand brother man? If not it'll just look like like something or someone put it on. But doing it by hand you'll create an uneven weathered surface. Therefore you will create a naturally weathered looking blaster with a surface finish of your liking =)
Thanks @Fierceskill! I am mixing my colors, about 1:4 black to brown and then watered down until i get a consistency that I like. I applied it by hand with a stiffer brush and then came back over it and blotted the surface to remove the brush lines. I'll post some higher res pics later today. Thanks for the advice!
 
Last edited:
Almost done! Tackling the grips and finishing!

So this is where we're at
IMG_9283.JPG
I started by masking off the grips, and then started applying Agrax Nuln Oil Shade until I got it to a color I like
IMG_9282.JPGIMG_9284.JPGIMG_9286.JPG

The Shade has a very dull finish, so to bring out more of the metallic nickel look and make it more of a gun and less a hunk of plastic, I hit it with some rustoleum Matte Satin Finish clear coat. Which leaves me here.
IMG_9285.JPG

Almost completely done!
 
Last edited:
Its been quite the journey to get from this
IMG_9191.JPG
To this
IMG_9328.JPGIMG_9331.JPGIMG_9332.JPGIMG_9333.JPGIMG_9329.JPGIMG_9334.JPG
I will say that the lighting for these pics was kinda weird so I took one in a different location to try and give a sense of the actual color. I was going for a halfway point between Poe's and Leia's (a happy medium between more of a tan and a black) and it came out the exact color I was hoping for.
IMG_9327.JPGIMG_9285.JPG

- - - Updated - - -

That looks absolutely amazing.
Thank you very much!
 
Last edited:
Well done. Have you thought about adding the blue light effects into it?
Example: https://www.instagram.com/p/BUof2t7lhNV/


Hahaha I would love to! That's actually one of the first pics I saw when I was considering whether or not to build the kit. But unfortunately to add it at this phase it would have to be printed in a different way. Mine was printed in the form of several solid components that slid together and were then painted, whereas most are the whole gun split in half and the two shells painted separately.

But if theres a will theres a way...;)
 
Last edited:
I'm not trying to say you don't know your stuff or anything like that but that is my friend not how they made that gun that is the Hero version and it consists of 3D printed metal parts and SLA printer parts and specific areas of the gun is hollow so they then can install electronics just saying they wouldn't split it in half and do it like that just because it would be a s***** job. Just saying because the ones that light up and everything are usually 9 times out of 10 3D printed metal parts and SLA printed Parts as well and they are the hero versions then the ones that don't light up are there stunt versions of the hero props which most of us already know. Just FYI

Sent from my SM-G920P using Tapatalk
 
...it consists of 3D printed metal parts and SLA printer parts and specific areas of the gun is hollow so they then can install electronics just saying they wouldn't split it in half and do it like that just because it would be a s***** job. Just saying because the ones that light up and everything are usually 9 times out of 10 3D printed metal parts and SLA printed Parts as well and they are the hero versions then the ones that don't light up are there stunt versions of the hero props which most of us already know. Just FYI

https://www.youtube.com/watch?v=RkD4I1YWS1g

Ahh you're completely right, I didn't see that was John Boyega and thought it was linked to the same blaster featured in the video above. I edited my original post for clarity's sake. I meant to cost effectively add LED's most people split their prints down the middle, as shown in the video.

Thanks for keeping me on my toes! I'd hope that they wouldn't build the hero prop that way! :facepalm
 
This thread is more than 6 years old.

Your message may be considered spam for the following reasons:

  1. This thread hasn't been active in some time. A new post in this thread might not contribute constructively to this discussion after so long.
If you wish to reply despite these issues, check the box below before replying.
Be aware that malicious compliance may result in more severe penalties.
Back
Top