Raptorion Pharah from Overwatch

maddycat

New Member
First post woo!! I've been lurking for quite a while and i finally decided to post updates about a build ive been working on. Pharah's Raptorion skin from Overwatch! Ill be wearing the costume to anime expo without light, servos, or special finishes, but i will be adding all of this in to the costume in time for Blizzcon. I'm hoping to enter the cosplay contest!

Here are front, back, and side references:
ScreenShot_17-05-26_01-59-24-000.jpgScreenShot_17-05-26_01-58-40-000.jpgScreenShot_17-05-26_01-58-52-000.jpg

I have completed much of the patterning for this costume already. Most of it was completed by a lot of trial and error, cutting out pieces to the size i think they need to be, re-cutting and re-drawing over and over again for hours until I got everything right based on my own and pharahs proportions. I don't have a computer program to help me so im stuck patterning everything by hand for this one! each individual piece of the armor has 10-30 seperate pattens pieces so you can imagine how much time its taken me just to pattern ( I think ive clocked about somewhere between 70-80 hours so far.) Becase I am using a method like this, I decided to make drafts out of all of the arm and leg pieces so that I would not waste the higher quality foam that i would be using on the final build. if anyone wants to see the giant stacks of paper that go into a pattern i would be glad to post a picture.

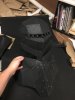
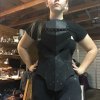
here are the drafts i have finished so far

IMG_2814.JPGIMG_2813.JPG
IMG_2817.JPGIMG_2815.JPG
( i cant figure out how to flip these pictures, forgive me. if some knows how i would love to know)

alright, this is all ill post for my first update. Day by day, or every few days, ill upload what progress i've made, and show the things i did before i started this thread, and if anyone has any questions feel free to ask! I think i will show the torso and wings progress in the next post.

( also, i am unable to use tags on this post, if someone knows a solution please let me know!!)
 
I know how you feel. I drafted almost all patterns for Cordana by hand as well. Analog work ftw!

Good luck on Pharah! So far it looks pretty good!
 
Alright, last year was crazy and I never ended up updating all of my progress, so i'm gonna do a walk through of what i did! on this costume starting off where I left off.

((( if someone can tell me how to flip the images i would love to know! I cant figure out how to get them them to stop flipping!!)))


After finishing the drafting for the costume, which was a large portion of making the costume ( probably 80-90 hours total of patterning the costume) I moved on to doing the final pieces in tnt cosplay supply foam! I used various thicknesses depending on what type of piece i was making. generally i stuck with 6-8mm foam.
IMG_2982.JPGIMG_2980.JPG

I used a duck tape corset to get the base patterns for these pieces, and traced out the shapes I would need. After cutting everything out, i made the pieces slightly larger than the original pattern to make up for the thickness of the foam. Cutting the foam with bevels and various angles helped me get the angular shapes that I needed. i also did this with the legs!

IMG_3265.JPG


the drafts on the legs were extremely helpful in making the final piece!
 

Attachments

  • IMG_2980.JPG
    IMG_2980.JPG
    1.6 MB · Views: 77
  • IMG_2982.JPG
    IMG_2982.JPG
    363.1 KB · Views: 157
Onto the wings!


I didn't want to use a backpack type harness due to chronic back pain, so I opted for a system where the weight would be distributed to my waist.

I ordered a wist trainer/ support online, and used that as the base for my wing harness

for the brace that is attached to my back and the piece that holds the wings, I used sintra board. I found this material rigid enough to support the wings, but lightweight enough to hold for 10+ hours without many breaks.

IMG_2416.JPGIMG_2635.JPG

I figured out the scale by printing out a few sizes of the wing and seeing which one was best scaled to me
IMG_2634.JPG

I then tested out the size again by making a draft from foam board!
there were two bars bent to shape to support the actual wing pieces. the final wings were held into place with nuts and bolts, which made it easy to take apart for repairs and travel.

IMG_2640.JPG


I made the base of the wings from enforced sintra, and everything else was made of 8mm floor mats and 2 mm craft foam.
IMG_3049.JPGIMG_3064.JPGIMG_3068.JPG

each wing was made of six pieces, which were held together with industrial velcro to made it easier to take apart for travel
IMG_3280.JPG
here you can see how all of the pieces come together
 
View attachment 811136

Here's the entire suit laid out and ready to be painted! I was going crazy because I only had one day until the convention 0-0

I covered all of the pieces in 3 layers of plastidip

I somehow managed to (very sloppily and incorrectly) paint the entire suit in 8 hours

Heres how I looked the day of the con!


View attachment 811137

after I wore it to the con, I started the process of repainting the whole suit.

I hand painted the entire suit using sponges and brushes. the repaint process took me around 60 hours I believe.

IMG_4507.JPG

the first thing i did was change the base color. it was much to dark the first time arroud, so put a new base color on everything. you can see the difference in these two leg pieces.

i also added pink details on to various pieces using a plastic folder, i just cut everything out with an exacto knife!
IMG_4476.JPG

I did most of the weathering in the blue parts wiht a dark blue paint, and highlights with white. I added a lot more shading than in the actual game in order to make the pieces pop in pictures.

I went over all of the black parts with a wash of silver to give it an extra pop! it gave it a metal effect that wasnt there before.
 
Last edited:
Here's how i did the lighting in my costume!

Since i'm not good with wiring my own led strips up, I decided to use fairy lights! The battery packs are tiny and easy to hide

I cut out spaces for the lights to go in, and then hot glued the individual lights into place. it was quite time consuming, but it worked!


View attachment 811145 View attachment 811146 View attachment 811147

heres what it looks like altogether

View attachment 811148


I did the same lighting and painting process on all of the other pieces!
View attachment 811149 View attachment 811150


View attachment 811151 View attachment 811152


and finally after nine months of work, the final costume was complete!
im very happy with how everything turned out :)
View attachment 811153

I do wish I had more progress pictures, but think this sums up everything pretty well :D I did also film while building, and am working on a few videos documenting the process!

here is the first of the series :

https://www.youtube.com/watch?v=4l3h4gGdyNc&t=4s

I think I will make another post soon about how I put on the suit and how its all connected!
 
This thread is more than 5 years old.

Your message may be considered spam for the following reasons:

  1. This thread hasn't been active in some time. A new post in this thread might not contribute constructively to this discussion after so long.
If you wish to reply despite these issues, check the box below before replying.
Be aware that malicious compliance may result in more severe penalties.
Back
Top