"Witcher" (original character)

Keelan562

Well-Known Member
At it again with an original Witcher character. The overall design is heavily influenced by the School of the Cat armor from Witcher 3: Wild Hunt. Some parts are modified either for aesthetics or [potential] ease of making. A lot of the parts built will be made with craft foam, especially the leather bits. Primarily the idea of doing this was to make it easier to make the chest piece and gauntlets. However, a chainmail shirt is being made to wear beneath the chest piece, even though only portions of it will be seen.

Witcher Graelan.jpegWitcher Graelan colored.jpeg

Chainmail: Started off making even the links myself with fence wire and a wood dowel. While visually it was looking awesome, it was proving a bit too time consuming (also had to take into consideration a friend is helping me and I don’t want to take up too much of their time). So pre-made jump rings were bought and the work continued.
20170408120408.JPG20170408160911.JPG

A lot of what looks to me like a “bib” was made. Work stopped there while figuring out how to do the sleeves and collar section, which comes back up later to kick my brain in the *****.
20170418_205042.jpg

Some items I ended up needing to buy online. The pants and boots I both ordered on eBay, as well as the swords. The medallion (wolf school with red LED lights in the eyes) I’ve had for a while, just had to dig it out of storage. The harness for the sheaths I got off a seller on Etsy (https://www.etsy.com/shop/lantredurenard ): I could not be more pleased with the item!

Foam: In taking a break from the chainmail, I decided to start work on some of the craft foam pieces. I started with the gauntlets. The idea is to use some fingerless gloves I have and put the gauntlet pieces over them. I found a video on YouTube (https://www.youtube.com/watch?v=xfe7JM_kQGw ) that showed how to use an iron and foil to give craft foam a leather texture. I’ve seen other since then that are just as good, but as this was the first I saw I felt the need to give a shoutout to this video in particular. :) The initial results were exciting enough, but once paint starts to get added, it really starts to come to life!
image (1).jpegThe black section is how the foam looks naturally, with the painted over version of it on the right. The two segments above it were both parts of a sheet of gray craft foam.

image4.jpegimage5.jpegimage6.jpeg

After seeing how the two different foams looked painted, I decided to go “light” with the straps. Hopefully, this allows for some separation when all is put together. I used the fence wire to create the “buckles” for the straps, and painted some of those little googley-eyes to use as “rivets.”
Still figuring things out, but the plan is to use Velcro to secure things in place.
image8.jpeg

Collar/Current Issues: The biggest hurdle right now is the desired collar for the shirt. The piece itself was made and came out well, but the issue comes in attaching it. While the back seam lines up perfectly, there is a strange part around the shoulder where the lines stop running together. I tried getting a little creative with some “patching,” but didn’t like the end result, thus the collar was removed until I can figure things out (suggestions welcomed!).
image7.jpegimage2.jpeg

I’m really hoping I can get the collar to work. My other option is to make a bishop’s mail to give the illusion that the shirt has a collar, but an actual collar as a part of it would be preferred.

Next Steps: Gauntlets are a priority for now, while work will continue throughout on the chainmail shirt.
image.jpegimage1.jpeg

The next big piece for the project will be the chest piece. I’m thinking that I’m going to take a t-shirt and cut it apart at the seams, then use those pieces to trace the shapes to cut from the foam roll I have. I’m thinking that having it broken up into pieces then put together where the seams are will be the best way to get it done.
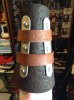
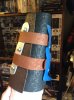
Also, I’m going to try making sheaths for the swords. I’ve already experimented with this once (it was a test to see how the leather texture would look, as well as what a pain in the ass the sheath itself would be to make), but I’m thinking of using different swords for the actual costume, thus different sheaths would have to be made. I’ve already started on the shell for one while I wait to find another of around the same size that looks good enough so I can start on that one after it’s ordered and arrives.

What’s Left: Next I need to figure out the pouches. Been looking at some options online, but may make one (again, with craft foam) if it comes down to it.

Also found a 3D printable version of the knife used for collecting trophies, so I’m thinking to order one of those and make a sheath for that as well (http://www.thingiverse.com/thing:868252 ).
I’m also thinking I may do without the crossbow in the end. Can’t find any good templates to make one out foam or as papercraft, and any decent looking replicas I find are way out of what I’d like to spend on such a prop.

More pics and updates to come as things progress! Sorry for all the chunks of text. ^_^
 
UPDATE #1:

Bit of a small update here. First off, there was some major work done with the chainmail shirt. As previously mentioned, I wasn't 100% convinced with the collar, so I made a second version (wider) and added that to the shirt, followed by expanding the opening at the chest so that I could fit my head through. While I don't like that the halves of the collar are so far apart (closer together would have been preferred), I think I did a decent job considering chainmail shirts don't have collars in the first place! :D

Shirt with Collar.jpegCollar 1.jpegCollar 2.jpeg
Going to work on adding a little more to the bottom of the shirt torso, as well as getting the sleeves attached.

Next on the update, these are the two swords that I intend to use. I'm going to make a scabbard for both that are the length of the longer blade, even though one sword is actually shorter than the other. I figure this way, I can have the shorter sword easily in reach for photo ops.
Swords.jpeg
I've already got the cardboard shell for the scabbard of the longer sword done, just need to go over with with leather-textured craft foam to finish that up, then it's cutting the cardboard pieces and doing the same for the shorter sword.

Final item is the sfx make-up for the scar. This was super easy, and the results were more than I could have ever hoped for, especially for a first try!
Eye 1.jpegEye 2.jpeg
I've typically used liquid latex when making scars, but wanted these to be recessed rather than raised on the skin. Thus, I discovered rigid collodion, and I am in love with the stuff! Super easy to use, and the more layers you put in place the more pronounced the effect. All that's going to be changed for the final application is that I'll go over the scar with a light dusting of colorless powder to cut down on the shine.

That's all for now! Still working on a few bits in the next couple of months that I should be able to share when done. :)
 
UPDATE #1:

Bit of a small update here. First off, there was some major work done with the chainmail shirt. As previously mentioned, I wasn't 100% convinced with the collar, so I made a second version (wider) and added that to the shirt, followed by expanding the opening at the chest so that I could fit my head through. While I don't like that the halves of the collar are so far apart (closer together would have been preferred), I think I did a decent job considering chainmail shirts don't have collars in the first place! :D

View attachment 733649View attachment 733650View attachment 733651
Going to work on adding a little more to the bottom of the shirt torso, as well as getting the sleeves attached.

Next on the update, these are the two swords that I intend to use. I'm going to make a scabbard for both that are the length of the longer blade, even though one sword is actually shorter than the other. I figure this way, I can have the shorter sword easily in reach for photo ops.
View attachment 733652
I've already got the cardboard shell for the scabbard of the longer sword done, just need to go over with with leather-textured craft foam to finish that up, then it's cutting the cardboard pieces and doing the same for the shorter sword.

Final item is the sfx make-up for the scar. This was super easy, and the results were more than I could have ever hoped for, especially for a first try!
View attachment 733653View attachment 733654
I've typically used liquid latex when making scars, but wanted these to be recessed rather than raised on the skin. Thus, I discovered rigid collodion, and I am in love with the stuff! Super easy to use, and the more layers you put in place the more pronounced the effect. All that's going to be changed for the final application is that I'll go over the scar with a light dusting of colorless powder to cut down on the shine.

That's all for now! Still working on a few bits in the next couple of months that I should be able to share when done. :)
I have a bottle of rigid collodian on the shelf all ready to go for my Reinhardt scar.
Your test looks great :)... ive been told though to not get it too close to the eye itself.
Anyway, the rest of your armour looks kickarse too.
Looking forward to more.
 
I have a bottle of rigid collodian on the shelf all ready to go for my Reinhardt scar.
Your test looks great :)... ive been told though to not get it too close to the eye itself.
Anyway, the rest of your armour looks kickarse too.
Looking forward to more.

Thanks buddy! Yeah, the pics show pretty much the placement of how close I'm willing to get it to the eye (could get a little closer with the upper one to the brow, though). Also, when applying it there, for sure use the method of applying spirit gum remover to take it off, don't just peel it. Less of a risk of pulling off enough skin to make an actual scar.

Thanks for the complements. Hoping things come along well in the next few months and it all comes together decently. And I'm hoping to see some awesome pics of the Reinhardt costume. :)
 
UPDATE #2:

Sorry this is taking so long. Got really busy with work and such (as happens with all of us!), but I've some free time before the new batch of students arrive, so I sat down and started up on the project again!

For this update, I'm showing the progress on the sheaths for the two swords. Only one is completed at the moment, mind you: I literally finished it about half an hour before posting this. :)

Swords and cardboard.jpegSwords w harness.jpeg For the start, we see that I have the two swords now with sheaths made up of cardboard for the shells, held together with masking tape. To get the lengths the same, I started with making both sheaths for the longer sword, then cut out the triangular indentation from the crossguard on one so that it fit in snug. The second pic also shows off the harness I mentioned in a previous posting.

Tip design.jpegI wanted a nice, rounded tip at the end of the sheath, but couldn't quite figure out how to do it. I started with a design drawn around the shape of the sheath as it was in cardboard form, then thought to have it sort of clamshell around the bottom.

Tip 1.jpegTip 2.jpegTip 3.jpeg The two halves would never meet considering how thick the sheath was (especially after wrapping leather-textured craft foam around the cardboard shell!), so I took a piece of scrap foam and made a band to bridge them together as best as I could. if I took a little more time, I could have probably made the seams run a little smoother. Luckily, a decent couple coats of plastidip helped with that, shortly followed by a nice coat of silver spraypaint.

Tip A.jpegTip B.jpeg This shows off the tip cover attached after the silver paint is added. The small detail in the middle was always part of the design, put in place to cover up the seam where the craft foam beneath ended and the cardboard/masking take remained. LOVE that the idea actually worked out!

Sheath.jpegSheath w Sword.jpegSheath w Sword and Harness.jpeg Some shots of the sheath (without sword, with sword, and finally strapped in place in the harness). Really liking how this one came out in the end, and looking forward to the next one! Also, forgot to take photos, but the band of silver at the top of the sheath is just a piece of craft foam painted silver after drawing some creases in it with a ball-point pen. Not sure if the detail comes through or not, but I'll be sure to feature a detail shot when it's beside its sibling.

A final piece for the update, started back on work with the gauntlets.
Gaunlet alpha- 2.jpegGauntlet alpha-1.jpeg Still need to do some work to get them to fit a bit better, but they're coming along! You can see the different colors helping to separate the "leather" bits. I still need to get the fitting right before adding the buckle effect to the straps, and I'm thinking I might go over them (the straps) with a wash coat to make them a bit darker, as they stand out a liiiitttlle too much. ;)

That's all I've got for now! Hopefully more fairly soon!

(also, sorry for the stupid sideways "attachment" shots at the bottom...Friggin' hate it when a post does that!)
 

Attachments

  • Gaunlet alpha-2.jpeg
    Gaunlet alpha-2.jpeg
    671.6 KB · Views: 77
  • Gauntlet alpha-1.jpeg
    Gauntlet alpha-1.jpeg
    827.2 KB · Views: 71
Last edited:
MINI-UPDATE 2.5:

Just finished up the second sheath for the "silver" sword and couldn't wait to share some pictures!

Sheath Design 2.jpeg Of course, it all started with the design. I wanted to make sure it looked different than the other. Part of that came with more pointed elements to match the different crossguard; another difference came in this one having far more color to it. I went for a combination of green and gold (with a splash of brown) as a nod to one of my favorite characters from the books/games.

Sheath 2.jpegSheath 2 w Sword.jpegSheath outside.jpeg The process was basically the same as with the previous sheath. The big difference with this one was cutting out the portion to allow the angular trim at the top. The brown strip was done by simply drawing straight lines in the craft foam (after texturing) with a yardstick edge. I just made sure to go over that section with the same brown acrylic paint that I've been using on the gauntlets, as opposed to the dark green acrylic used for the other portion. The "stitching" was just a bunch of dots I made with a metallic Sharpie. The third pic was taken outside and shows the colors of a little bit better.

Sheaths.jpeg And here we have a pic of the two swords in sheaths side-by-side in the harness! Overall, I'm very pleased with how these came out, considering I've been figuring out the process and making it up as I go along.
 
UPDATE 3:

About time for another update!

Chainmail sleeve.jpegChainmail semi.jpegChainmail semi A.jpeg
First and foremost, the sleeves for the chainmail have been added! To help with seaming the sleeve to the torso, I looped a thin bit of suede lace through the edge rings. Ended up liking the look that I decided to leave them in place. Also, I didn't fully close the sleeves, leaving the under area open. This is because, with the collar on the shirt, it's very stiff to get out of in the neck/shoulder area, and I wanted to avoid having a panic attack when trying to get this thing off alone. XD Because of these modifications, I decided to forego the "leather" trip around the edge of the sleeves.

I started to work on the vest piece, finally. Using the same method as I have been for all the leather bits making them from craft foam, I started by cutting up a shirt I felt would be the right size. From there, I made three pieces: one for the back, and two for the "flaps" that would make up the front of the vest.
Vest A.jpegimage2.jpeg
Here you can see I have things taped together roughly where the seams are. The horizontal pieces of tape were a reference of where the "buckles" are to later be placed. The second photo is just to give a better look at the texturing. The pieces were fixed together with the appropriate combination of superglue and PATIENCE all along the seams (a few places where they're not perfectly lined up, but nothing noticeable unless you're looking for them). You can also see in the first photo where I had to re-attach the bottom portion of the front flap where I cut in the wrong place from the pattern and had to extend the front; even though the area was a bit more rigid from the superglue, it was still flexible enough to work with and was disguised during the painting process.

Pieces shown earlier are being used for the buckles at both shoulders and later where the flaps overlap (I still need to add those pieces once I get the right type of velcro). Also as shown before, the rivets are googley-eyes painted over silver (also...is it just me, or does the unpainted version look some some strange variation of a Zygarde cell from Pokemon? :p )
image3.jpegimage7.jpegimage0.jpeg

For coloring, I've started going over the vest with a dark blue acrylic paint. The coloring in the sketches has the bulk of the vest a lighter blue with dark trim, but I'm changing it around so that the trim will now be the lighter shade of blue once I get around to painting that. (Also, went and added the wolf school medallion to help give a sense of effect to the way it's looking all together).
image4.jpeg

I've attached the first of the two shoulder buckles, so this pic (though somewhat on the dim side in terms of lighting) gives a good indication of the end product)
image5.jpeg

The final bit for this update comes in the form of my trophy knife! I found an excellent 3D print file based off the knife in The Witcher 3 here: https://www.thingiverse.com/thing:868252 and had it printed through Shapeways. The print actually came out much larger than I expected (I was anticipating something between 3/4 and 1/2 the size it came out as), but in the end I like the idea that it would be such a large knife in order to be able to collect the trophies off some of the larger monsters.

Knife A.jpegKnife B.jpegKnife C.jpeg

I wanted to give it a different feel than the swords, so I opted for getting a piece of vinyl that had a wood print on it to use for the handle. I cut it to size, and used a single hole punch to add where the "rivets" are in the handle.
image10.jpegimage1.jpegimage9.jpeg

Finishing that part of the project, I went and did a small scale version of the sheath for the knife, and added some of the suede lace wrapped around it. I'm thinking to have this on the belt around the small of my back, out of sight but easily accessible for when those hunts are successful. ;)
image8.jpegimage6.jpeg

That's it for this update!

Next one, I plan to have the finished vest, and I'll probably take a couple pics to show the contact lenses I bought for the costume (already done a test fitting, just didn't take any photos). After all that, all that I'll be waiting on is the belt and pouches I commissioned from a shop on Etsy, and the costume will be complete well ahead of time!
 
Last edited:
Thank you!

I'm hoping my students and co-workers this year get a kick out of it on Halloween (didn't dress up or celebrate last year, so I need to make up for it. ;D )
 
UPDATE 4:

Got some nice progress to share.

First, I had an idea about getting some contacts that were UV reactive, that way my witcher eyes would glow when in certain light.
Eyes (UV).jpegEyes (norm).jpeg
They're a bit more on the "green" side than "yellow" when in regular light, but that could also be because my natural eyes (blue) alter the coloring somewhat from beneath. But they get the job done! I just need to keep an eye on them (ba-dum-tsh!) throughout the day to make sure they don't get too lopsided. :D

Another big step in the update is that the belt came in!
Top 1.jpegTop 2.jpegTop 3.jpeg
These first three show me figuring out how to wrap the belt, considering it's far longer than I thought it would be. I haven't 100% figured if I want the sheath for the knife placed there or not (and certainly haven't figured out how to affix it; in the photos, it's simply wedged between the straps).

Here's some shots with the sheath:
Top S1.jpegTop S2.jpegTop S3.jpeg
A bit of a shame that the sheath is covered like this, but then again I never really noticed it being in place in the game while playing, so I guess it would make sense that it's rather hidden but still easily accessible. Either way, I think the costume has come a long way since just being a concept art piece. ;)

The belt was a piece commissioned of a shop on etsy: https://www.etsy.com/shop/ChaseTheMyth

They are simply awesome! Great communication, they were able to make the piece for me, even though I contacted them right in the middle of their busy season (due to so many Renaissance faires and such happening consecutively), and were even able to work out the best coloring option so that it matched with the colors being used in the costume. The belt and all the pouches/accessories that came with it (there were other pieces that I decided to not use for this particular costume) came out a bit on the expensive side, but considering it's all actually made out of leather and crafted by hand, I'm not about to complain, and I'd highly recommend others check out their shop.

Going into a combination of the UV reactive material and the swords, I thought it would be cool if the "glyphs" on the blade would glow. So I went and got me some of those invisible-marker style pens that you can only see the writing for with blacklight, and started marking the "silver sword" blade. Two different sides to the design are visible under UV/blacklight (otherwise invisible):
UV sword A.jpegUV sword B.jpeg
I do wish my lines were a bit better, but I think it gets the visual across well enough for now.

Only part left to finish is getting the elastic bands around the palm area for the gauntlets, and getting the velcro in place for the "buckles" similar to what I did with the front of the vest. Will definitely be ready in time to wear at work on Halloween. Can't wait for the students to see it! :D
 
Last edited:
Thanks buddy!

And yeah, it's turning out to be an interesting mixed-media costume. Funny enough, everything below the waist has real leather (pants and boots are leather as well, just haven't posted pics of them), while everything above with the exception of the harness for the swords is the craft-foam leather. Kinda cool to see the two textures next to each other like that.
 
Understandable. I'd be in the same position were I in any way able to make the pieces out of the actual material with any degree of quality to match what I could re-create with the foam medium. Plus, I'm thinking of comfort (heat in California, plus the weight of the costume).

If I decide to do the costume again down the line, I will definitely do the foam parts with actual leather and metal. :)
 
I'll be sure to put some time into learning the craft a bit once I have the free time to do it (right now, simple materials are where I'm at as a starting point). I'd LOVE to be able to start learning to make my own pieces of clothing and such; so much badassery that can be made that way later on. :D I've just never done any sort of sewing or anything like that. Pretty much everything I'm doing with this costume I'm learning or figuring out as I go along.
 
Re: "Witcher" (original character)

UPDATE #5:

The costume was overall a success for Halloween yesterday! The students loved it!

Shot of the test fitting the week before:
Test Fitting A.jpg

Started off the day adding the final scar:
Final Scars.jpeg

I had to forgo the use of the contacts, as one of them had developed a small rip and it felt like a knife being held against my eye. I tolerated it for all of 2 minutes before scrapping them. However, based on the pics in daylight, I sort of like how the blue of my eyes worked with the overall costume, so I might order a pair of BLUE cat-eye contacts for the costume (I know, I know...no Witcher on record has BLUE eyes...so I guess my OC will be the first! :p ) The gray in my hair was accomplished by lightly brushing in gray eyeshadow. Going to be getting more for the forthcoming photoshoot (a little more about that toward the end of the post) so the color is a bit more obvious, as right now it just looks like I'm getting up there in years. ;P

And got a few good shots taken while at work walking around during lunch with the students:
Halloween 02.JPGHalloween 01.JPG
My step-sister (who's a student there) wanted to get in on one of the pics with me:
Halloween 05.jpg
Then of course a few of the work-bros wanted a pic together, too:
Halloween 04.jpg

It would have been great if I could have had the swords on my person during the day, but of course if we don't let the students have prop weapons we need to set an example and not have them on ourselves. :/

I'm waiting to hear back from the friend of mine who helped with the photo shoot for my The Division costume to get in touch and we'll do a photoshoot for this costume as well with all the bells-and-whistles, so keep an eye out for those pics in the next couple of months!

Also, Hellwolve, you'll be very pleased to know that I'm 100% going to re-make the vest (and likely the gauntlets) later down the line in actual leather. Foam core was great in keeping the weight down and the heat tolerable, but lack of flexibility made the piece less-than ideal. If it were shaped to be a bit more snug, things would be different, but in the end I think your suggestion of making more pieces out of the materials they're representing is a valid idea, so thank you for the little nudge in that direction. :)


SIDE NOTE: Sorry for the thumbnails of the gauntlets again...and the outake of the test fitting XD ; accidentally attached the pics during the post and even though I deleted them, the thumbnails still who up in the weird attachment box thingie at the bottom of the post. :/
 

Attachments

  • Gaunlet alpha- 2.jpeg
    Gaunlet alpha- 2.jpeg
    1.3 MB · Views: 79
  • Gauntlet alpha-1.jpeg
    Gauntlet alpha-1.jpeg
    1 MB · Views: 80
  • Test Fitting B.jpg
    Test Fitting B.jpg
    1.9 MB · Views: 97
Last edited:
This thread is more than 6 years old.

Your message may be considered spam for the following reasons:

  1. This thread hasn't been active in some time. A new post in this thread might not contribute constructively to this discussion after so long.
If you wish to reply despite these issues, check the box below before replying.
Be aware that malicious compliance may result in more severe penalties.
Back
Top