WIP: Darth Revan

So i thought i would share where I am at with my Darth Revan costume. This is my second attempt at a Pep build, the first being a failed Obi Wan CW armor I got a little carried away with the fiberglass build up. I started looking around and love history, so I was researching the Old Republic and just loved the Revan character. To me his story of redemption, plus his gear is Schweet! I wanted the mask to look a little more rough, I see a lot of Revan masks that are too perfect to me. Although they look just amazing and bueatiful, but its just not the look I wanted my costume to reflect. So instead of making sure each line was dialed in, I left some areas rough, some pitting, some line unsmoothed. However I did forget to rough up the gloss black, but it will get a matte clear coat anyways. I still have lots to do to have it finished in time for ComicCon in sept. Enough chit chat, here are the pictures.

this is the earliest picture i have. I messed up the first print and forgot to scale it. I was pretty obvious right away it was too small, but I thought my 6 year old daughter would like a mask too. I just did a quick paper mache with hers.


View attachment 723777

View attachment 723778
View attachment 723779View attachment 723780

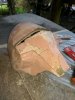
After the Gluing was done (I use straight PVA glue if anyone is wondering) I made a cardboard skeleton to hold the shape while I did the outer resin coat.
View attachment 723782View attachment 723783View attachment 723784View attachment 723785

Then I made one for the outside while I worked on the inside.

View attachment 723786View attachment 723787View attachment 723788 IMG_20170330_224106.jpgIMG_20170330_224057.jpg

So, I forgot to pick up some fiberglass cloth or matting. FYI, paper towels work in a pinch instead. I did 5 layers of paper towels, then bought some matting and did 2 layers of that. it is solid as a rock.
IMG_20170331_235213.jpg

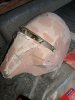
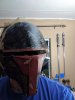
I couldn't find my black spray paint for a guide coat, so i just grabbed a tan. it kind of looked like skin and grossed out my Wife haha.
Here are some shots of knocking down the high ridges.

IMG_20170401_120322.jpgIMG_20170401_113809.jpgIMG_20170401_113801.jpg
IMG_20170401_233145.jpgIMG_20170401_120326.jpgIMG_20170401_233151.jpg

Here is a shot with the Mini Revan mask....

IMG_20170401_233228.jpg

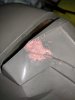
I then started the Bondo. Woohoo, getting close now.

IMG_20170403_201117.jpgIMG_20170402_175723.jpgIMG_20170402_175716.jpgIMG_20170403_201123.jpg

*I dont like using power tools on bondo because its too easy to sand off to much way to easily. So other than using my mini dremel tool for grinding down edges I only use sand paper by hand and a foam block to minimize finger sized grooves.

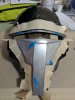
Here I had gotten it "smoothed" out some and started to do light coats of primer to smooth out more of the hills / valleys.

IMG_20170403_220316.jpgIMG_20170403_210042.jpgIMG_20170403_210035.jpgIMG_20170404_222516.jpg

Prime......Bondo.......sand......
IMG_20170405_215422.jpgIMG_20170405_215435.jpgIMG_20170405_215455.jpg

Prime.....Bondo......sand....
IMG_20170407_190215.jpg
 

Attachments

  • IMG_20170407_190220.jpg
    IMG_20170407_190220.jpg
    4 MB · Views: 120
  • IMG_20170407_190226.jpg
    IMG_20170407_190226.jpg
    4.1 MB · Views: 125
Not sure why the first few pictures aren't showing?

But here's a few test fit pictures. Even fits with my glasses on without hitting them. woot!
IMG_20170403_220259.jpgIMG_20170405_215540.jpg

At this point I ran into a problem, some of the card stock didn't get fully soaked in the resin. As I was sanding down the high spots during the bondo process I noticed the paper showing through. I posted my issue on the forum and got some great help. I ended up getting a thin layer of bondo or two over the exposed paper getting it sealed correctly. But, there was another problem I will share shortly.

IMG_20170407_232757.jpgIMG_20170407_232808.jpgIMG_20170407_232814.jpg

Sand, sand, sand,
Prime, prime, prime,
Sand, sand, sand.......
IMG_20170407_232822.jpgIMG_20170409_224835.jpgIMG_20170409_224851.jpg

I wanted to smooth out the dome first, because it was the easiest duh.

IMG_20170411_221226.jpgIMG_20170409_224901.jpgIMG_20170413_211148.jpg

I have tons of pictures, Ill skip ahead a bit. to some it up, sand, prime, bondo, sand prime, bondo.......

IMG_20170415_233403.jpgIMG_20170415_233353.jpgIMG_20170417_215826.jpg

I realized the the cheek areas were not the same on both sides and I had to even them up. Outside looks good, its a good thing the inside doesn't matter.

IMG_20170418_225159.jpgIMG_20170417_215836.jpgIMG_20170417_215833.jpgIMG_20170418_225207.jpg

Now I had about 4 coats of primer on the whole thing, and started to wet sand to smooth out some of the edges. Then I noticed something so lame.... There must have been just a sliver of paper that got exposed during the wet sanding. while I was drying it off I noticed some fuzzy stuff and using my nail I scratched at it. Yup swollen wet paper UNDER all the bondo and paint, just bubbling away. WARNING, the following pictures are DISTURBING!!
IMG_20170419_225653.jpgIMG_20170419_225659.jpgIMG_20170419_225754.jpg

I had to remove all the devils work......
IMG_20170419_230854.jpgIMG_20170419_230921.jpg
 

Attachments

  • IMG_20170420_203547.jpg
    IMG_20170420_203547.jpg
    3.7 MB · Views: 121
Okay, I guess I was a little over dramatic. But at the time I was NOT happy.
Bondo, sand, prime.
IMG_20170420_215835.jpgIMG_20170420_210133.jpgIMG_20170420_203547.jpgIMG_20170420_215843.jpg

Then after 3-4 more coats of primer(using #0000 steel wool instead of wet sanding because I'm scared now), I started laying on thin coats of gloss black.
IMG_20170422_202651.jpgIMG_20170422_202704.jpgIMG_20170423_163719.jpgIMG_20170423_163709.jpgIMG_20170422_204357.jpg

It kind of sat drying completely for 24 hours. I could not decide on what way I wanted to do the weathering, after reading a million different ideas with varying degrees of difficulty. I decided to try my hand at dry brushing, I was having a hard time picking up the brush though because the gloss black looked so pretty all by it's self.

But I put my purse down, maned up and grabbed that chip brush and metallic silver like a boss.. ROUND ONE.
IMG_20170423_174633.jpgIMG_20170423_174640.jpgIMG_20170423_174644.jpgIMG_20170423_175206.jpgIMG_20170423_175210.jpg
IMG_20170423_175214.jpgIMG_20170423_175227.jpgIMG_20170423_175233.jpgIMG_20170423_175230.jpgIMG_20170423_175237.jpg

Then I layed down 4 coats of silver acrylic paint as a base for the red.
IMG_20170423_185154.jpgIMG_20170423_185157.jpgIMG_20170423_203933.jpgIMG_20170423_203935.jpg
 

Attachments

  • IMG_20170423_204440.jpg
    IMG_20170423_204440.jpg
    3.4 MB · Views: 110
I wanted to add a level of weathering I have never tried. TOOTHPASTE!!
Pretty straight forward, I used a small spreader that came with the can of bondo I bought to put it on. painted over it........
IMG_20170423_204440.jpgIMG_20170423_205340.jpgIMG_20170423_205339.jpg

Using an air brush I mixed a drop of black to a bunch of red. Watered it down A LOT I started to build the layers. I had a minty scent as the airbrush blew =-)
IMG_20170423_205342.jpgIMG_20170423_212920.jpgIMG_20170423_212923.jpgIMG_20170423_212925.jpg

I lost count of the layers of red, but it took a while to cover everything. I then waited 1 hour, I cleaned up and watched an episode of the Following with Keven Bacon.
An hour later I grabbed some damp paper towels and gently wiped off the toothpaste exposing the silver underneath....
IMG_20170423_221808.jpgIMG_20170423_221805.jpgIMG_20170423_221811.jpg

Sorry, I thought I had some pictures of the toothpaste removal. I was busy, Leave me alone. haha.

Anyways, here are the last pictures I took at 12:08am (as in this morning)

Dry Brushed with:
Silver Acrylic
Silver/Black mix Acrylic

Brown/Black wash (way watered down)

IMG_20170424_000100.jpgIMG_20170424_000119.jpgIMG_20170424_000127.jpgIMG_20170424_000143.jpg


I have started the chest parts. I made a super basic design in blender then unfolded it in pepakura. I will upload that progress later after work. I would like to thank the forum. Every google search I did put me here to find an answer. Thanks for checking out my build and I will be finishing this costume for comiccon, so it will be updated..
 
Here is where I am at with the chest armor right now. The pep is just a rough template, I'm sure there are better ways, but this works for me. The drawings I did were just for a visual reference. I made a cardboard frame to hold the shape similar to the mask. Then I did the same thing on the out side to fine tune the shape a bit more. And that's it so far..

0afaab413f72c40d2c48ac8a8fffee38.jpg
1bbdd18a7a48f16077a5c5f04c4620c7.jpg
4ebedfa22ef68ea1bfc1ab5edd034ce5.jpg
a0f792eb4c7f38c6f8c29bf55856e2d5.jpg
95688af3de86e801be50f867ba4e0524.jpg
6b90fd0d4f9e955ddb7b28f60270e3c0.jpg
5ef92172aa1c4c9e0ab5e0eb96ad3d9b.jpg
5b86b2e2753e94270ae2f9aa6675a16a.jpg
fe07c7625c04d96ede66e7cef554db31.jpg
8f9dc1624935f8425df252fe78756161.jpg


Sent from my Pixel XL using Tapatalk
 
Not much too report. I put a generous layer of resin on the inside trying to make sure all the card stock was soaked. The next day I did the first strengthening​ layer of fiberglass matting.
*FYI, if you are doing this for your first time, make sure you get the "chip" brushes to spread out the resin. I read that some people prefer to use the sponge brushes, don't do it. They suck big time for spreading the resin and soaking the matting. And about 20min into using the foam brush the plastic core broke. I have used chip brushes for years doing glass work, and I thought I'd try out one. I eventually ran inside and grabbed a little brush from a hair dye kit (sorry Honey) and that worked loads better.

Tonight I'll be working on a second layer to strengthen the piece before I cut the 2 pieces apart.
0428881aaee0573dc4100dec57362ddb.jpg


Sent from my Pixel XL using Tapatalk
 
Tonight I cut all the hang over fiberglass around the edges, and cut the upper and lower pieces apart.

Now I was hoping that my pep file had enough left over from the middle part I cut out to also cut out the hand guards. And it did, hurray for pre-planning!

I also put a small bit of some air dry stucco clay I had laying around to see if it could work for some of the raised details. The plan is to put a thin coat of Bondo on it once it's all dried out. It dries quit hard but I'm more curious about whether or not it will stick enough and not crack as it dries. After 24hrs I'll know, then I'll remove the test clay and start shaping the whole thing.
0d19481b0ee2d5ba130234d6f1bbdee4.jpg
e2fc6d28f7fa9e26ac30944b1ab54f1f.jpg
37f78161611f55fae8e0ab414b0d5342.jpg
d7cf85995dbf5bc254934960451564a4.jpg
615e53bc251507af5a5864102353013e.jpg


Sent from my Pixel XL using Tapatalk
 
Well it seems my test of the air dry stucco clay cracked. However it only cracked where I blended 2 pieces together. And it didn't stick to the resin at all, which I sort of knew would happen. So my thought is if I use long pieces of the clay so I don't have to blend any pieces, and apply the clay after I do all the Bondo (it should stick to the dried Bondo just fine), then apply some Bondo over the clay it should work!

That's my current plan anyways. I have some triming in the area near my arm pits to do, and knock down the sharp angles from the paper to do before I am ready for Bondo so I have some time to think about it.
4a1961f18c81c8bc9645cc1f398879a6.jpg


Sent from my Pixel XL using Tapatalk
 
I got a healthy bondo base on the upper chest piece, it has quit a bit of shaping in it near future.
IMG_20170430_112256.jpg

While I stew over different ideas for the chests details, I made some progress on the mask.

I email my local 501st rep about the coloring of the silver/grey/black area of the forehead cheek areas to make sure they where a acceptable shade, but I am still waiting to hear back (maybe I sent it to the wrong person?) I'd prefer to keep it how it is, I like the darker look of the mask, but rules are rules haha. Hopefully I'll hear back soon.
IMG_20170424_000143.jpg

I then started playing with visor ideas. My first try was with a clear plastic 2 liter soda bottle. It was clear, easy to work with and my hot hair drier molded it easily. I got it to a close enough shape, then had to figure out the tinting. I bought a bottle of black Rit dye and after reading through the Rit website, and various website I had a plan. I put enough tap water in a pot to submerge the plastic then added 1/2 of the black dye. I had the burning on med (6) until the temp was steady at about 150-160*, not boiling. I used my candy thermometer as it is glass and wouldn't absorb any dye.
IMG_20170430_161558.jpg
First attempt 30sec, it looked like it was changing but after a cold water rinse all the dye came off. Second attempt 1min, same results. 3rd,4th,5th attempts all yielded the same results, nada!
After more reading I added some salt, and then white vinegar to the mix with no change. Absolutely irritated, I decided to measure out some elastic for the mask and get that going while I thought about the visor.
IMG_20170430_184129.jpgIMG_20170430_185452.jpgIMG_20170501_071305.jpg

I trimmed out some scrap EVA foam and hot glued it around the visor hole so I had some meat to glue the visor to.
I added liquid crazy glue (not gel) to about the first inch of the elastic. this made the elastic ridged and will give the glue something to really stick to. it also helps lessen the amount of stretch so it wont weaken the final glue. while waiting for the crazy glue to dry I had an epiphany......

I sold my motorcycle a few months back along with my helmet, but the manufacturer sent me a free visor because the anti fog wasn't working on the original. I never used it, just tossed it in the closet and forgot about it, until now!

I made a template of the visor opening so I knew how much over hang I needed to glue it in the mask. I covered the new visor in masking tape to keep it safe while I cut it.
IMG_20170430_111532.jpgIMG_20170430_114102.jpg

I tried to use the really hot hair drier but it wasn't hot enough to get the plastic to bend. I then googled and found out that if I put it in the oven at 300* on a cookie sheet for about 5-10 min it will lie flat and allow me to lay it in the mask to remold it for my needs. So i gave it a shot, I had enough visor material to make 2 mistakes and 1 to use after that. Did it work out?
IMG_20170430_123240.jpgIMG_20170430_125327.jpg

Sort of, did it relax the plastic and make it more pliable? Yes.
Did it distort the clarity of the plastic? Yes.
Did it burn my hands through the ovenmits while I tried to mush it in to the mask? Yes, ouch it's hot.
was it actually usable and mold to the contours of the mask? No, it would twist slide around and the edges wanted to curl. I could have made a plaster neg mold I suppose, but I didn't want to. Plus that may not have worked either.
the second attempt was the same as the first. So my thoughts on this method are that my visor was made of 2 layers maybe? it never fully layed flat in the oven, I tried leaving it in longer but the corners started to burn. So I sat, and pouted.
I had 1 more chunk of visor material left and thought I would just try to dye it to see if the different plastic material would take the dye. I got the pot back up to temp (150-160*F) put the plastic in there, turned around to clear a spot in the sink to rinse, turned back around to check on it (10 seconds pass maybe) and it was already tinting!! I rinsed it under cool water to check and yes it was in fact already taking the black dye. Sweet!! I did a few dunks at 20sec each until it looks dark enough. Now it is important to remember that the tinting does not go all the way through the plastic. I found this out by accident later on. It is tough enough though you can scratch your nail on it, clean it. its the same as a pair of sunglasses really.
So now I trimmed it down a bit more to make it easier to work with in the mask. But I still had to figure out how to mold it to the mask. While adding a re-reinforcement layer to my elastic straps, I had an idea. I pulled out my lighter (for heat shrink tubing) held it 2" under the plastic and slowly went back and forth checking for pliability often, it finally let go and was super easy to bend. woohoo, sometimes the most simple answer is the best answer. I do need to do another dunk or 2 in the dye as it seems a bit light still, i could still see my glasses and eyes in a few Revan selfies I took last night.
IMG_20170501_223543.jpgIMG_20170501_223552.jpg

And thats where I am at at the moment. Thanks for looking.
 

Attachments

  • IMG_20170501_223259.jpg
    IMG_20170501_223259.jpg
    2.2 MB · Views: 94
I heard back from the local 501st rep regards to the color of my mask. It will have to be re painted, it's just too dark. NO worries though this is fun trying to make everything just right.
I will be knocking down the gloss black, then mixing up some dark grey acrylic and air brush a base. Then weather with some dry brushing.[emoji3]

Sent from my Pixel XL using Tapatalk
 
I got the mask finished. Taking a short break, caught flu (I'm a preschool teacher, what do you expect lol) then my wife and I thought it would be cool if I made some dinotrux heads out of eva foam for my class to wear. So I am making one head then back to the Darth Revan project.

Sent from my Pixel XL using Tapatalk
 
Ok. Finished 1 of 5 foam masks for my preschool class. First time making anything out of eva, I'll definitely revisit this material. Time to get back to Darth Revan.
fe5e039e365551e75eeb29a5c1d0a256.jpg
7c367872043b8f33cea6625513a80be3.jpg


Sent from my Pixel XL using Tapatalk
 
Just realized I didn't post pictures of the mask in it's new 501st approved color scheme!
Well, here you go. I had to dip the visor in the rit dye solution a few more times to get it dark enough. With a good up you can't see my eyes or glasses. I used elastic strap and e6000 to keep it on.

On a side note, the motorcycle visor I cut down and tinted actually held the antifog layer and after wearing it for 10min with my hood up it did not fog. Now my glasses on the other hand is another story. I might have to sith around comicon with out my glasses, luckily I'm not totally blind. Guess I'll have to use force vision like Kanan. Haha.
94b62c80265b8019593778fef6a650a0.jpg
3baf4833e22f134f3a90d8f5b6733926.jpg


Sent from my Pixel XL using Tapatalk
 
Between last night and this morning I have just added the first heavy Bondo layer, knocked it down a little then added a second more smooth layer. I plan on making the bondo thick enough to use my Dremel to add the detail lines later.
79f9d2b45e2f8a6d17f76d6973c89923.jpg
fd869c2d60b00dc17a8c010b616ac39d.jpg
d65d10b1e99a66a9e966a51023ee8830.jpg
57f6b9634acc1db4a2f0180fe7be221e.jpg


Sent from my Pixel XL using Tapatalk
 
This thread is more than 6 years old.

Your message may be considered spam for the following reasons:

  1. This thread hasn't been active in some time. A new post in this thread might not contribute constructively to this discussion after so long.
If you wish to reply despite these issues, check the box below before replying.
Be aware that malicious compliance may result in more severe penalties.
Back
Top