WIP: Darth Revan

Coming along nicely [emoji6][emoji1303]


Sent from my iPhone using Tapatalk
Thank you. Things have been slow going at the moment. Not because of the build but I have been working on getting some work done on my wife's 04 Tahoe all week after work. I should be back to Bondo, sand, Bondo, sand tonight haha.

Sent from my Pixel XL using Tapatalk
 
Kinda got tired of the sanding, so I took a break and started Darth Revans​ saber. It's almost done, I'll post some pictures when it's done [emoji6]

Sent from my Pixel XL using Tapatalk
 
Here's the hilt, empty. All pvc, aluminum spray paint, bronze spray paint with acrylic paint weathering.
9bea3590755ed83870bfce279e094745.jpg
9876aa118ff4a8d14741a86c907f3b8f.jpg
6eafa36370f74fd4517fa57c0df7ee8a.jpg


Sent from my Pixel XL using Tapatalk
 
Thank you TRCViper, it means a lot when there are so many people producing high end sabers and costumes. And here I am having to wait until I have enough change to buy a pack of sand paper lol. Anyways, here are the finished pictures. It looks crooked but its the weathering pattern. The illuminated button is the battery life indicator. Now I can go back to the chest armor. Haha.
68e6c97899ef0ba430c4f987594fb32a.jpg
8b60a9c8cf1a518714253c1e77726a9a.jpg
aab18fb3e0c473276d4e5f501a88a6da.jpg


Sent from my Pixel XL using Tapatalk
 
Here is a short clip. not very loud but its just a Vader Hasbro board. there is a mini usb charging port in the middle of the handle were it opens.
cree xp-e2 red led
Vader Hasbro sound board/speaker/momentary button
recycled portable charger (usb charging, illuminated battery indicator, 18650 3.7v 2800mAh)
thin wall blade (cant find thick wall locally)

I plan on working on the pommel to see if i can get a bit more db's out of it but we'll see.
As a side note I found a can of "water putty" at home depot for like $3. I have used it years ago for filling holes in wood when making furniture and just forgot all about it.
It takes a few tries to get the right mixture but it dries rock hard and is what I plan on using for the raised detail on my armor.

[video]https://photos.google.com/photo/AF1QipMasTBsDtQLZz4bc6MNuu-9-YH3gPQrEgLtp7xP[/video]

Sorry about the link, for some reason I couldn't get a downloaded video to upload.
 
Last edited:
Back to the armor work. I am going to use some water putty for the raised details. The stuff is super hard when it's fully cured, but once you figure out how to mix it so it doesn't just run all over it works pretty well.
987bbd56d4c47dc7f38a3554d74815e9.jpg


Sent from my Pixel XL using Tapatalk
 
I hit the water putty with a sanding drum and knocked it way down. Looks better for now, I might take it down farther. After staring at the 501st reference pictures I decided instead of building the details up, I would cut shallow lines then taper and round out the details. It was a friggin nightmare to try and keep straight. But I think I did a fairly good job, considering every breath or heart beat made the Dremel move lol. My hopes are high that tonight I'll get to start painting.
e6658f592aa4a3311618ba980bce4751.jpg
3e3412ea02e2a8906e9a3de38c480cd5.jpg


Sent from my Pixel XL using Tapatalk
 
Updates.
Seriously, this is a pain in the....finger tips! I used a mini Dremel to carefully bevel the edges, that got the grooves defined enough. Then I had a tiny flat head screwdriver from an eye glass repair kit and filed a Sharpe edge on it. I used the screwdriver and dragged it in the lines etching the lines deeper and wider. Then with a small square of 220 sandpaper I knocked down the rest and smoothed it out.
99d9e8473383e27d887c063faa3bcb3c.jpg
e0b3680e528a5a63803d91c1d6cb2ecc.jpg
80e641a095cbf496ce8fb72fd6f843e2.jpg
7284f39cd4e076c2af3fb3bc99601932.jpg
ac8a30056c7d34b0a2ae5ca0d2e2354b.jpg
7ac064003ff53fdaaf3d584f8fa5465f.jpg
14a1713dc6488bec5563f6da681a574f.jpg
ebc4770a8d4d02a456b6725bcad3371f.jpg
569e33767798c2f83ff824bdda84fad0.jpg
9065f03e738f3a8acb8c13ab8ce02ee5.jpg
4ba5aff283914263994146998a6bbd07.jpg
b3880a9e8da343d5830c317ab31778bf.jpg


Sent from my Pixel XL using Tapatalk
 
This is after a light coat of some primer to check it out better. Looks better than I thought it would. But still some dialing it to do. The raised areas need to be rounded more for sure. Then I'll work on the top half.
I still am not happy with the water putty. It worked great, it's hard great for details. But it's still too tall, I'll just knock it down some more later.
bbdf88ec523876b96a549f85d40ff7b4.jpg
2f482636b6e7db71450f2b9c6f6a0720.jpg
b7edb81daa7fa29eccbb52e97bd3bdef.jpg


Sent from my Pixel XL using Tapatalk
 
I used the little screwdriver to etch the grooves I made with the Dremel deeper. Then used the small pieces of 220 sandpaper to smooth and round off the details.
I sanded down the water putty a bit more, etched out the grooves and cleaned up some of the lines. Then finger sanded to get the lines smoothed out. I also measured and cut out the holes for the strapping. I just measured 3/4" in length, drilled a hole at either end, then used the Dremel with a cutoff wheel to cut out the middle. Then filed and sanded it some.
3f36c8aca62e843bd90643919d815496.jpg
7428e3e93d53e44021b983e94a5e5594.jpg
b052d46566e9ab51c8ba537b5b85a871.jpg
4af54892b19cd8209318179eb31c007a.jpg
b858d1a488d57860f9a33e2c42f2f0e2.jpg


Sent from my Pixel XL using Tapatalk
 
1 light coat of a bronze spray paint this morning followed by a heavier coat this evening. After it's dry I'll mask off some parts and spray some gloss black. After that's dry it will get a light coat of satin clear followed by some brown/black wet wash for weathering. Then 2 more coats of clear.
d400c5ce8b66bdf5dbe4702ea4fd7f1f.jpg
f83f361509491edc88e42d7bf8b19bd0.jpg


Sent from my Pixel XL using Tapatalk
 
Update time. I masked off the bits and sprayed them black. there are 1 or 2 small area the are not symmetrical from one side to the other. But what are you going to do at this point? After I removed the tape and paper, I put 2 light coats of satin clear. I mixed a really watery batch of a regular brown, and a few drops of black acrylic and began washing it down. I did make a booboo, my clear wasnt thick enough and the acrylic stained the bronze and would not wash off! I ended up trying my best to shade match the areas around the stain lines. It turned alright, I might add a bit more wet wash to the middle area, but im not 100%. After the wet wash I did 3 coats of the satin clear. and now it is hanging on the wall under my mask.

In the same hour I finished the upper chest piece, I began work on the lower section. I knocked down the fiberglass on all the angles.
IMG_20170623_230620.jpgIMG_20170624_003253.jpgIMG_20170624_003300.jpg
IMG_20170625_095148.jpgIMG_20170625_095122.jpgIMG_20170625_095157.jpg
IMG_20170625_095540.jpgIMG_20170625_212323.jpgIMG_20170625_171754.jpgIMG_20170625_212325.jpg
 
Started on the lower section of the armor the other day. I didn't document as much as the mask and chest because it's just the same process. Bondo,sand,bondo,sand ECT. Posting pictures shortly of the progress.

Sent from my Pixel XL using Tapatalk
 
Just realized I forgot to post progress pictures :facepalm

I did not take many picture like with the mask or chest because its just the same bondo,sand as usual.

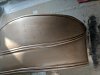
I did about 4 layers of bondo, then about 4 layers of filler primer.

IMG_20170704_122748.jpgIMG_20170704_122750.jpg

I used a foam ruler I made when I made the Dino Trux helmet to draw the outer lines that I later notched then scribbed to round. I tried to use the ruler to make the 3 arching lines the run through the middle but I could not get it to look even. So I made a templet.
IMG_20170704_131335.jpgIMG_20170704_125444.jpg

Then I carefully used a cutoff wheel on the dremel to trace the lines I drew out. I try to be a straight as possible but it will all be sanded a lot later so some waves I didn't mind.
IMG_20170704_181807.jpgIMG_20170704_181805.jpg

I used the trusty tiny flat head screw driver here again to etch the lines deeper and wider. Again I screwed up on a few spot but the sanding later will fix them.
IMG_20170704_195457.jpgIMG_20170704_195459.jpg


Next I used a sanding drum on the mini dremel to knock down the areas inside the lines. I had said before I don't like to use power tools to sand this smaller stuff because you run the risk of sanding to much if you don't pay attention. Well I didn't pay close enough attention and had taken a little too much off in a few spots. After stepping back to decide if I should put a thin layer of bondo over it, I noticed that it will probably make some interesting weathering patterns. I did of course hand sand it all back to minimize and deep valleys. Unfortunately I didn't get any pictures of the bottom half, but your sharp, you get it I'm sure.
IMG_20170705_212959.jpg


4 layers of the filler primer. After it was totally dry (1 hour in the sun) I rubbed it down with some 0000 steel wool to smooth it out instead of wet sanding. Then I wiped it down with a damp paper towel before I sprayed the color.
IMG_20170706_205253.jpgIMG_20170706_205257.jpg

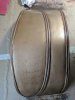
I of course used the same bronze spray paint as the chest. The can is intense, I have to spray from 3-4 feet away to get the first few thin layers because it has a powerful spray.
IMG_20170706_214119.jpgIMG_20170706_221700.jpg


Now the part I hate because I never know just how the weathering is going to go. My wife always asks, "it's so pretty, now you have to make it ugly and old?" haha.
Yes, yes I do. I just used a burnt umber acrylic paint and add water a little at a time until it's really runny. This time I used a 1" chip brush to paint the whole thing at once, and did about 6-8 passes of paint it on let it sit for a few seconds, then with a damp paper towel to wipe it off leaving paint in the lower spots. After doing this a few times, I switch to a small paint brush to apply thin layers for the watered down paint to select areas in certain patterns. That sits just a bit longer until its almost dry, then with the same damp paper towel start removing small amounts of paint until it looks right. When I'm happy with how it looks I let it site for an hour or more to let the acrylic paint totally dry before I add a few coats of the satin clear.
IMG_20170707_192628.jpgIMG_20170707_194225.jpgIMG_20170707_194227.jpgIMG_20170707_195222.jpg
IMG_20170707_195225.jpgIMG_20170707_195442.jpgIMG_20170707_195445.jpgIMG_20170707_195622.jpg
 

Attachments

  • IMG_20170707_195626.jpg
    IMG_20170707_195626.jpg
    4.3 MB · Views: 47
  • IMG_20170707_204012.jpg
    IMG_20170707_204012.jpg
    4.6 MB · Views: 47
  • IMG_20170707_204014.jpg
    IMG_20170707_204014.jpg
    4.3 MB · Views: 52
This thread is more than 6 years old.

Your message may be considered spam for the following reasons:

  1. This thread hasn't been active in some time. A new post in this thread might not contribute constructively to this discussion after so long.
If you wish to reply despite these issues, check the box below before replying.
Be aware that malicious compliance may result in more severe penalties.
Back
Top