Homemade Spidey Suits: Show Off/Open Build Thread

Thanks for all the info! Your pockets look really great, I was thinking of doing that but I'm not expactly sure how and I don't want to mess up the hoodie haha. And yeah, I think the costume designers went for a look that implied that the suit peices were from Aunt Mays closet that he stole :lol

Thank you. Glad if I can help :)
I used this tutorial for the pockets https://threadtheory.ca/blogs/tutorials/welt-pocket-tutorial
 
Hi,
it's my first post here. Just wanted to show off my suit and say thanks to all you guys for the great tipps. This thread relly helped me in getting it done! Thank you very much!

I already finished the suit in november, but only now I have some decent pictures to post here.
Unfortunately I finished the web shooters shortly before the making of Hela's headdress was released, so I only had the movie for reference and had to guess some of the details, but you can really move the trigger like in the movie. So, it's something :D

If you like to see more of my friend's and my stuff, check out our instagram @marvundsina

View attachment 806991View attachment 806992View attachment 806993

Your post inspired me to work on a 3D model of the webshooters over the weekend. I hand made them for my Halloween costume last year because I didn’t know any 3D programs but since then I’ve learned Cinema 4D. Here’s a render of them.

a880df8a66a40242f3251d5f3d7cd13d.jpg


Sent from my iPhone using Tapatalk
 
For the screen-used mask they used the sleeves turned inside out they cut off from the hoodie. Works perfectly, the hoodie fabric is so thick you don't need a face shell and it is just like in the movie :D

When you cut the Sleeves from the Hoodie. What did you do to sew the raw edges? Or did you just leave them unstitched?
 
I hope many RPFers see this.

I want to thank many on here for sharing their knowledge, research, tutorials, etc. It's been inspiring and instrumental for my son and I.

First, my son was able to gather all the parts and pieces generally agreed upon that were used by the costume department for the film(s). Not only was he able to get every piece, he taught himself how to sew so he could make the mask from the sleeves of the hoodie, as Parker would have done.

He was able to find a tailor that helped him tailor the items to best fit him and is learning how to do alterations on his own.

Secondly, the community inspired me and helped me make the web shooters, thanks to all the photos and screen caps floating around the RPF. We had originally planned on a father/son build of the web shooters using EVA foam and other items, until we stumbled upon some RC parts used on the actual prop. Unfortunately for me, I mentioned that I may be able to make them using styrene sheets. LOL. My son was ecstatic but worried it was too much for him to ask. I gladly took on the project while he concentrated on the costume. BTW, he didn't want to take the easy route and buy prints from the ONE screen accurate 3D model we found on the internet's. He did, however, relent due to time constraints and studying for AP exams...and bought the goggles from someone who printed screen accurate ones.

Well, 4 straight weeks of looking at pictures, finding minor parts, reviewing some costly screen accurate 3D files, reverse engineering, toying with measurements, etc, I finally finished.

Here are a few pics I have on my phone.
I want to take some more detailed ones of the web shooters later.

The main point of this thread is my gratitude to all you creative SOBs!!!

You all should be proud of yourselves...

Mark
 

Attachments

  • IMG_20180512_151813277.jpg
    4.5 MB · Views: 217
  • IMG_20180513_162438430_HDR.jpg
    8.9 MB · Views: 160
  • IMG_20180512_150918870_HDR~01.jpg
    IMG_20180512_150918870_HDR~01.jpg
    1 MB · Views: 184
  • IMG_20180512_151027577_HDR.jpg
    5.3 MB · Views: 149
  • IMG_20180511_232944855_LL.jpg
    5.3 MB · Views: 174
  • IMG_20180511_235150866_LL.jpg
    5.5 MB · Views: 160
  • IMG_20180513_162230198_BURST014.jpg
    5.7 MB · Views: 134
  • IMG_20180513_162057070_HDR.jpg
    5.1 MB · Views: 145
Last edited:
When you cut the Sleeves from the Hoodie. What did you do to sew the raw edges? Or did you just leave them unstitched?
I left them unstitched, that's what they did in the movie and it definitely looks more home made. I worn my hoodie a couple of times and washed it by hand, so far the edges haven't frayed. The close-up is my hoodie, the other one is the screen used hoodie.
IMG_20180522_001718.jpgTechnoBuffalo-6.jpg
 
MarM This looks super awesome. Amazing job, dude :D And I think it's really great that you did this together with your son.

I have a couple of questions for you, if you don't mind :D
Could you elaborate on how you made the shooters using styrene sheets? Did you just bend some wire for the golden wire on the sides or is this also a ready to use RC part? Did you make the small middle part, where the spring is attached to, from styrene or is this also an RC part?
Great shooters, I really like how they look like metal.
 
Last edited by a moderator:
AektschnMarv

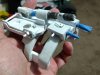
Thanks! Attached are some pics of the final build stage. In retrospect, I should've documented all the progress.

- I used 5mm, 2mm, and 1.5mm styrene sheets for various parts.
- I used various sized styrene tubes for some parts and filled them with Aves Apoxy modeling putty to fill them in.
- I used a 10mm (i think) solid square styrene rod for the trigger and swivel part (where spring attaches to trigger). I sanded down the trigger to slope like the prop does.
- I used the Aves Apoxy putty to fill in the mechanism with spring attached as well as over some plastic curved strips to get the thickness of the "bracelet" parts.

I started with the cartridges. Once I decided on a height, length, and width I cut all 6 sides out of the styrene sheets. Then, I glued them together in their shape. I filled them with left over sculpy clay I had laying around to add structural strength and some weight to the cartridges. From there, I built the cartridge holders around the cartridges.

I decided on measurements based on best guess using a known object (the RC ball joints I had in hand) and guestimated based on the pictures and what worked best for my son's wrists and hands. That was the difficult part. It was like reconstructing a crime scene.

From there, I decided on measurements for other parts based on what was decided for the cartridges and many pictures I pulled from this thread and other spots online. Built the rest of the components off of each previous piece made.

I made all joints that swivel using styrene tubing reinforced with brass tubing inside for strength.

As you can see from the pics, the "grey" or none white parts is the Aves Apoxy I used.

This link is for the name of the ball joints that are on the actual prop.
https://www.towerhobbies.com/cgi-bi...yQd4J_pEilmR8zhTx2nDd43KvnYKqvARoCIYUQAvD_BwE

You can show the picture at your local hobby shop that sells models, trains, and RC parts. Hobby Lobby and Michael's will not have them.

The rest of the bolts, tubing, etc I got from Home Depot. I went with nylon washers and thin nylon filler washer to make the trigger "button". I used nylon washers since I knew even my awesome gel super glue wouldn't keep a metal washer and plastic rod secure. I filled in any gaps from the washers glued to the square rod with Aves Apoxy.

I used Aves Apoxy putty to fill in as many seams as I could on the parts that needed to look like a single thickness or general gaps in the seams that the super glue didn't fill during the build.

I hope I answered your questions appropriately. If not, I can expand on specifics as best I can without pictures.

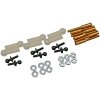
Yes, I used brass solid tubing to make the gold bars. I bent them using some needle nose pliers that are rounded so as not to crush the tubing when I bent them.

Mark
 

Attachments

  • IMG_20180508_214212831_LL.jpg
    5.1 MB · Views: 163
  • IMG_20180508_214246906_LL.jpg
    5.2 MB · Views: 161
  • IMG_20180509_193020389_LL~01.jpg
    IMG_20180509_193020389_LL~01.jpg
    1.9 MB · Views: 185
  • IMG_20180509_193449432.jpg
    4.4 MB · Views: 149
  • IMG_20180509_193020389_LL.jpg
    5.9 MB · Views: 146
  • IMG_20180502_193642702_LL~01~01.jpg
    IMG_20180502_193642702_LL~01~01.jpg
    1.8 MB · Views: 194
  • web shooters 3.jpg
    6.1 MB · Views: 162
  • web shooters 4.jpg
    5.9 MB · Views: 176
  • RC Ball Joint.jpg
    RC Ball Joint.jpg
    13.5 KB · Views: 183
@MarM

That is a super detailed answer :D Thank you very much. It's very interesting to see how differently other people tackle the same "problems", so your explanation was definitely a good read. And thanks for the tips. I'm from germany and unfortunately most of the stuff you find in the US, you can't get here or you have to pay a high shipping fee, so I have to see how to get some stuff. The link to the ball joints would have came in handy three months ago, when I searched far and wide for them :D I found some fitting ones in the end, not exactly those, but they will do.
I think I have to get myself some of this Apoxy putty, thanks for the idea. And could you tell me the diameter of the brass tubing you used for the gold bars? Initially I just didn't want to do them, because I'm lazy, but it looks so good on your prop, I want them too :D

My project of making new and more accurate shooters has come to a halt, since I encountered problems with casting the parts in resin. I 3D-printed every part once, sanded and fillered them smooth and then tried to make moulds from them to cast them. You will definitely know how tiresome it is to build and smooth the same part eight times :D So casting could save a lot of work and time.
But the moulding and casting isn't working as I'd like it to. So we'll see, when I can finish my new shooters.

Thank you and I hope you and your son will continue doing awesome projects :)
 
Hey everyone!
Fett202 and I have been working on offering screen-accurate kits of the homemade webshooters with functionality and real hardware. We have laellee working on the 3d models right now, and I wanted to share his progress:

050618 render 2-2.png050618 render 1-2.png050618 render 3-2.png

If you'd be interested in a kit, feel free to drop us a line in our interest thread in the project runs section!
 
Last edited by a moderator:
Hey everyone!

I know this thread isn't as active as it used to be but I have some exciting/important news. I wanted to make my costume as screen accurate as possible, so when I was buying the shoes I knew I had to get the same kind used onscreen. The shoes were Sockwa G4s (as many of you know) but I remember having a hard time coming across a pair. I ended up getting them from Sockwa.com, but they do have a Sockwa logo on it. The movie doesn't, but I still think that they look fine. I spoke with Sockwa and they said they might have a pair without the big logo in June, but not at the moment.

They ended up giving me a 20% discount code that they are letting me share with friends and fellow cosplayers. The code is PPMV2TZE0ASP, which you can use at sockwa.com or genecos.com. You can use it at checkout, and it is valid until the 31st of December I believe. This is a good opportunity for anyone trying to make the suit accurate without spending too much. Hope this helps out anyone trying to do this build, and feel free to spread the word of the discount code!!

(Pics attached are for reference in case any of you want to know what the shoes look like on the costume)

-MarMIMG_8028.JPG IMG_8030.JPG IMG_8032.JPG
 
This thread is more than 3 years old.

Your message may be considered spam for the following reasons:

  1. This thread hasn't been active in some time. A new post in this thread might not contribute constructively to this discussion after so long.
If you wish to reply despite these issues, check the box below before replying.
Be aware that malicious compliance may result in more severe penalties.
Back
Top