Kyle Katarn Cosplay Project

ChubbyGawd

New Member
Hello everyone!

I'm working on a Kyle Katarn cosplay, an amazing opportunity for me to finally delve into the world of prop/costume design (excluding the #D part, been part of that for awhile now).
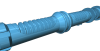
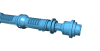
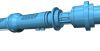
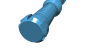
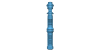
The first bit I decided to work on is Kyle's saber, specifically his second one (I might make his first one someday, but I'm not sure, it's a bit too bland for my liking). I made the saber with 123D Design and plan on printing the whole thing, mold it, cast it, electroplate it etc. The only problem I have now is that I don't have a 3D printer yet, hopefully I will soon. There is, however a part I left off because of personal preference and lack of reference images. I left off the usual nub to clip into a belt clip (the type of bit that was used on prequal sabers) and I plan on just using a D-Ring clip that'll be riveted into the base of the pommel. For now I'm going to make his blaster. I still need to scale up the saber so it's the proper length. I'm mainly just basing the base measurements off of Luke's ROTJ saber.

Length = 26 cm (260 mm)
Height = 3.6 cm (36 mm)
width = 3.6 cm (36 mm)

If anyone has any extended expertise with 123D Design, I would really appreciate getting some help with resizing (I know the multiple ways, but a helping hand would be pretty nice). I definitely plan on keeping you all updated on the whole project. I plan on wearing the costum in December for the premiere of Episode 8 so I have awhile to work on everything. Now I'll stop yammering and throw out some screenshots, if anyone would like the STL file for your own builds don't hesitate to send me a PM :) whole.pngEmitter.pngBody.pngBody2.pngBottom.pngPommel.png
 

Attachments

  • Body.png
    Body.png
    465.9 KB · Views: 138
  • Body2.png
    Body2.png
    332.1 KB · Views: 157
  • Bottom.png
    Bottom.png
    337 KB · Views: 143
  • Pommel.png
    Pommel.png
    236 KB · Views: 136
  • whole.png
    whole.png
    110 KB · Views: 159
Hello again, everyone!

Well the project thus far is going smoothly. I finished sizing the saber to the accurate measurements, sliced them up into manageable pieces for my 3D printer, which I should be buying sometime this week! The next part I decided to tackle was making Kyle's blaster. After hours and hours of searching, I found an abundance of refrence images to go off of. I only had one proble and that was the asthetics with the original blaster seen in game. It was just too "bland" for my liking. So instead I used the Bryar pistol that came with the Death Star DLC for Star Wars Battlefront, which is far more pleasing to my eye and astheticly gorgegus but with that caked on gritty feeling that comes with space guns used by smugglers. With all the refrence images I could find, I made my first ever blueprint, a blueprint I'm happily sharing with the community. Let it be known that this is my first ever attempt at a blueprint and I'm still fine tuning my vectoring techniques.

I plan on making even more blueprints just for practice and also for builds and depending on the model and how much time went into it, I should be giving them out for free.

Now the hard part; modeling the actual blaster and then printing the pieces off. I'm switching over from 123D Design and trying my hand at Fusion 360 so this portion is probably going to take awhile. Well I hope everything works out on my end and I really hope my blueprint will be useful for any of you also making a replica of the blaster. The image attached is a png file so it should be relatively good size, if not then shoot me a pm and I'll happily supply you with the pdf. Also, I'm extremely open to suggestions and tips on either using Fusion 360 or making blueprints in general. Happy building everyone! :D k-16 Blaster.png


Yes, it's a bit different. I couldn't decide which reference images I should use and settled on a replica, a pretty bad idea I've come to realize. I've thus made a new model.

- - - Updated - - -

Hello all!

As you can see through the thread, I remade the saber, using the reference image off of Wookiepedia and I'm very satisfied with the results. I also made the original while still learning one of my CAD software so it didn't feel as good as the one I just made. I left the two circle rubber (I'm assuming it's rubber) off of the model with the hopes of using O-rings after casting the real model.Bottom.pngCloseUp.pngEmitter.pngRear.pngTopDown.png
 
Hello again!

Well I finally got my 3D printer (A Maker Select V2 if anyone is interested) and have been fiddling with it for quite some time now. The blaster model still isn't completed, but it's making great progress and I'm learning so much about the program I use.

I decided to star printing off the model I DO have finished; Kyle's lightsaber. I printed the emitter first and ... well ... It came out really well!! ... till you turn it to the side that was held up with supports. I also noticed that the bars along the center tube are too thin, the damn things looked so much bigger on the computer screen ... still a challenge i need to get used to when 3D modeling. Something that's 3 mm will look the same size as some 70 mm when on a screen. I also noticed that the central hole in the nozzle isn't a perfect circle, possibly from the angle I printed the piece.

4 hours of printing just to end up with a failure. That's the life of using a 3D printer I guess haha. I would really appreciate any advice on using support materials from anyone else on here that also prints. I'm currently using Cura as my slicer program and only use PLA. I might try other slicers, but that's for another time. Time to adjust my model and give the print another go! I also made a replica of Luke's ROTJ saber and printed off the emitter. Got the same results as Kyle's would sanding and filling/sculpting with Bondo be a good solution?

IMAG0226.jpgIMAG0225.jpgIMAG0224.jpgIMAG0223.jpgIMAG0222.jpgIMAG0221.jpgIMAG0220.jpg
 
Started printing Kyle's saber! I sliced it into 4 different pieces to lower print time and to fit on my bed. All the prints are actually really nice! ......... Until the latest piece decided to snap when the registration nub was inserted into it ... I'm assuming its because the layers were too compressed (tried out a 0.15 layer height instead of the usual 0.2) and the inserted nub was somewhat deformed due to support material holding it. The piece is somewhat thin, something I like about lightsabers cuz I feel that all replica sabers are too wide or too thin. However, I'm not sure if I like the size of the saber. I might just leave it as is.

Material: PLA
Slicer: Cura
Layer height: 0.2 mm
Print Speed: 50 mms
Infill: 20%
Layer thickness: 0.8 mm
Nozzle temp: 195 c
Bed temp: 0 c
Raft
Support material everywhere
Printed horizontally

IMAG0251.jpgIMAG0250.jpgIMAG0249.jpgIMAG0247.jpg
 
Here's a shot of the actual game model. They made the top that dark, not me...

View attachment 730037


It amazes me that I never found that reference image even though I spent days searching. As far as I can tell, my model is spot on, except for cuts along the top and bottom of the emitter. My tubes encompassing the barrel came out too wide, but I printed it anyway. A key part I left off the model, well a piece I've seen in other replicas, is the belt clip nub that was mainly used in the prequels. I personally don't like that design, makes it too static, so I'm going to put a D-ring clip on the but end of the pommel so it can move around more, giving off more of a cowboy, "this is a dangerous tool, don't mess with me vibe".
 
The fully printed model. I still need to sand and everything else. Not sure if I'm going to mold and cast it. I left off the little round bit in the middle of the saber, but left little divets so I could put on some O rings. I'm assuming those pieces are meant to be a portion of the hand grip haha.

IMAG0254.jpg
 
Well, i took my site down a number of years ago, so that'd make the image much harder to find :)

It's a low poly model and it extracted with the textures beautifully. I drew it up back when the game came out and sent it to raven to see if they had any suggestions and they said 'nothing to change, it's perfect' - the guy who designed it himself wanted to know how i got so accurate :)
 
Hello - I'm mostly interested here in your BRIAR PISTOL.

Any chance you could upload the pieces you made and instructions so I could print myself a copy? :O
 
Hello - I'm mostly interested here in your BRIAR PISTOL.

Any chance you could upload the pieces you made and instructions so I could print myself a copy? :O


I would love to, but at the moment I'm still finishing the darn thing haha! I've been working on the model for over a month, but's because I'm slow, lazy, have work, and had to deal with college finals. The modeling phase is nearly done, I just need to finish the handle, Magazine, magazine slot, and figure out how I'm going to slice the pieces up and in what orientation they all need to be in. What kind of printer do you have, what's the bed size, and what material do you print with? I only use PLA so my instructions may not transition well if youre using something like ABS, something I've never used and don't really want to use.
 
Finally finished the Bryar Pistol! Already sliced up, ready to be saved as stls, and then printed. Just waiting on a few upgrades for my printer (glass bed, mosfet, new y carriage) and then I'll be off and printing. Not too sure if I'm going to hand out the stl files yet, might charge, we'll see. There's definitely a few things inaccurate with the model, like the handle for example, but I'm still proud of it.

Dissassembled.pngFront.pngFullBody2.pngFullGun.png
 
This thread is more than 6 years old.

Your message may be considered spam for the following reasons:

  1. This thread hasn't been active in some time. A new post in this thread might not contribute constructively to this discussion after so long.
If you wish to reply despite these issues, check the box below before replying.
Be aware that malicious compliance may result in more severe penalties.
Back
Top