The Fifth Element - Element Stones WIP

cavx

Master Member
attachment.php


I do believe this year marks the 20th anniversary of THE FIFTH ELEMENT. I missed it in the cinemas back 1997, but was lucky enough to be able to get a private screening in a cinema because I knew the cinema owner and he had kept the film. For those that don't know, when cinemas ran 35mm film, each print was worth about $10K, yet prints got "lost" all the time and were just written off. These days, it is all digital and there is no chance you can lose a film.

THE FIFTH ELEMENT was always one of those films that had freakishly huge success at the box office and on video and today is part of the pop culture. I loved it from the first day I saw it in the cinema and raced out to buy it on video as soon as it came out. It was my first DVD and probably one of the first Blu-rays I bought. I don't think it was meant to be the success it was and of course, there are so many cool props in this film.

One prop I've admired and always wanted is of course the Element Stones.

This build is going to be a WIP and budget build - famous last words.

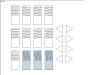
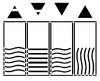
This template was first posted in another build thread and I have decided to use it for mine.
attachment.php


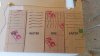
Using this template, I started my own set of stones. I never used to hoard until I came here and where I have learned the value of keeping bits and pieces and all my scraps. The problem is, now I can't bring myself to throw anything out, so I decided the best way to "thin out" my stash was make things I have wanted for a while. This both uses stuff and doesn't cost me anything. A win/win.

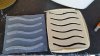
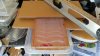
Hand cutting sucks and so the only part I am actually happy with is AIR and maybe EARTH is OK as well. These are cut out from 3mm Perspex and then glued (using Weldon#3) to a 2nd piece of 3mm. This way I have constant depth to each line.

attachment.php


I am not 100% sure which one is actually AIR and WATER, but as it turns out, the same part reversed can be used for both. I had also asked why FIRE only has 5 strips and not 6 like the other 3 stones. Well it seems that they used the same template and 5 is all that will fit. So this is my plan anyway.

attachment.php


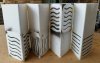
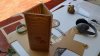
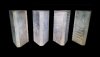
A quick stand up for size and these are bigger than I initially thought.
attachment.php


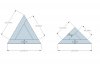
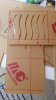
If money was no object, I'd have these part laser cut. Given I am unable to do that for this project, the easiest way to replicate the same details is to mold and cast. What I am hoping to do here is be able to create a reversed part so that AIR and WATER are the same, but reversed. Also FIRE might be able to be made off the same part, then cut down to have only 5 lines.

attachment.php


Given today it bloody hot again, I should imaging that is "6 hour cure time" silicone will be done by the time I am finished posting this.

More to come, stay tuned.
 

Attachments

  • 5th Element Stones Template.jpg
    5th Element Stones Template.jpg
    35.9 KB · Views: 4,725
  • 20170125_105637.jpg
    20170125_105637.jpg
    144.7 KB · Views: 3,464
  • 20170125_112431.jpg
    20170125_112431.jpg
    128.8 KB · Views: 3,380
  • 20170125_112836.jpg
    20170125_112836.jpg
    142.9 KB · Views: 3,485
  • 20170125_120132.jpg
    20170125_120132.jpg
    132.4 KB · Views: 3,279
  • Stones.jpg
    Stones.jpg
    138.5 KB · Views: 3,931
Last edited by a moderator:
Yes, I like the stones as a prop too. I don't have room to display them though.

I am quickly running out of room, but I will find the space if I can make these light up.

And progress update:

A bit rough, but you get the idea.

attachment.php


Some of the issue today was that silicone got stuck on the rough surfaces inside the slots and tore a little. Still good enough to test my idea of reversing the part.
Because this silicone mat was a tester, I trimmed it back to see how big a 5 line would be for FIRE if turned at 90 and looks good.

And the first mold box ready for silicone.

attachment.php


So I decided best to get the mold done....but I mixed in the F-Type kicker and not the normal kicker and with today's heat (35 C), the silicone went to gel in the pot, so i could only scrape it out. That means epic fail and no more on this until I get more silicone.
 

Attachments

  • 20170125_173133.jpg
    20170125_173133.jpg
    120.4 KB · Views: 2,912
  • 20170125_172903.jpg
    20170125_172903.jpg
    144 KB · Views: 2,907
Last edited:
I decided to watch the film again and take a few screen grabs for the details of the stones.

41a1532f5e59c650ffd9fbb9a4c44199.jpg

490a99fc8187ee3b92b04a32e41dfb5f.jpg

5c7fd91428246a337747799b50d699cc.jpg

dd28d1955a257a971adca826c6132ace.jpg

It appears to be different version of these props.

WATER has the peak of the curves on the right and has the smooth end up (inverted). It does not appear to have the flat edge.
FIRE is also inverted and appears to be quite rounded on the edges.
WIND has it's pattern at the top. It seems to have a mirrored pattern and a very much flatter edge between the sides.
EARTH seems to have a very flattened edge and is also inverted.

Any experts on these, please chime in.

I might mock these up out of MDF first to ensure I get the shape right before doing anymore molding or casting.
 
Last edited:
So know do I keep this as a budget build or do I let this become expensive?

Something I learned on my first ever prop build is that you do get what you pay for. What started out as a $50 build soon became over $250.

It is worth at least getting a quote to have these laser cut.

attachment.php


But in the meantime, I just knocked these up in Core-flute.

attachment.php
 

Attachments

  • 5th Element Stones Template 3.jpg
    5th Element Stones Template 3.jpg
    74.7 KB · Views: 3,135
  • 20170130_121013-1.jpg
    20170130_121013-1.jpg
    124 KB · Views: 2,571
Also on my mind is the shape of the stone's footprint. I have made mine based on an equal lateral triangle or 60/60/6 . I am starting to think maybe these are 45/90/45 and that the flat edge is on the 90 side.

attachment.php

Certainly easier to construct the right angled version.
 

Attachments

  • 5th Element Stones Template Base V2.jpg
    5th Element Stones Template Base V2.jpg
    48.7 KB · Views: 3,246
Last edited:
Looks like you're off to a good start.

I don't think it was meant to be the success it was and of course, there are so many cool props in this film.

It was actually supposed to be a trilogy. It is a shame we never got that. Such an awesome film!
 
Looks like you're off to a good start.


It was actually supposed to be a trilogy. It is a shame we never got that. Such an awesome film!

A trilogy, really? I did not know that.

Was it re-written as a stand alone? Because there is really no where for those characters to go from there.

And yes, it one of my all time "modern classic" favourite films.
 
A trilogy, really? I did not know that.

Was it re-written as a stand alone? Because there is really no where for those characters to go from there.

And yes, it one of my all time "modern classic" favourite films.

Yup, really :(

Not sure, I don't remember the specifics, but it was mentioned a few times in the behind the scenes stuff on a special edition DVD. Hearing about that really bummed me out.
 
Great project! We just watched 5thE with my bonus daughter, she loved the movie. Let´s see what she says once I dig out the props ;)

Back on topic, the lines for the stones with horizontal decorations need to go all the way to the left edge and respectively to the right edge and then continue on the third side. And the corners need to be broken.
 
Yup, really :(

Not sure, I don't remember the specifics, but it was mentioned a few times in the behind the scenes stuff on a special edition DVD. Hearing about that really bummed me out.

The original DVD i bought had no extras. A while later, they did release a special edition and later the "super-bit", but I never bothered to upgrade as the transfers were pretty much the same. The BD is OK, but apparently the UHD with ATMOS sound is worth the effort to upgrade to.

One of the corners should be flat.;)

IIRC there where 2 different sized sets of stones.

Is that on all of them? If you look at my screen caps above, some have this and others do not. I know there had to be at least two sets of stones - a hero prop set and the FX set with the little wings that stick out.

Great project! We just watched 5thE with my bonus daughter, she loved the movie. Let´s see what she says once I dig out the props ;)

Back on topic, the lines for the stones with horizontal decorations need to go all the way to the left edge and respectively to the right edge and then continue on the third side. And the corners need to be broken.

Have you got stones? What other props have you got? This film has so many cool things. Even the cockroach with the camera is cool.

Anyone with ta set of stones that is kind enough to post photos, it will be greatly appreciated.
 
...
Have you got stones? What other props have you got? This film has so many cool things. Even the cockroach with the camera is cool.

Anyone with ta set of stones that is kind enough to post photos, it will be greatly appreciated.

I have two multipasses, once had a Zorg Hand kit, a few paper props, some merchandise, I think a key somewhere, everthing safely buried in tons of other stuff. But once the basement is cleaned out, everything should surface again ;)

Regarding the stones templates, I think that with the corners cut (no pun intended) or broken, the templates will be fine, since they of course go onto the raw stones.

There is a ton of replicas pictures out there, especially of the official replica set.
 
Ok had a quick search in the work shop and I found some MDF forms that I made a few years ago for sitting PVC pipe in whilst cutting it. I had made the jig 1200mm long which is just enough to make 4 stones at 290mm each.
For this set, I will be using the 45/90/45 configuration.

7ff7835a60feeb3a7f3a78f20f947e10.jpg

e69b5d19fe93af772da91206e00b3d28.jpg


And now champagne! No I mean let the glue dry and then I can sand them back.

Sent from my SM-G900I using Tapatalk
 
I made a set and put it on Shapeways. I put it available in 3D printed Sandstone. It's price is $2700.00

I don't expect to sell any, and it's set at the maximum of 200 mm high, but it makes an interesting conversation piece.

Almost all the cost is in Shapeways favor, as three monstrous sized stones printed in sandstone are just outrageously expensive.

I'm glad you're finding LESS expensive things to make them out of. :lol
 
Last edited:
$2700! Are they solid?

Yes I am finding many other ways to get a set and cost so far is $0.00 as I am currently recycling.

And after a few hours this afternoon, this is where I am.

f131e438394567b9e7d9f38bdc662ecf.jpg


As I mentioned, I am keeping these hollow so I can add the four different coloured lights.

Sent from my SM-G900I using Tapatalk
 
I realized I have been looking at these all wrong. That flat edge is actually the front of each stone.

attachment.php


attachment.php
 

Attachments

  • Stone layout.jpg
    Stone layout.jpg
    32.3 KB · Views: 2,300
  • 5th Element Stones Template Base V3.jpg
    5th Element Stones Template Base V3.jpg
    29 KB · Views: 2,758

Your message may be considered spam for the following reasons:

If you wish to reply despite these issues, check the box below before replying.
Be aware that malicious compliance may result in more severe penalties.
Back
Top