Kevin's scatter build thread

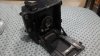
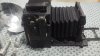
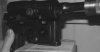
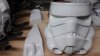
I took my family to Disney last week, I spent some time in the star wars museum at Hollywood studios. Here are a few shots of the Tie and ATAT buckets.

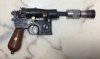
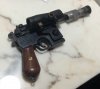
I'm pretty sure the ATAT is a master replicas seeing how only 2 ATAT buckets were made. Also not too sure about the accuracy so I didn't spend much time on that prop. The tie looked pretty accurate and the sign did say, on loan from lucas films.

IMG_3417.JPGIMG_3418.JPGIMG_3419.JPGIMG_3441.JPGIMG_3442.JPG
 
Nice pics kevin!


Sent from my iPhone using Tapatalk
Thanks, I have a bunch more however I think they would need to be requested so I don't get in trouble:$

I have some sabers and scale model shots as well. Lots of shots.

I just hope I can get some answers or guidance for the TIE and AT AT HELMETS
 
Wish I could help you on the helmets, but buckets is a real weak spot for me. I don't know much...


Sent from my iPhone using Tapatalk
 
I bought an x wing kit a short while ago from darth hair. It's a complete kit with inside foam padding as well as a mic and decals. I have been doing alot of research on these buckets seeing how I don't have much free time for building. These helmets look extremely accurate and are a real bargain. I also decided to ask for a couple extra shells to build a tie and ATAT. I bought my face plates from ATA (affordable trooper amor ) the same place I bought my stormtrooper kit shown a few pages back. The reason behind making a hybrid kit is because they will be displayed together. The stormtrooper, Tie and Atat will now have the same faceplates, and my x wing, ATAT and Tie will have them same shells.

This is the beginning of the marathon build. 3 lids at the same time. I will start with the x wing first and then begin the 2 ties.
20170826_143807.jpg20170826_144510.jpg1503778022587653133778.jpg
 

Attachments

  • 1503777973859-1930425078.jpg
    1503777973859-1930425078.jpg
    535 KB · Views: 106
Last edited:
So above is a basic description of what I'm doing. I have spent alot of time reading about these on starwarshelmets.com and found that only 14 Ties were ever made for the OT films. Later on 2 of the Ties were remade into ATAT helmets. These Ties were nothing more than x wing helmets with a stormtrooper faceplate added a 3 inch strip instead of the 2 inch strip to accommodate the width of the faceplate. Of course the Mohawk changed and they added ear pieces with the greebies.

So my goal here will be to make 2 Tie buckets and then make one into an ATAT. Yes, the original Ties were pulled in black ABS however seeing how parts were limited in white, I decided to go all white and paint them black. The good news is darth hair is ramping up to build Tie helmet kits, but is still in the testing phase. Above in the pics is his mohawk and ears. I'm going with as many metal parts as I can for the greebies and found my pill boxes on Shapeways.com. I will share links here as I find and have the greebies in hand so others can play if you decide to build one yourself. Also, most of my research is done off site on sites dedicated to the project I'm currently on. The same way I have done with my R2 and stormtrooper builds. I believe in going to the source. I will keep my build logs here because I don't see the purpose to add to the dozens of logs on those sites already. I will still post there to make sure I stay on track and keep it accurate .
 
My first real parts!

20170930_193011.jpg20170930_193029.jpg20170930_193033.jpg
This is a 2 cell with all the goodies.Camera and all. Also I decided to buy the Archers torch that was shown in the most obscure props thread. I thought it was really cool, seeing how I'm building an R2. I used the bottom half of my romans graflex that I already built. The flash gun is missing the red button. This one is romans. I will keep an eye out for an original as well as an original 3 cell bottom.


This is the real graflex with romans 3 cell bottom. (for now)
20170930_193741.jpg

I will most likely part with my 2nd romans graflex. I will be selling the camera with the extra flashgun parts. I was thinking about keeping them for display, however, no room.
 
Last edited:
20170930_203046.jpg

Pretty cool camera
 

Attachments

  • 20170930_203312.jpg
    20170930_203312.jpg
    733.5 KB · Views: 107
  • 20170930_203230.jpg
    20170930_203230.jpg
    727.3 KB · Views: 109
My wife's first prop build, well kinda

I had my BS kylo helmet out and my son was playing with a new Santa hat with beard. I came home to this

20171119_184418.jpg
 
Getting back to building. I'm going to school for my electrical contractors license however, I really need to build during my down time. Anyways, starting with Luke's blaster. Standard denix with bobadebts parts. I'm using Fieldmarshalls scope because I already have his on my E11. Looking to buy real wood grips as well. So far it's torn down and I began the mods. Just looking for details on cutting down the barrel and finding scope bracket placement. Any links or guidance would be appreciated.

IMG_4468.JPGIMG_4469.JPGIMG_4470.JPGIMG_4473.JPGIMG_4471.JPG
I began filing and hand etching already. I pulled out my Dl44 to check my original mods.

I know I have other projects started however, I need more glue because it dried up, and I am missing parts that would delay me anyway. I have everything I need to finish this project. I can always change the grips later.
 
Last edited:
Is this correct ? I didn't cut anything off, just removed the orange plastic insert and cut off the front sight.

IMG_4478.JPGIMG_4479.JPG

I am having issues finding info on Lukes blaster. It seems Han's is king when it comes to these ESB Dl44s. Any suggestions will be highly appreciated. I need to know where the scope bracket goes before I make a mess.
 
The barrel tip should really only poke out half that, but you're right it does poke out!

as for luke's mount - thats the one I did - maybe this will help..
 

Attachments

  • image.jpeg
    image.jpeg
    355.8 KB · Views: 102
  • image.jpeg
    image.jpeg
    375.3 KB · Views: 91
  • DSCN3991.jpg
    DSCN3991.jpg
    1.3 MB · Views: 101
The barrel tip should really only poke out half that, but you're right it does poke out!

as for luke's mount - thats the one I did - maybe this will help..
Thank you, yes this does help. Looks like you nailed the proper distance from the edges. Can you share your measurements from the bottom of the gun to the bottom of the bracket as well as the front ? I can't for the life of me, find any clear shots of the other side. Only replica or idealized pictures have been seen so far. Your blaster looks great and thanks for sharing.
 
Thank you, yes this does help. Looks like you nailed the proper distance from the edges. Can you share your measurements from the bottom of the gun to the bottom of the bracket as well as the front ? I can't for the life of me, find any clear shots of the other side. Only replica or idealized pictures have been seen so far. Your blaster looks great and thanks for sharing.

I hope I matched this up correctly. Looks like the bracket lined up with the lip on the bottom
b6f8988b17e6c285f83dc16da049477d.jpg
6d61d7feeee303b8c20c2d75c17964e4.jpg
b8bc075d5bd66a880855d8bedd79b063.jpg
82ca73a1ebaea34f9956cb41b289d8c9.jpg
d47534f728f22555af53eb4ad6b3b210.jpg

My bench is getting messy again

A just for fun shot
20f41c51dbf08286a66aafb6049c5ffb.jpg


Sent from my iPhone using Tapatalk
 
A side note if you will.

I like posting pictures because it's easier to see all my imperfections and trouble areas that need attention. Wow I have a long way to go!
 

Your message may be considered spam for the following reasons:

If you wish to reply despite these issues, check the box below before replying.
Be aware that malicious compliance may result in more severe penalties.
Back
Top