Hi alll - I've been a fan of the forum for a while and thought I'd finally introduce myself and make a post about a rebuild of an Apollo A7L glove that I've undertaken.
First a little about myself though - I am a freelance primary teacher here in the UK, delivering science workshops to schools. One of my workshops involves me visiting schools in an Apollo A7L replica to teach the kids about the space race and space science in general. I purchased a suit from one of the usual US suppliers for the purpose a couple of years back for around $1500, which is good for the age range I am working with (ages 5-11) but the space geek in me has been looking to improve it ever since.
That said, although I am pretty handy at making most things I don't have the tools or resources to get to a high prop standard, so tend to go for the best I can do within my limitations in order to provide a good tool for teaching the pupils. So, onto the build.
The reason I chose the glove is that I managed to get Buzz Aldrin to sign a piece of cloth for me a couple of years ago that I fix to my current glove for kids to wear and have their picture with - however, it is pretty much the poorest part of the suit, made of ironing board grey fabric and basically a pair of rubber washing up gloves. Ever since I have been looking to improve the gloves to make a better 'frame' for the signature. Below is a pic of Buzz signing it so you can see what I mean.

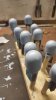
I thought I'd start with the fingertips so after a lot of research (and some great tips from other forum builds) I managed to source some rounded silicon plugs that are almost exactly the same 32mm size as the real fingertips as shown below in this museum pic with the plugs alongside (I bought the blue version). As an ex sword fencer, I also realised that the best match for the 'Chromel R' metalised covering was a sword fencing lame, which for the uninitiated is a conductive jacket worn over fencing whites.


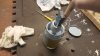
The next problem was the colour of the tips and after a little more searching I went for the plastidip method that I've seen used on a couple of previous builds. I made little sticks and a stand for the plastidip to set on and they came out ok with a pretty good colour match, using the make your own colour set which cost around £34 here in the UK.

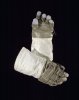
When it came to the overall glove size, this was a real problem as there doesn't seem to be a size spec available anywhere, especially for the length of the fingers etc. so using a photo that the very kind 2storyprops had uploaded showing the glove with a 6.5" ruler alongside the width I used photoshop to get some approx. sizes for final assembly. I am aware that due to perspective and bends in the ref pictures I won't get a spot on scale but at least it's a working idea of sizes for me to run with. This is an official photo with some of the rulers overlaid:

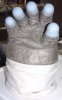
All that said, the photos show the stage I am at now, having made finger tubes ready for a wrap around cover. I'm not too bad at sewing so realised that the best way to assemble it is to sew the fingers together then put these in this cover.


I will post other pictures as it progresses as soon as I have them ready and all advice is greatly appreciated.
Darren
First a little about myself though - I am a freelance primary teacher here in the UK, delivering science workshops to schools. One of my workshops involves me visiting schools in an Apollo A7L replica to teach the kids about the space race and space science in general. I purchased a suit from one of the usual US suppliers for the purpose a couple of years back for around $1500, which is good for the age range I am working with (ages 5-11) but the space geek in me has been looking to improve it ever since.
That said, although I am pretty handy at making most things I don't have the tools or resources to get to a high prop standard, so tend to go for the best I can do within my limitations in order to provide a good tool for teaching the pupils. So, onto the build.
The reason I chose the glove is that I managed to get Buzz Aldrin to sign a piece of cloth for me a couple of years ago that I fix to my current glove for kids to wear and have their picture with - however, it is pretty much the poorest part of the suit, made of ironing board grey fabric and basically a pair of rubber washing up gloves. Ever since I have been looking to improve the gloves to make a better 'frame' for the signature. Below is a pic of Buzz signing it so you can see what I mean.
I thought I'd start with the fingertips so after a lot of research (and some great tips from other forum builds) I managed to source some rounded silicon plugs that are almost exactly the same 32mm size as the real fingertips as shown below in this museum pic with the plugs alongside (I bought the blue version). As an ex sword fencer, I also realised that the best match for the 'Chromel R' metalised covering was a sword fencing lame, which for the uninitiated is a conductive jacket worn over fencing whites.
The next problem was the colour of the tips and after a little more searching I went for the plastidip method that I've seen used on a couple of previous builds. I made little sticks and a stand for the plastidip to set on and they came out ok with a pretty good colour match, using the make your own colour set which cost around £34 here in the UK.
When it came to the overall glove size, this was a real problem as there doesn't seem to be a size spec available anywhere, especially for the length of the fingers etc. so using a photo that the very kind 2storyprops had uploaded showing the glove with a 6.5" ruler alongside the width I used photoshop to get some approx. sizes for final assembly. I am aware that due to perspective and bends in the ref pictures I won't get a spot on scale but at least it's a working idea of sizes for me to run with. This is an official photo with some of the rulers overlaid:
All that said, the photos show the stage I am at now, having made finger tubes ready for a wrap around cover. I'm not too bad at sewing so realised that the best way to assemble it is to sew the fingers together then put these in this cover.
I will post other pictures as it progresses as soon as I have them ready and all advice is greatly appreciated.
Darren