gt350pony66
Master Member
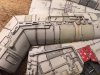
well, the latest incarnation of the 5 footer docking collars from Tony 308 bits/Shapeways are pretty nice. Here they are next to HH collars. Now I'm not here to knock either one. As we all know from watching these movies a zillion times, and image searches, we've seen both styles of the collars. I'm here to state that each of these designs is the best representation so far, of each style of docking collar. other than that it's a matter of personal preference as to which collar you like. I will say that if you're a fan of the 5 footer, which I actually lean toward, you have to appreciate what Tony has done here. I've got plenty of these kits to build and intend to use both depending on the theme of the build. JMO

- - - Updated - - -
the Shapeways are on the left, HH to the right
- - - Updated - - -
the Shapeways are on the left, HH to the right