Walking Dead - Daryl Dixon's New Bike Replica Build

In the early part of this year I began framing an idea inspired by "Daryl's Bike" This thread was immensely helpful. I can't thank Nstevic01 for posting in the level of detail that he did. the parts list was also very helpful. The bike isn't named yet.. but I put it together in time for Wasteland Weekend. (A Mad Max festival in California.)

blurred.jpgIMG_20180927_100729.jpgIMG_20180930_124437.jpgIMG_20180930_124447.jpgIMG_20180930_124503.jpgIMG_20180922_121139.jpgIMG_20180922_121132.jpgIMG_20180922_121120.jpgIMG_2273.JPGIMG_20181017_124503_2_01.jpg
 
Things that I did differently..

Condi tires, because they come in the natural size of the wheels.
1977 RD400 tank. I wanted something more angular. I actuated that by doing the tri-tone paint.
Visual fuel gauge on side of tank.
Relocated oil cooler to the front of the forks. (not an easy task)
Custom Corbin seat (I live about 1.5 hours from them. It cost my several hours of working with their artist and several hundred dollars... totally worth it.)
Halo-Tri-light (I don't even want to discuss how long this took.)
Hand made electronics box.

Things you can't see..
Super loud air horn with compressor.
Keyless ignition
Gorgeous sounding pipes.

Plenty else.. but those are some of the biggest bits.

Woooowooooowoooo! I love it! You really did a great job here! WTF! It's amazing.... The way you delocalized the oil cooler is awesome! It looks so badass!
Could you tell us where did you get all your front lights please ? Are they led ?
The tank is beautiful...

Thank you to share it ADV...
 
The primary headlight is actually just a standard halogen moto headlight but with a Halo ring. (5.5") The medium sized light is a generic LED flood light. (3.5") The small one is technically an LED "spot" light but it was advertised as a "flood" light. (2.5") All of these were found on Amazon. The lights are fastened to an assembly of aluminum and steel. To secure the assembly to the forks I used round bar clamps intended for mounting floodlights on a truck rack. Those were also found on Amazon. Creating the assembly and securing the lights to it required some work.

-Adam
 
I'm still building, and running into a couple of noob questions. I hope there's still some activity on this thread to help me out ;-)

How is the mesh on the exhaust and crank case secured? Is it glued in place? Or welded? Or mystically kept there by invisible sources?
Also, the CB750 has dual throttle cables, the R6 has only one right? So do you just use the single cable without any issues?

Thanks,

Harm

The mesh is welded. I will tell you this was THE BIGGEST PITA to get right. For the exhaust ones, I ended up making a mold and using a shop press to form the shape of the inserts.

As for the throttle cable, yeah, just went to one. So far, so good. Been running for about a year like that without issues.
 
How did you guys shape your seats? Especially those of you who did an ínspired by' build, rather than an exact replica.

The framerails of the bike are asymetrical. Did you follow the contours of the rails, or did you make the seat symmetrical?

Any detail pics of how the seat sits on the rails in this area would be much appreciated!
 
I could also use some advice on the filters. I'm looking for a more afordable / locally available product.

I think the K&N RC-2382 filters might fit and look close enough.

Here are the dimensions:

Flange Center to Center 2.938 in (75 mm)
Flange Inside Diameter 2.125 in (54 mm)
Flange Length 0.625 in (16 mm)
Outside Length 6.25 in (159 mm)
Outside Width 4 in (102 mm)

How does this compare to the Cognito Moto or Steel Dragon options? Does anyone know if I'll be running into clearance issues?
 
Salut à tous ! Déjà bravo pour vos réalisation , c'est un travail remarquable que vous avez tous fais ici.
Je viens de France et je fabrique moi même la réplique de la moto de daryl, j'ai vu sur le forum qu'il y à déjà un français parmi vous ^^
Je fabrique moi même certaine pièces, style les filtres à air c'est moi, j'ai réalisé le Te de fourche supérieur en mousse expansé pour avoir une idée du résultat final aussi, mais je pense le commandé chez classified moto ( à voir...) 350$ avec les frais de port. J'ai fais faire ici en France le réalésage de la colonne de directions de la R6 pour s'adapter sur le cadre du 750 par un professionnel.
Voici quelques photos de mon projet en cours.

Hi everybody ! Already congratulations for your achievements, it is a remarkable job that you have all done here.
I come from France and I make myself the replica of the bike daryl, I saw on the forum that there is already a French among you ^^
I make myself certain parts, style air filters it's me, I realized the Te of upper fork foam foam to get an idea of the final result too, but I think the ordered at classified bike (to see. ..) $ 350 with postage. I have done here in France the reaming of the column of directions of the R6 to fit on the frame of the 750 by a professional.
Here are some pictures of my current project.
 

Attachments

  • IMG_20180930_140721 - Copie.jpg
    IMG_20180930_140721 - Copie.jpg
    176.4 KB · Views: 165
  • 20181019_142134-COLLAGE.jpg
    20181019_142134-COLLAGE.jpg
    215.1 KB · Views: 191
  • IMG_20190210_121624 - Copie.jpg
    IMG_20190210_121624 - Copie.jpg
    198 KB · Views: 203
Right... I'm still building, and running into some issues.

Since the air filter is replaced, there's no connection for the crankcase breather hose. On the pics of the bike, it looks like there's still a hose attached to the top of the crankcase... but where does it go? Is it simply left open?

And regarding painting the engine: I wasn't planning on taking it apart. But it looks like painting might be quite difficult with the engine in one piece. How'd you guys go about this?

And how did you connect the seat pan to the frame? It would like it to be detachable, but still tight on the frame.

Any and all suggestions are welcome.

Regards,

Harm
 
The engine I ended up painting in one piece, outside of the frame. Just take your time masking everything off.

Seat pan to the frame, I went with tabs in the front and a bolt in the rear to hold it down. I don't really have a picture of this one oddly enough.

For the crank case filter, I went with this option:

VH7TViFuZwBfMTABTmkz0_6Zu306JdtZ-MQSFiAHkwlQ=w2400.jpg


1udspqBK_F069ppR3GfSzkRTeJYXjUrjvCQOnhxw8ECM=w2400.jpg
 
Salut !
Je suis heureux de participer à cette discussion. Je suis moi-même en train de faire cette réponse.
Je l'ai acheté en cours de modification, mais je devais tout refaire.

Je suis au pas des filtres à air. Pourriez-vous mesurer les dimensions?

J'ai trouvé quelqu'un pour le faire ici en France. Massouille et Popeye pourraient être intéressés pour former un groupe.

Bon dimanche!
 

Attachments

  • IMG_20190902_074047.jpg
    IMG_20190902_074047.jpg
    5.2 MB · Views: 99
Salut !
Je suis heureux de participer à cette discussion. Je suis moi-même en train de faire cette réponse.
Je l'ai acheté en cours de modification, mais je devais tout refaire.

Je suis au pas des filtres à air. Pourriez-vous mesurer les dimensions?

J'ai trouvé quelqu'un pour le faire ici en France. Massouille et Popeye pourraient être intéressés pour former un groupe.

Bon dimanche!

Salut Calypse ! wé pourquoi pas crée un groupe de français qui réalise le même projet, retrouve moi sur Insta "mad_max_twd" on pourra discuté
 
Hey guys, I finally finished my Dixon bike. Thanks to nstevic01 (Nathan) for the insight and motivation. This was a fun build although now the bike is running really rough. Wanting to put the baffles back in the exhaust but accidentally got rid of them. If anyone knows where I can get some aftermarket baffles for this exhaust I'd be grateful. I don't like how loud the bike is without them and I need to fix the jetting. I cheaped out on some of the parts (rear shocks, no engine paint or guards, etc.) and didn't get a 100% replica but I still enjoy how these bikes are set up.

View attachment 813471View attachment 813472View attachment 813473View attachment 813474View attachment 813475
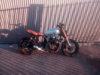
Hey body what kind of mesh did you use on the exhaust? And how did you attached it?
 
The engine I ended up painting in one piece, outside of the frame. Just take your time masking everything off.

Seat pan to the frame, I went with tabs in the front and a bolt in the rear to hold it down. I don't really have a picture of this one oddly enough.

For the crank case filter, I went with this option:

View attachment 1054303

View attachment 1054304
Hi, thank you for all the info you and the rest put in this forum, can you send me link or the information of:
crank case filter and the little filters in the petcocks.
The mesh you used for the muffler.
And what battery did you use?
Thank you again.
 
Hi guys. Thinking about this project...over time. I'm a photographer, and a lot of clients have dried up because of the COVID-19 thing...anyway, wondering about the tank...it says in various places they used an aftermarket tank...wondering if it's this one:
Standard Fuel Tank Black Paint

Also, I used to make knives, and I can tell you, on the brass plate on the engine, the perforated screen on the muffler, etc. it looks like the coloring was done with a torch...and then clear coated. Does anyone know how the "repair plate" is attached to the engine cover?
141003_CM6879_profile.jpg


Last, thank you to all who worked so hard on this list. What a huge benefit for the rest of us!
 

Your message may be considered spam for the following reasons:

If you wish to reply despite these issues, check the box below before replying.
Be aware that malicious compliance may result in more severe penalties.
Back
Top