ROGUE ONE Jyn Erso - open build thread!

Based on the newest photos I have not gained any new information of the small parts on Jyn's vest. Based on the best information so far, here are some diagrams I am using to fabricate the vest hook and hose clips if anyone is interested. In some photo the hoses seem to move very easily, in others they seem to appear more as an interconnected group. At the current time I am using independent pieces of 4 mm rubber hose (which I mentioned before). If necessary these can be joined/glued together at a later time. If it turns out they are separate but need to be more rigid, I have found running a length of electrical wire inside the hose will work well.
View attachment Erso Vest Parts.pdf
 
In this post I have tried to compile all of the currently known design elements of the Rogue One Battle jacket. Some elements have been identified from photos as being common to both the Jyn and Cassian versions of the jacket. (These elements are enclosed within a Green border.) Other elements have been found only in the Cassian photos, (enclosed within a Purple border) but since some elements are common, I have extended these Cassian features to the Jyn version as well. However there are still some areas (bordered in Black and shaded in Yellow) which are unknown or are not clear enough to add into this compilation.

In other situations after looking at pixels at 500% magnification one starts to see thing you want to see whether they are really there or not. One example is when I look at the Left-hand pocket flap of Cassian’s jacket in the “leaving the temple” photo I can see either creases in the fabric or a circular shape. Whenever something seems regular enough to be “man-made” I try to justify what it is. In this example I “see” a 31 mm circular Rogue One Starbird. I have not added any of these “mirages” until more evidence helps to confirm to disclaim these guesses. The associate diagrams are 1/3 scale for the front and sleeve/cuff details.

I am always interested in additions or corrections. I will even be glad to add your guesses and mirages to my list.
View attachment Jyn Jacket Front.pdf
View attachment Jyn Jacket Sleeve.pdf
 
Comments from Chrononaut and Scott4040 motivated me to fill in my obvious knowledge gaps of ponchos and its many variations. Also the excellent detailed photos provide by Without a Stitch in their album of Star Wars Celebration photos provided excellent, if sometimes confusing, references for Jyn Erso's concho.

If you are not interested in Jyn’s Concho, you can skip this rather lengthy, picky discussion.

This discussion is not an exhaustive analysis but I hope it gives others a starting point to expand and improve. It also tries to answer some of my own questions like “how did the back of the bandolier – disappear?” This poncho-cowl-cloak-cape-ish garment was an interesting 3D challenge to me to understand how and why it was made the way it was. I have made some assumptions which I provide here so others can challenge and suggest alternatives. The resulting product is not how I would make a garment for tropical protection, but since Jyn does not even have her hood up in the face of a blowing storm in the Behind The Scenes video, I guess keeping dry is not the ultimate goal.

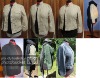
I break down the garment into the following major elements, main (rectangular) body which also forms the sleeves, a shoulder cowl, a collar stand, a collar, two exterior“pockets”, and a hood.

The width of the body should be roughly the measurement from wrist – behind the neck – to opposite wrist when your arms are stretched straight out to your sides. The length is roughly the distance from the back of the upper thigh - over the shoulder - to front upper thigh. The body in turn seems to be made of four panels, left and right fronts and left and right backs, each of which is half the width and and half the length of the full body rectangle. The two back panels are joined by a center back seam from hem to nape of the neck. In two of the right shoulder photos there appears to be a small portion of shoulder seam which may be part of the shoulder cowl. The two front panels are attached only at the shoulders leaving a front opening like a cloak.

The back panels have the same deep hem. The front panels have the same narrow hem. The difference between these hem patterns is most obvious where the front panel is sewn to the back panel at the end of the sleeves.

Aside: This back seam, shoulder seam, and open front is not good for providing a weather-proof garment but I believe this approach was taken to provide the best fit, weathering and “character'” to the garment. One traditional approach to making a poncho is to start with a rectangular tarp (or in this case maybe two). Just like my jeans, it is the edges of the tarp which will be the most worn and frayed and those are the parts which the designer will want to retain. This means cutting out the center of the tarp(s) so you can retain the outside edges when putting them together.

The body also produces the sleeves. This is accomplished by making slits on the front panels. Each slit starts at the outside edge and goes more than 1/2 of the distance across each front panel. The height of the slit is located below the arm pit. (I found making the length of the slit being the same measurement as its height above the bottom edge makes for an interesting design which ties some elements together well.) The upper edge of the slit is sewn to the back panel at the same height to form the sleeve. The back panel under the seam hangs down to provide the back of the poncho. The part of the front panel below the slit seems to be folded under and back toward the center. To strengthen the end of the slit, there appears to be a heavy seam (perhaps even a binding?) along the upper part of the sleeve seam, and then following (part way?) down the folded edge. This would make an “L” shaped seam but with the arms down at your side the legs of the “L” are roughly parallel to each other such as how they appear in the photos. At the bottom of the folded edge there is a cutout. On the right-hand side this provides access to the gun and holster. On the left-hand side this allows access to her other weapon and entry for Jyn's bandolier to return under the poncho.

One major assumption I am making is that to reduce bulk and weight, the portion of each front panel below the slit has been cut away close to the fold and seam. This is because I see no evidence of this material going back either across the front of the mannequin or around the side and across the wearer's back. In traditional ponchos the sleeves would not have been sewn closed (but often just loosely corded together) and the material would not be removed. This would have allowed the poncho to be unfolded at the shoulders to provide a large rectangle to use as either an overhead cover or ground cloth.

Another major assumption relates to the cutouts. The top of each cutout appears to be a section of stitched belt or webbing. This webbing in both cases seems to wrap around the body. The webbing may only go as far as the “L” seam but since the front is open, this would make for a very “flappy” poncho. On some ponchos designed for cyclists there is a cord or belt which attaches one side of the front, around the back, and to the other side of the front. This allows the wearer to cinch in the material to reduce the bulk in the front as those ponchos do not have an open front. The belt is not attached to the back so the poncho is free to drape over the wearer’s back, backpack, cycle seat, etc. I believe using the webbing at the top of the cutout as a belt around the wearer back would provide a similar ease of wear.

I also assume there is some type of (currently unknown) front closure as using the bandolier would not provide a practical method.

My assumption is there is both a body neckline and a larger cowl neckline with the collar attached to the body and the hood attached to the cowl. The collar is a rounded mandarin collar. The collar is sewn onto a collar stand. The stand is taller than the collar. The stand is longer than the body neckline so the left-hand side can overlap the right. My assumption the collar attaches to the main body because the collar is located inside the hood. Also collar would provide a finish for the body neckline.

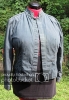
The hood is comprised of three pieces - two sides and one center. Once the three pieces are joined together the hood is attached to the shoulder cowl at the cowl's own neckline. The front of the hood extends beyond the neckline and left unattached. These hood flaps are turned wrong-side outward and on the left side provides a surface for an attached small greeblie. In practice these flaps could be turned up and wrapped around the lower part of the face to provide protection from the weather. One the right side, the front edge of the hood is partially covered by the bandolier. When the mannequin was dressed for Celebration it appears the jacket was put on first, then the bandolier, then the concho. The concho was positioned with the right front over the left front (which can be seen hanging below the grommets in some photos) and the bandolier was used to help close the concho. At the lower left side, the front panel of the concho was placed behind the bandolier allowing the bandolier to go through the left-side cutoff. The upper right front of the concho was then pulled under and partway through the bandolier. The bandolier also distorts the upper right of the concho and hood flap as the bandolier apparently goes over the collar on the right side and down the wearer's back under the concho. The position of bandolier and oxygen mask (which is clipped to a leather strap which goes around the neck inside the hood) covers the details of the front opening.

With the hood sewn to the shoulder cowl, the cowl assemble is sewn to the body over the shoulders like a yoke. Having a second layer of fabric on the top of the shoulders does work well for weather protection. In my concept the cowl follows the shoulder seam as there is no evidence of it on the concho’s back other than the center extension. The center extension goes slightly down the back, covering the top of the back seam which would help with water resistance. The cowl fronts wrap over the shoulders and angles toward the center. (This angle is similar to what would normally be at the shoulder seam, but in this case rotated to the side. This could provide some fitting structure to the otherwise “square” shoulders.) On the left side a layer of fabric forms a “window” for another larger greeblie. On the right side there appears to be a layer which makes the bottom of the shoulder cowl into an exterior pocket.

The attached diagrams provide some rough approximation of the separate elements.

I normally test my patterns before providing them. In this case I did not make a test garment but I did make a paper and tape model to make sure the concepts were “workable”. At the current time I do not plan to make this garment so this may be as far as I take this concept. However, as a part of my process I have measured, counted stitches, and calculated, and normalized many elements of this design from the available photos. If anyone is interested in this data, I can try to organize and make it available.

View attachment Poncho Body.pdf
View attachment Poncho Cowl Hood.pdf
 
Last edited by a moderator:
I came here just to say thank you for all the pattern! Just did a paper fitting of the vest, because life got in the way and my "finish as well as possible" deadline is Saturday. And its looks like it will work great. (Except for the obvious lack of 1/2 cm ripstop fabric which will be good enough for version one by doing the top stitching every 3/8" which is close enough.)

Thank you for all your hard work and saving me a some insanity!
 
Now I'm close to finished on the shirt, let me say that having that seam right where the overlap happens makes fitting and test versions about 100x easier. At least in my version. The fabric I'm using now Kaufman Greenwich Chambray in Onxy is about 2 or three shades too dark, and possibly not slubby/linen-like enough, but is super lightweight (so the double layer on the yoke is no big deal) and a gorgeous fabric.

You might want to check it out in Pepper
https://www.fabric.com/buy/0433701/kaufman-greenwich-chambray-pepper


(which is white and black as opposed to grey and black) and maybe overdye it lightly with indigo or use one of the other really lightweight Kaufman Chambray fabrics. (This one is the lightest, though.)
 
Last edited:
View attachment 653529
I'm thinking a bit darker for the dye.

It is good to see others are making progress on their Jyn Erso projects. I do not know if it will help you in achieving a darker hue with the dye you already have but one trick is to warm the leather before adding the dye. By this I mean just something simple like leaving the leather in the sun for a while to warm. (I don't want anyone to try to microwave their leather.) The heat will help open the pores of the leather and allow the dye to penetrate a little more deeply. Also over years of exposure, sunlight will naturally oxide most leathers turning them darker whether that is what you want or not.
 
smithjohnj from what I saw at SDCC, that fabric looks like a pretty close match. If anything, it might be a touch too grey and dark, but it's hard to tell from the photo. I remember thinking at SDCC that her shirt seemed to be equally blue and grey. Her shirt appears so much darker in the color-corrected trailers though, and the fabric you found looks a lot like it appears on screen. Can't wait to see how it looks when you receive it!
horsegir48 your belt and holster look great! I don't think you actually need to go darker. In person her belt l more of a medium brown, with kind of an uneven dye job/spots that were weathered off and appear lighter.
 
Last edited by a moderator:
Chrononaut identified a few brands of ski boots with buckles similar to those on Jyn Erso's boots. Based on that research and some of my own, the Lange brand seemed to be a close match to me. I was able to find two pairs at reasonable prices to disassemble. (If anyone is looking to buy ski boots, it seems to be a great time of year to negotiate a bargain.) One pair of boots had three buckles the other had four. The pair with three buckles per boot has buckles which are exactly the same. The pair with 4 buckles has more variation. On each side three buckles were the same size and the fourth (the one closest to the toes) is of the same style but only 75% as long. The wire bails on these buckles also varied in length. Again the shortest bail was closest to the toes and increased in length as the buckles go up the boot. The left and right boot buckles of the same relative position are the same. This variation in bail length is helpful if you are looking to produce buckles for both Jyn and Cassian boots.

Other manufacturers produce buckles which have a distinct left and right sides which cannot be interchanged.

Many of the new photos provide excellent details to allow makers to sculpt their own versions of the buckles. However there are a couple of details which are obvious in first-hand observation which may not be recognized from the photos. First the bails have a slight bend along their length. This allows the bail to more easily conform to the curve of the foot and boot. The bails are also made of spring steel. A significant force is required to spread these legs apart in order to remove the bail. When removed from the rectangular block the open ends spring much closer together. As such, these bails would probably not be suitable to reuse in a urethane replica.

The next element in line is the bail block. The photos may provide width and length dimensions but the depth can be more difficult to estimate. All of my examples are by Lange and are the same size for all of the buckles on all four boots 22 x 25 x 8 mm.

The mechanics of the buckle is made up of a mounting bracket, a toggle lever and a spring-tensioned adjustment link. In operation, the bracket attaches to the boot; the toggle fits between the uprights of the bracket and is riveted to allow it to pivot. In the center of the toggle there is a slot which holds the adjustment link. The link is riveted onto the toggle and can also pivot. The front of the adjustable link is threaded and screws into the bail block. By screwing or unscrewing the block, the effective length can vary as much as 20 mm. (At the end of the link there is a clip which prevents the block from accidentally being completely unscrewed and separated from the link. If the clip is removed the block and link can be separated.) The details of the mechanics are not important to any static sculpture but understanding their relationship can help understand the photos.

Again it may not be obvious but the top of the toggle and link each has a slight curvature along their length. The bottom surface is also curved to better conform to the boot. The effective length of my examples from the end of the toggle to the front of the bracket is 55 mm. There is a 5mm upward bow across the bottom of the assembly. To follow the curve the link is also bent in the middle much like the bail.

All of the standard parts match very well with the Jyn Erso buckle with one exception. The Erso toggle appears more angular which will actual make it easier to produce than the curved Lange version. In the attached diagram I try to provide the dimensions and show the relationships among the parts.

View attachment Rogue One Boot Buckle.pdf
 
smithjohnj - glad to be of help! And thanks for the breakdowns!

A little bit of the evolution of my jacket....
fed9327c-75c0-47f7-9bd6-bd342f74e887_zpsmnhsyqn8.png


From left to right: 1. original jacket, 100% cotton - thrift store find. 2. pockets removed, hem let out. 3. re-hemmed to proper length so that it looks like it has a band sewn on. 4. jacket with black scarf - fabric is some kind of poly cotton. 5. dyed jacket with a whole bottle of Rit Dark Green...and ended up with black. 6. Rit Color Remover got the jacket almost back to tan, and lightened the scarf up to a nice weathered grey/ faded black. 7. re-dyed the jacket with half a bottle of Rit Dark Green, much better. 8. two overnight tea baths aged the jacket down to a nice worn green.

I'm still testing how to do the stripes, but it looks like the first layer will be white puffy paint sponged on for coverage, then the yellow/tan on top. I think I'll have to add some regular brown acrylic paint to the yellow matte fabric paint I got in order to get the right color. So far masking the shape off with masking tape looks like it will work the best on this jacket, if I was making it from scratch I'd make a freezer paper stencil and do the strip of fabric first before sewing it into the sleeve. Since this jacket already has a sewn detail stripe in the sleeve, it's too bumpy for stencils to stick.

Lucky for me, the jacket didn't shrink. I only simmered/boiled it 5 times!
IMG_2531_zpsh49fjgzc.jpg
 

Attachments

  • fed9327c-75c0-47f7-9bd6-bd342f74e887_zpsmnhsyqn8.png
    fed9327c-75c0-47f7-9bd6-bd342f74e887_zpsmnhsyqn8.png
    294.7 KB · Views: 97
  • IMG_2531_zpsh49fjgzc.jpg
    IMG_2531_zpsh49fjgzc.jpg
    274.6 KB · Views: 218
Last edited by a moderator:
US_ARMY_Vests2.jpg
Ok! So I am not sure if anyone has already pointed this out (if so, sorry! I tried to find it on here but didn't see it) Her vest is very similar to the US army flak vest from the Vietnam war era. Since Rey had actual military components I thought Jyn might as well and I stumbled upon this. The pockets have the same angle with the flap removed and the webbing over them is similar as well. I'm not sure that they modified an existing vintage vest because of the color and such but I believe they certainly took design notes from it! Thoughts??
 
Zooming in really closely on this image makes the belt closure look like it is covered by another piece of leather, Jedi-style, as some people have speculated.

http://www.ew.com/sites/default/files/1470972260/trailer-rogue-one-006_0.jpg

trailer-rogue-one-006_0.jpg

- - - Updated - - -

View attachment 653889
Ok! So I am not sure if anyone has already pointed this out (if so, sorry! I tried to find it on here but didn't see it) Her vest is very similar to the US army flak vest from the Vietnam war era. Since Rey had actual military components I thought Jyn might as well and I stumbled upon this. The pockets have the same angle with the flap removed and the webbing over them is similar as well. I'm not sure that they modified an existing vintage vest because of the color and such but I believe they certainly took design notes from it! Thoughts??

It definitely looks like this was a source of inspiration for the costume designers. Great find!
 
There were some new hi-res photos released at (EDIT NOT comicbooknews.com but) cosmicbooknews.com today. It adds some additional information at least about Andor's Battle Jacket. At the (right) waistband there is an adjustment mechanism. Also the bottom left side of the left chest pocket does appear to be straight as I depict in my conceptual diagram. However, the flap on that same pocket may also be clipped only on the right and straight on the left. Perhaps someone with better eyes or better photos can clarify these observations. Also there is a new Japanese language trailer release which has some spoiler info and a couple new scenes including Andor's Battle Jacket. However the subtitles obscure some of the parts I was hoping to see.
 
Last edited:
Here is a photo of a recent fabric purchase for the Erso Blouse. It is a 55% linen- 45% cotton blend sold under the brand name Kaufman Essex Linen Blend and the color is called Steel. This is what I would call a medium weight fabric with the same hand and opacity as an Oxford or Broadcloth dress shirt. I would recommend the fabric if not the color. The color reference card illustrates a range of grayscale from White, 35%, 50%, 65%, 80% Gray, to Black. This was taken with a flash so it is well lit. I like the texture and the color, but believe it is too light for the blouse. Also the website photo gave the impression there was a bluish hue to the fabric but that is not the case now that it is in hand. However, if I decide (am brave enough) to try to over-dye it with a blue hue that should darken it.
Kaufman Essex Linen Blend - Steel.JPG
 
Two new photos from Empire Magazine:

Rogue-One1-386x500.jpg

empire.jpg

With her scarf appearing blue/green in one photo and brown/grey in the other. I still don't know which way to go on it!
 
With her scarf appearing blue/green in one photo and brown/grey in the other. I still don't know which way to go on it!

I keep being reminded of the "no, really, it's brown not navy blue" Han Solo Hoth parka, so I checked to see how the Rebel Legion requirements were written.

Which is...

"1. Dark blue or dark brown quilted thigh-length parka... "

So if you're going for that specific set of membership requirements, you'll probably be ok. I think your best bet is to choose whichever set of colors you like best (and aren't the most crazily color corrected) and have all the pieces match that.

Thankfully, the scarf is pretty neutral and kind of splotchy to begin with, so it shouldn't be the most intimidating piece for dye experiments. (I'm looking at you "really really good deal black Frye boots I bought before we realized they should have been brown!")
 
With her scarf appearing blue/green in one photo and brown/grey in the other. I still don't know which way to go on it!

I'm still thinking neutral gray or very faded black, maybe with a slight warm tone. The cover picture looks like studio lighting, and everything looks bluer. The other one looks more like sunlight, so things look warmer.


(I'm looking at you "really really good deal black Frye boots I bought before we realized they should have been brown!")

Maybe try some brown shoe polish? I have black combat boots, so I dyed the flaps to match and once the boots are assembled, I'll be weathering/sanding them down a lot, then adding a layer of brown shoe polish to hopefully give them a "faded to brown" look. It'll be a while before I get to that point though, I had to order a new stitching awl. Stitching the flaps onto the boots (at least my boots) is rough.
 
Last edited:

Your message may be considered spam for the following reasons:

If you wish to reply despite these issues, check the box below before replying.
Be aware that malicious compliance may result in more severe penalties.
Back
Top