Captain Canada: The First Peacekeeper

LastMinute

Active Member
Another build thread time!

This is a concept that I've been thinking about doing for years, and slowly with getting more and more challenged by costumes, I decided it was time to give it a go. I was specifically inspired by these two images:
2015-09-18 22.15.30.jpg2015-09-18 22.16.09.png

I love the TFA suit, and this image of the suit with Canadian iconography is badass. Its a little ambitious to start out with, but I figure I can do it in stages. My "Phase One" suit will be more inspired by the end of TFA, while I add some Canadian items, and work on little bits like the helmet and belt.

I want to take the simple SSR T-shirt, and add some Canada to it:
b67eda1baa6c65482791c06db938b89d.jpg

So I had a friend alter the logo with a Maple Leaf, an Albatross (the RCAF bird), and "CSR"
2015-10-24 20.26.12.jpg

Which brings me to the harness! I got the AoU (I think) buckle from dstengler, which was a breeze to put together:
2015-09-24 07.26.04.jpg

And a pattern for the straps generously provided by SMP designs. I got some faux leather, craft foam, and started playing with scale and sizing.
Photo 2015-11-24, 1 33 53 PM.jpgPhoto 2015-11-24, 1 33 46 PM.jpg

I happened to have some CADPAT pants, combat boots, and gloves from another costume, so the look for Phase One is starting to come together:
2015-11-09 18.35.39.jpg

The Helmet.
There's a free craft foam template floating out there online that is easy to find, I just printed it onto card stock, cut it out and traced it onto foam:
Photo 2015-11-24, 12 55 11 PM.jpgPhoto 2015-11-24, 12 55 13 PM.jpg
I ended up re-doing this helmet since I wasn't happy with it, adding a few more lines and details, more similar to TWS or AoU Helmets
Photo 2016-03-26.jpeg
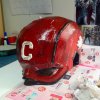
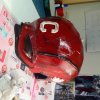
I sealed it using Smooth-On's Epsillon foam sealer, and bondo/sanding before painting.
Photo 2016-03-26-3.jpegPhoto 2016-03-26-2.jpeg
And then weathering:
(In the attachments... don't know why it ended up there.. thrice. Oh well.)
The Shield.

.... Not yet. I've been working with phebert to do me a custom shield, and it's almost ready, but that will be for a future update. I'm SUPER excited and can't wait to get my hands on it.

Thanks everyone for checking this out, I'll be posting updates as I finish the helmet and start work on the shield and onto the "Phase Two" suit!
 

Attachments

  • Photo 2016-01-22.jpeg
    Photo 2016-01-22.jpeg
    902 KB · Views: 203
  • Photo 2016-01-22.jpeg
    Photo 2016-01-22.jpeg
    1.7 MB · Views: 211
  • Photo 2016-01-22.jpeg
    Photo 2016-01-22.jpeg
    1.7 MB · Views: 229
Well done. my friend made me a captain canuck shield and i have an old army helmet that I put and "EH" on for more of the raid style outfit.
 
Love this project! My in-laws are from the Maritimes and currently live in Toronto. So, while I'm from the US, I love my CA. :)

I'm glad that harness template worked for you - it looks great! I've also used the dstengler hardware and it is quite nice.

Cheers!
 
Hnnnnnnngggggg the shield arrived and its amazing......
12988049_10156816744020080_1967518534_n.jpg12969279_10156816744205080_1197190493_n.jpg12969149_10156816747840080_226334403_n.jpg

I'm particularly impressed with the brackets and straps. Really sturdy and the leather is heavy and a beautiful deep brown colour. Now the battle of choosing a paint scheme.... There will be options...
 
I got it painted!

Masking off the maple leaf took a solid 2 hours alone. But I did it and laid down the Duplicolour MetalCast.
13083336_10156864167150080_8967445782673621970_n.jpg

I'll freely admit, I didn't really know what I was doing. I only just read as much as I could in the "Im Painting a Captain America Shield" Thread, so I gave it a go. Its not perfect, but damn is it satisfying to take the tape off.
13043782_1028977497194550_8915813679105846441_n.jpg
Next up will be weathering it. I really want to get some good scratches, bullet hits, and burn marks on it before giving it that satin automotive clear coat.
13062186_1028977560527877_4491971573523361062_n.jpg

Its going to be hard to rough it up since its so pretty!
 
Aight,

Time for another lengthy update since its been far too long since I've plugged the progress on this thread.

FABRIC

Lots of guys doing a TFA suit will get a CosplaySky, Whitesheep, or UD Replicas suit and modify it for some great results, however I can't really do that since Ive got something so custom. In researching the movie suit I learned that the material was ballistic nylon and in the more recent Cap suits, cordura. I wasn't totally sold on that as a fabric, so I started looking into what real military combat uniforms are made out of. Usually they are some combination of poly-cotton twill and/or nylon. I also looked into work pants like Dickies for that heavy rugged look and found that they are made out of "duck cloth" which is a type of canvas. Long story short, SAMPLES:
12314130_938906096201691_7665659317810006361_n.jpg
Photo 2016-08-03, 7 17 41 PM.jpg
13669567_10157242357760080_8278946738570423071_n.jpg
In all, I got over 20 fabric samples in varying shades of red and white (also leaning into the burgundy's and greys)
Photo 2016-08-03, 7 45 35 PM.jpg
What I was looking for was something that had rough and heavy weight and wasn't too bright red and white, as I wanted a more deep colour that felt a little less comic-book. I also want the red on my shield to be the most "red" part of the suit.

In the end I selected "Duck Wine" and "Combed Cloud" 9.3oz cotton Canvas. Here they are on my shield with helmet, harness, and Whitesheep CW gloves (note the "red" looks much darker in some lighting, which I actually really like.)
13886253_1092764540815845_2824626648908763161_n.jpg

So I'm currently in progress on patterning it out. Im using the duct tape body cast method (see Brutus Wayne Cosplay for great work on this approach) and sacrificing a pair of old crafting jeans to reverse engineer the pants.
13335841_10156988414985080_250776141427631381_n.jpg
Dat Cap Booty (with the help of Maple Bunnie!)
14183736_1115651841860448_4534943953082853245_n.jpg
Next up for this phase will be a muslin mock up and then start working on the actual fabric.

Also, my shield's getting dirrty.

Yeah... I decided to weather it.
Photo 2016-09-18, 11 53 34 AM.jpg

I got some great advice from my friend Captain Cosplay, and as such Im using black and silver acrylic paint. Im actually also adding a bit of burnt orange to the black to lighten it and give it some texture.

I started really light to just flick on a few marks, but soon realized that it needed to be heavier to really read as scorched,
Photo 2016-09-18, 12 31 25 PM.jpg
(Way too light)
Photo 2016-09-18, 3 35 58 PM.jpg
In person the marks read a lot darker, but Id rather have it read properly in photos like it does here.
Photo 2016-09-18, 2 44 42 PM.jpg
Im going to be going back in with the silver to try to add some more scuff marks to the red in order to make it seem as though the red has worn away in places, and Im also going to be adding some black into the grooves between the rings because as one of my Cap buddies pointed out, thats actually how it is on the on-screen shields (and it will help hide some of my less-than-perfect edges).

Photo 2016-09-18, 3 36 09 PM.jpg

All in all I'm quite happy with the slow, but steady progress. Im really looking forward to getting the suit done! Thanks for checking this out!
 
Fantastic! Long time lurker, first time poster, and as a Canadian I'm looking forward to seeing this finished.
 
Last edited by a moderator:
Hey everyone!

So I've let this thread lapse a bit due to work, but I finally finished Cap! I was able to wear it for the first time at Emerald City Comic Con and it went over great.
17342711_1311138282311802_5863296447716784291_n.jpg

I'm extremely happy with the outcome, the accuracy as well as the differences I chose to make:
17352257_1311138272311803_5810378700465456746_n.jpg
16831211_1298651023560528_6816018123560086703_n.jpg

I'll do a post about putting the shoulders together and final assembly, because the shoulder pad seem very complicated but actually are really easy to do. Maple Bunnie was an absolute champ with final assembly. After that I had to hand sew some strategic velcro and weather it.
16997938_1293552624070368_3377193029742030937_n.jpg

Next up I will be taking a Cattoys helmet and modifying it to look like the foam prototype I made:
18446948_10158709886330080_1013925462108318167_n.jpg

And I'm booked for a Fan Expo appearance at Canada Place for Canada Day in Vancouver, which will be awesome! Wearing 2-ply canvas in July isn't something I'm looking forward to though!

Thanks everyone!
 
That's fantastic, Captain!

Tell us all about how you weathered the suit. How hot was it?

For weathering I use various mixtures of acrylic paint. Brown, black, metal, orange, and wiped most of the paint off the brush before very lightly applying. Just quick little glancing brushstrokes over and over until I got the density of colour I wanted in given areas. I also rubbed coffee grounds into certain spots to give a dirt or dusty look.

Before/After (different brightness and lighting conditions though)
Photo 2017-05-14.jpeg

Heat was usually okay. It was cool, under 10C outside and I was able to mostly avoid sweating. Inside was a little more difficult, but if I didn't move too fast or stay in a congested area I didn't really sweat. I did sweat some overall which isn't surprising, but it wasn't out of control and I generally sweat a lot when working out etc.
 
Last edited:
This thread is more than 6 years old.

Your message may be considered spam for the following reasons:

  1. This thread hasn't been active in some time. A new post in this thread might not contribute constructively to this discussion after so long.
If you wish to reply despite these issues, check the box below before replying.
Be aware that malicious compliance may result in more severe penalties.
Back
Top