Captain Canada: The First Peacekeeper

lots of amazing work in this forum since the beginning but this one is absolutely fantastic,the colors are perfect everything you did is awesome.it's very different and refreshing.thanks man you made my day.

Francois
 
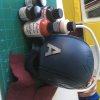
What would Cap be without a helmet?

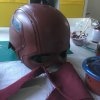
I decided that the best choice would be to get a Cattoys Rookie version helmet and attempt to mod it to get as close to my prototype style as I can.
Photo 2017-05-13.jpeg

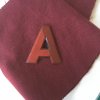
Standard practice is to cut off the A, replace the chin-cup, and paint slightly differently. I'm going to be painting a lot differently, and I need to find a solution for the maple leafs on the sides. I don't think I'll replace the chin cup as I don't really mind how it looks and this is custom anyway.
Photo 2017-05-27.jpeg

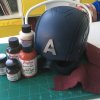
I went with Angelus leather paints, as is common with other Caps when modding. However I found that the "Autumn" Red and "Burgundy" were quite orange and purple respectively, so I'd warn anyone getting from them that their sample colour images on the site don't really match the real paint that well. I did a test mixing the two and came to a result I was happy with (Autumn on the left, mixture on the right, fabric for colour reference)
Photo 2017-06-11-3.jpeg

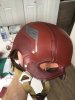
Used a razor blade to remove the A, and gave the whole thing a sand with 320 grit and a wash. Rubbed down with acetone and it was on to painting!
Photo 2017-06-11-2.jpeg

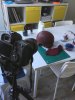
Yep, I will be doing a painting time lapse! Here it is after three coats. I left the wings bare for now, as I wasn't able to sand all of the silver away, and painting over it would contaminate my paint, so I'll do them last in red and then go over them in the pewter colour I have.
Photo 2017-06-11.jpeg

So I'm very encouraged by the results! This is a great base helmet if you wanted to do something similar but a little custom and the painting of it has not been difficult at all. Thanks again to everyone checking it out!
 

Attachments

  • Photo 2017-05-27.jpeg
    Photo 2017-05-27.jpeg
    1.1 MB · Views: 151
  • Photo 2017-05-27.jpeg
    Photo 2017-05-27.jpeg
    1.5 MB · Views: 131
  • Photo 2017-06-11-3.jpeg
    Photo 2017-06-11-3.jpeg
    1.3 MB · Views: 125
  • Photo 2017-06-11-2.jpeg
    Photo 2017-06-11-2.jpeg
    1.6 MB · Views: 131
  • Photo 2017-06-11.jpeg
    Photo 2017-06-11.jpeg
    1.1 MB · Views: 132
I love this so much.

Regarding the maple leaves, would a tourist souvenir shop have ... plastic magnets in the shape of maple leaves? Or maybe the dollar store? Or maybe the craft store would have wooden or plastic or metal leaves?
 
I love this so much.

Regarding the maple leaves, would a tourist souvenir shop have ... plastic magnets in the shape of maple leaves? Or maybe the dollar store? Or maybe the craft store would have wooden or plastic or metal leaves?

Im looking into 3D printing something for it. I can use the same image as I did for the chest star and the shield and extrude a 3D shape so that all the logos on the suit match one another. The printer from a friend that I'll be using apparently prints flexible material so its perfect!
 
Progress!
Photo 2017-06-17.jpegPhoto 2017-06-17-3.jpeg
Calling this done until I get the C and the leafs on it. Really happy how it turned out, and I love the wings in particular!
Photo 2017-06-17-2.jpeg
Cattoys Mod vs. Craft foam prototype

Thanks for checking it out, I gotta be done by July 1st!
 

Attachments

  • Photo 2017-06-17-3.jpeg
    Photo 2017-06-17-3.jpeg
    1.5 MB · Views: 107
Meant to do this, shoulder post!

I really wasn't sure how to approach these at first, but I knew I'd have to double up foam layers to get it done.
Photo 2016-12-30, 6 00 02 PM.jpg

Luckily another Cap shared a paper template so I printed and cut out the shapes on card stock and played with scale to make sure they fit my body.
Photo 2016-12-31, 11 25 11 AM.jpg
Photo 2016-12-31, 11 25 24 AM.jpg
I then transferred the outline and individual shapes to 4mm foam and glued them together.
Photo 2016-12-31, 12 34 39 PM.jpg
After that I had to source a glue that would adhere to both foam and fabric, be flexible, and dry clear. I did a couple of tests to see how the result would look on some scraps.
Photo 2017-02-10, 8 33 47 AM.jpg
Photo 2017-02-10, 8 44 23 AM.jpg
And then it's time to do the real thing! I put the glue into the edges and layer the fabric on top and used this stick to tamp the edges in. The glue doesn't fully dry for 24 hours so if things go wrong you can adjust.
Photo 2017-02-11, 7 24 12 PM.jpg
Photo 2017-02-11, 7 24 21 PM.jpg
Photo 2017-02-12, 9 38 55 AM.jpg
This technique was actually stupid easy and really effective. For any costume that has kind of armour panels this would be a great approach.

Thanks!
 
Hey, it's Canada Day!

...Apropos of nothing...
 

Attachments

  • CapCan02.pdf
    1.1 MB · Views: 142
  • CapCan01.pdf
    1.1 MB · Views: 129
  • CapCan02.jpg
    CapCan02.jpg
    163.8 KB · Views: 108
  • CapCan01.jpg
    CapCan01.jpg
    157.8 KB · Views: 104
Ha! Cool!

Couple pics from Canada Day at the Vancouver Convention Centre, which was a ton of fun. Sooooooooooo many photos.
Photo 2017-07-01-3.jpeg
Photo 2017-07-01-5.jpeg
Photo 2017-07-01-2.jpeg
 

Attachments

  • Photo 2017-07-01-3.jpeg
    Photo 2017-07-01-3.jpeg
    1.6 MB · Views: 115
lil update:

Released a preview vid of the helmet time lapse. Full vid will be done when all the icons are on and the helmet is finished and will have the full process on there. Until then, enjoy!

 
Last edited by a moderator:
Hey everyone!

After a long while of planning and getting the right time, I've done a shoot with my pal Meg Super!
DSCF6466.jpgDSCF6662.jpg
DSCF6678.jpgDSCF6509.jpg
DSCF6572.jpg

Lovelovelove how these turned out and glad to include my helmet even if its not completely done yet.

Thanks for looking!
 
This thread is more than 6 years old.

Your message may be considered spam for the following reasons:

  1. This thread hasn't been active in some time. A new post in this thread might not contribute constructively to this discussion after so long.
If you wish to reply despite these issues, check the box below before replying.
Be aware that malicious compliance may result in more severe penalties.
Back
Top