Logan's Run wall crystal

epoxinator

Well-Known Member
My interpretation of the larger lifeclock/power crystals from Logan's Run. First I made it in 3D Screen Shot 2016-01-31 at 7.15.54 PM.png

LR crystal top raised copy.jpgLR crystal raised 1 copy.jpg

- - - Updated - - -

It's been evolving. I started with this reference photo. Took it into Adobe Illustrator, where I discovered I could recreate an 8th and then mirror/copy that to get the full crystal.LR Crystal 1a.jpg
 
Earlier version I did last year and had printed. It's not deep enough and I decided to rework it and make it even, and have all the elements touch the outer circumference, so I get a cleaner mesh with no hidden holes.

life crystal bottom.jpg
 

Attachments

  • LR Crystal 8.png
    LR Crystal 8.png
    227.7 KB · Views: 213
Took the finished model and exported to an STL, then imported that into Pepakura which unfolded it into these (which I then cleaned up in Illustrator for print)

LR wall crystal Pep 3.jpgLR wall crystal Pep 1.jpgLR wall crystal Pep 2.jpg
 
Last edited:
Scaled up the model so the crystals stuck up nearly twice as high: looks more like the film. While I was at it I scaled it up to 12". Re-exported to Pepakura, then took that into Illustrator, printed out on cardstock. Building it out of paper turns out to have saved quite a bit of money before having it 3D printed: I still had some tweaking to do on the model.

LR crystal 12 cardstock.jpg12 inch version.jpg12 all facets.jpg
 
Oh, thank god! I thought Logan's Run was dead! Always happy to see new projects associated with this film!
Well done, sir.
 
I glued the whole thing to cardboard after cutting two pieces of cardboard into a circular base. I think it would have been better to have started off with the cardboard base: there is a certain amount of warping due to the use of white glue and card stock. Be that as it may, the paper top and cardboard are a single piece. I also started to paint it with some odds and ends of Testors paint that I've had in a box for a number of years. I started off with red, but when I emptied out the red bottle I didn't have another so finished it off with green. This is only a sealer coat to make the cardboard watertight. But it does make the crystal look pretty crappy.


12 painted front.jpg12 painted rear.jpg12 painted side.jpg
 
Last edited:
And now for a good coat of red paint. Also, at the hardware store I happened upon a light diffuser acrylic sheet, with "micro-square" texturing that I'm hoping will be a good fit for making a translucent version with lighting. Time to revise the file for laser cutting.

12 sprayed red 1.jpgcrystal plastic.jpg
 
Last edited:
I finished both the 6 and the 12 in paper versions as much as I plan to. They show me the concept is workable. Next step: making the finished lamp in plastic. I was at a hardware store and happened upon a "microprism" fluorescent light diffuser. Prism diffuser plastic is what the originals were made of but that material is just too thick and the prism texture too big for this size. This diffusion material is acrylic, which is a perfect candidate for laser cutting. I accidentally broke a piece out of the diffusion sheet, so I did a test cut of a facet.


12 and 6 inch versions.jpg12 and 6 final.jpgcrystal plastic.jpg12 plastic step 1.jpg
 
I took my Pepakura file and opened it in Illustrator and prepped it for laser cutting. Below are the results. Now I'm in the process of gluing them together. Once each module/crystal element is securely glued together, I will sand and grind down all the connecting edges so I can glue them all into a single piece.


Lifeclock temp construct.jpgall but 1 crystal segment.jpg2 crystals taped.jpgtaping cut pieces.jpg
attachment.php
 

Attachments

  • lighting test.jpg
    lighting test.jpg
    423.9 KB · Views: 329
Last edited:
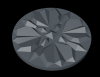
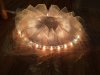
I found an LED light strip with a power supply and a cord long enough to hang my life clock on the wall when it's done. I went to a plastic place today and bought some gel glue for acrylic, and a 12" acrylic disk thick enough to be a good sturdy base upon which to mount all the crystal elements. I scribed all the positions of each separate element on the top of the disk. Then I glued each flat piece into it's correct position. These will be the placement guides for each of the assembled crystal elements. I'm having to sand each down, to take into account two things:

1. Each element has depth, and laser cutting can't do beveling, so each piece is glued inner edge to inner edge. I have to sand each piece down enough to remove enough material so each piece fits in it's proper slot. The next version, I will attempt to sand to the correct beveling before I glue them together.

2. As I assembled them I was introducing a slight amount of variation in shape. In retrospect, next time I will create paper templates upon which to glue the pieces, so I can get more uniformity of shape.

I only wish the company who makes the acrylic diffuser offered them in a red material. I will be trying gels between the lights and the front, and I will try red LEDs for a future version, but it would look really cool if the plastic itself were transparent red.

Another thing that might be interesting is to get a dimmer to fade the red lights off and on, and maybe even a sound chip with the call to carrousel "bong" sound playing in time with the on/off cycle.


acylic round and lights.jpgfinal construction begins.jpg
 
Last edited:
Finished gluing the face elements together. Now I need to get the side elements. I had only planned it to be about 1.5 inches deep, but my lighting experiments make me wonder if I should try a base around 4 inches deep. It looks way better when the lights aren't right up against the prism diffuser.

complete and rear lit.jpgglue up complete.jpgglue up in progress.jpgsanding to fit.jpg
 
Finally got the time and money together to get more done on the wall crystal. I knew I wanted to fasten theflat acrylic piece onto a section of acrylic tube. I got two 4"-deep tubes (12" diameter) but that was too deep. This weekend I finally bit the bullet and cut each into two 2" deep tubes, so now I have 4. I glued the completed top element onto the top of a tube, and once that was dry I wrapped around the side element and glued it into place. This time I used an acrylic gel glue, which I regret. It's thicker than the first glue I used and much blobbier, so there are a couple of places where it dripped down the side. It seems to damage the acrylic if there is stress put on it (such as wrapping it around an acrylic cylinder) and underneath the glue blobs there are tiny cracks in the light diffuser. The first of the attached photos shows a photoshopped black color under the light diffuser on the side, which I plan to do once I get the light elements put together. I will cut circles out of particle board and drill holes through which I will push the LEDs from the christmas light set I got for the purpose. I've tried it out, as you can see in the picture with a cardboard mockup through which I've got the lights pushed up. On an interesting side note, when I try to shoot the crystal with the LED lights on, there can sometimes be dark bands through the image. Interestingly enough, the reflected light off the cardboard doesn't seem to be affected by this phenomenon.

Carrousel light 1.jpgcarrousel light 2.jpgCarrousel light 3.jpgCarrousel light 4.jpg
 
Gave away the paper power crystals. In a mistake I gave away two crystals to three different people, so I printed and cut out a third paper version to make things right. Instead of folding and using paper taps to connect them I cut out each facet separately and fastened them all together with a folded strip of paper. It came together way more tightly than the first two, and I discovered that I had made an error in alignment that explained why I had to do SO much sanding on the acrylic version before all the pieces would fit together.

paper crystal v3 01.jpgpaper crystal v3 02.jpgpaper crystal v3 03.jpgpaper crystal v3 06.jpgpaper crystal v3 07.jpgpaper crystal v3 08.jpgpaper crystal v3 09.jpg
 
I like em! have you tried different paints? I wonder what a metalic red would look like on one.

Oh and have you tried red lights In the clear ones?
 
This thread is more than 5 years old.

Your message may be considered spam for the following reasons:

  1. This thread hasn't been active in some time. A new post in this thread might not contribute constructively to this discussion after so long.
If you wish to reply despite these issues, check the box below before replying.
Be aware that malicious compliance may result in more severe penalties.
Back
Top