You are using an out of date browser. It may not display this or other websites correctly.
You should upgrade or use an alternative browser.
You should upgrade or use an alternative browser.
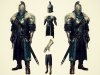
Dark Souls II: Faraam Set Armor build
- Thread starter PFMF
- Start date
PFMF
Active Member
So.
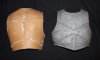
The first thing i started to build was the Breast- and Back-plate.
I used the classic method of using a craft foam core and covered it with Worblas.
Then after i had all parts combined together and brought into the right shape i covered it with Apoxi Sculpt. It is a real fantastic material. A two compound modeling mass that can be formed like clay but hardens very hard and stable.
I also modeled the details out of the same material.
Attachments
PFMF
Active Member
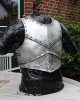
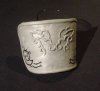
After wet sanding everything, i first primed everything and then painted it with a mellow lacker.
Then I used rivets to fix the leather strips that hold the two pieces together on the armor.
Then I used rivets to fix the leather strips that hold the two pieces together on the armor.
Attachments

PFMF
Active Member
Yeah Apoxi Sculpt is a absolutely beautiful material. And the old hammered metal look is what I was going for. The armor´s from dark souls should´t look clean and new. All in this world is decaying and used.
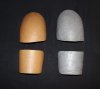
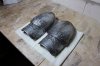
I also started working on the shoulder plates. I am building them the same way as the breastplate.
I also started working on the shoulder plates. I am building them the same way as the breastplate.
Attachments

Really nice job! I was a bit skeptical at the idea of spreading apoxi sculpt over the entire piece, not just the details/raised edges, but it makes sense because its easier to sand than the worbla. Might have to try this for my berserk armor.
PFMF
Active Member
Yeah i know. First test pieces with this technique were not so promising. I used to much water modeling and made the layer to thin. I created bubbles and the Apoxisculpt didn´t adhere to the Worblas. It broke and fell of.
You need to make the layer thick enough (around 1.5 to 2 mm) and you should sand the Worblas with a rough sandpaper to create a rough surface on which the Apoxisculpt can stick. (it is only needed with bigger surfaces) And don't youse to much water because it gets brittle and creates bubbles on wide and thin layers.
You need to make the layer thick enough (around 1.5 to 2 mm) and you should sand the Worblas with a rough sandpaper to create a rough surface on which the Apoxisculpt can stick. (it is only needed with bigger surfaces) And don't youse to much water because it gets brittle and creates bubbles on wide and thin layers.
Gotcha. Thanks for the tip!
Yeah i know. First test pieces with this technique were not so promising. I used to much water modeling and made the layer to thin. I created bubbles and the Apoxisculpt didn´t adhere to the Worblas. It broke and fell of.
You need to make the layer thick enough (around 1.5 to 2 mm) and you should sand the Worblas with a rough sandpaper to create a rough surface on which the Apoxisculpt can stick. (it is only needed with bigger surfaces) And don't youse to much water because it gets brittle and creates bubbles on wide and thin layers.

PFMF
Active Member
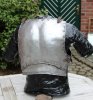
And I have finally finished the base of the Helmet and started to cover it in Apoxi Sculpt. In my opinion the most daunting task, because of the complex shape. But I believe it came out relatively well.


One nitpick, that will hopefully not become problematic later on, is that while test fitting it with the other armour pieces, I realised that it is comparatively big. This is sadly not changeable as my head is relatively big and a smaller helmet would not fit. I am hoping to later correct it with the shawl and fur parts and that it will not look oversized.
One nitpick, that will hopefully not become problematic later on, is that while test fitting it with the other armour pieces, I realised that it is comparatively big. This is sadly not changeable as my head is relatively big and a smaller helmet would not fit. I am hoping to later correct it with the shawl and fur parts and that it will not look oversized.

mcoractual
Well-Known Member
I really like the direction you are taking this. The hammered iron look of the armor is impressive. Keep it up!


PFMF
Active Member
Next thing to do is sculpting what would in a real armour be the ridges that strengthen the helmet.
First I went to the references and measured them out so the placement would be correct. After that I took the marker to it and marked the positions.

Then I continued with sculpting them and correcting their placement a little so that it would look more even.

First I went to the references and measured them out so the placement would be correct. After that I took the marker to it and marked the positions.
Then I continued with sculpting them and correcting their placement a little so that it would look more even.