nerdman234
New Member
Steampunk Vanguard Build
This was my first costume I hand built and I'm quite happy how it came out. It still needs a lot of polish and I have quite a few things I didn't add because of skill/time constraints. This isn't a replica costume necessarily, but it pulls a lot of ideas from a few different areas (Mass Effect, steampunk as a whole).
Ideas:
This whole costume came together because of a fantastic mask I came across (On Instructables), which gave me the idea for a steampunk pilot. Interestingly enough, I got into it, built the mask, fleshed out the costume, and ended up dropping the mask and the pilot idea. I do still have it and really want to use it. I had played through Mass Effect (playing as a vanguard) and liked the balance
Arms:
My (second) plan was to create a more heavily armored left arm with an "artificier's rig" on it (Magic-y looking crap) and a lighter right arm with a weapon of some kind. I scaled back the left arm to be an armored glove with a half arm covering gauntlet.
Weapon:
I started with the idea of a sniper, but parred it back to a modified Nerf pistol after seeing the amount of work needed. I also wanted to integrate the magic ideas into the gun, and added a glowing "magazine" to the pistol. In hindsight it ended up looking like a hand cannon (The phalanx). I will come back and secure the "magazine" a lot better, cover the
Belt:
To hold up the artificer idea, I wanted to add little pouches and a bandoleer of "potions". I also wanted to add some banners on the front and back like what you would see on some sets of Medieval armor.
Clothing:
I wanted to have a red/brown/tan theme, so I dug around to find a brown vest that would fit and came across an eBay post selling "western" brown vests. Ended up being $40, but I've used it for multiple costumes and I was quite happy with the quality. Throw a pair of Khaki pants red button down, and some regular boots, and I was pretty much done. The only problem was that the costume was really "top heavy" (all the detail above the waist) and I couldn't figure out to do on the legs. I decided to make/buy some boot covers (see some WWI uniforms and the Amestris military uniforms from FMA). I ended up buying some cheap ones off Amazon which served their purpose well. I will come back and make my own to get them to match closer to the rest of the costume. (Color is off and it's felt looking where the rest of the costume has a "canvas-like" material)
Head:
Goggles, nuff said. PSA: The welding goggle repaints on Amazon are dirt cheap, but incredibly uncomfortable.
----------------
Build:
Mask:
The creator of the mask I was basing mine off of used leather, which I have no experience with, so I planned on using a base of foam with thin copper sheet as the facing. I followed his Instructable for the fabrication of it (Replacing leather with foam). I used the template I made to cut the foam to sketch out the shape of the copper "plates" and used a pair of tin snips to cut it out. A pair of pliers with some rubber nubs and a file was used to round out the edges so they weren't angled outwards. I drilled holes in the corners of each plate (apx 1/8" to 1/4" from the edge) to make holes for some copper carpet tacks I used as rivets. I cut off most of the tack and used a small dot of super glue to hold it in. I made a stencil of the area not covered by the copper to make the "shark face" design you see on some war planes and cut another sheet of foam to raise the design up to the level of the copper. I then took a shoe box, my copper, and some old screwdrivers and spare metal, and shook violently to add damage to the really clean copper. After bending the sheets roughly to the shape of the mask, I used some sandpaper in different areas for more scuffs the highlated (washed?) with charcoal/brown paint to finish the effect. While the "shark face" piece of foam was still separate, I used a pencil to trace design through my sketch, used a sharpie to do the edging detail, and acrylic paint for the rest. I came back with a sharpie to fix my mess ups. Knowing what I know now, I would've sealed it before paint... Oops. The copper plate was mounted to the foam, rivets added, and straps added to finish it.


Pouch/Bandoleer:
These were a last minute deal, though it turns out that mod podge on top of brown craft foam looks really similar to leather, grain and all. I made a simple template (think of how a cube looks when flattened), folded it into shape, using hot glue to hold it together. I then took a small piece of copper to make a "button". These are non-functional and will be replaced in the future so they are functional. I used mod podge to finish. For the bandoleer, I added some 1" foam rings to a strip of foam with belt loops. Not much to say here. I will redo with Nylon Webbing as the based and foam as a facade. I inserted some "potion vials" into them. These vials are bottle preforms, or 2L bottles before they are blown up to full size, so they resemble a large test tube with a screw top.

Banners:
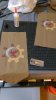
I came up with the banners idea after seeing some medieval armor and the colored "flags" they would have hanging below their chest piece. I used some cheap canvas (Earth colored) and created a design in Paint.NET based off my Diablo 3 emblem (Raven Moon). I added some flair and a cog around it, printed it out on cardstock, and used an exacto knife to cut out a stencil. I used a few layers of acrylic paint to paint the design on and duplicated it on two (front and back of my belt. Using fabri-tac I rolled the edges, made a triangular end, and made a small loop to go on my belt. (Paint is still drying in picture)


Left arm rig:
The idea for this was pretty simple, I wanted some glowing test tube rig on my high left arm, and used two of the preforms sticking out of a 4"x4" foam box. I potted (sealed in with a water proof seal) leds into the tubes for a green and blue glow and filled the tube with dyed water. I took some highlighters, pulled the ink sponges out, and soaked them in hot water (suggestion from another build) to give the water a more fluorescent look. Used a webbing strap that went up the over-shoulder part of the vest to support it, and used an elastic strap around my arm. I used brown craft foam to cover the exterior and sealed it with mod podge. The tubes were done with 1/4" vinyl tubing filled with colored water (same trick as the test tubes). I used LEDs stuck in the ends of the tube for lighting. Interestingly enough, they are just slightly larger than the tube and need no glue to hold them inplace to waterproof the tube.
I liked the look of it, but it felt wonky to wear and ended up with a dead LED after a weekend of use (Not bad all things considered). I already have it's replacement laid out, and I totally didn't think of half of it while doing this write-up.


Left gauntlet:
I had 0 experience with foam while doing this and ended up with a panel on the outer side of my arm with some cobbled together copper, tubing, and scrap metal. I'm really not proud of it. (Still wet. Totally not the night before)


Left Glove:
To make an armored glove, I used paper to make templates for ellipses that would sit on each knuckle (on top of a glove), taped them on to test fit, then used a heat gun to bend them in half and glued them down to my glove (harbor freight mechanics glove). I used hot glue, and needed to have the glove on my hand to get the shape right, so I wore a pair of jersey gloves underneath. This proved problematic because either the hot glue soaked into the glove, or the gloves fused together and are now inseparable. This isn't a huge issue, but I only have about a quarter of my regular movement.


Pistol (Blaster):
I used a Nerf nightfinder as a base and started by disassembling it (a con I attend regularly doesn't allow anything that can ever function) and removed air tube, and rerouted the wiring from the "laser" to an area just behind it. I took another bottle preform (filled red this time), potted a red led into it, and attached it using a wedge of foam so that it was angled toward the grip. I used the existing switch for the laser to run the red led. Lesson one: I used 12v LEDs because they came prewired. The Nerf gun uses two AA batteries (3v) and can't drive that. Oops. I changed up the battery bay wiring and made a CR123 (12v) battery fit in there. Problem solved. I removed the components and applied brown, copper, and bronze (it was closer to gold) spray paint. I used black acrylic for the grips and then applied clear (Rustoleom matte). Lesson 2: Enamel clear doesn't like the hammered copper (lacquer?) Rustoleom paint. It looked mostly okay.


Misc:
I used a half finger leather glove for the right hand. It worked as intended. When I found the boot covers, I bought a pocket watch that was suggested. It was bronze-grey, it had a cool map as the face, neat runic looking designs. It was cheap impulse buy, Shut up. Strangely it has kept time for nearly a year now. Only about a minute or so off. I also bought some painted welding goggles. They did their job, but were very uncomfortable.


Hope you guys enjoyed! (I loved every minute of making it) I'm currently working on a Destiny costume and have a halo one afterwards, but I'll be upgrading this soon.
Let me know what you think, think I did wrong, or what I can do. Thanks!
Sources:
- Ibles Erza Cosplay (Gloves idea)
- Ibles Dieselpunk Mask (Mask idea)
- RPF (Random bits, thanks guys )
)
This was my first costume I hand built and I'm quite happy how it came out. It still needs a lot of polish and I have quite a few things I didn't add because of skill/time constraints. This isn't a replica costume necessarily, but it pulls a lot of ideas from a few different areas (Mass Effect, steampunk as a whole).
Ideas:
This whole costume came together because of a fantastic mask I came across (On Instructables), which gave me the idea for a steampunk pilot. Interestingly enough, I got into it, built the mask, fleshed out the costume, and ended up dropping the mask and the pilot idea. I do still have it and really want to use it. I had played through Mass Effect (playing as a vanguard) and liked the balance
Arms:
My (second) plan was to create a more heavily armored left arm with an "artificier's rig" on it (Magic-y looking crap) and a lighter right arm with a weapon of some kind. I scaled back the left arm to be an armored glove with a half arm covering gauntlet.
Weapon:
I started with the idea of a sniper, but parred it back to a modified Nerf pistol after seeing the amount of work needed. I also wanted to integrate the magic ideas into the gun, and added a glowing "magazine" to the pistol. In hindsight it ended up looking like a hand cannon (The phalanx). I will come back and secure the "magazine" a lot better, cover the
Belt:
To hold up the artificer idea, I wanted to add little pouches and a bandoleer of "potions". I also wanted to add some banners on the front and back like what you would see on some sets of Medieval armor.
Clothing:
I wanted to have a red/brown/tan theme, so I dug around to find a brown vest that would fit and came across an eBay post selling "western" brown vests. Ended up being $40, but I've used it for multiple costumes and I was quite happy with the quality. Throw a pair of Khaki pants red button down, and some regular boots, and I was pretty much done. The only problem was that the costume was really "top heavy" (all the detail above the waist) and I couldn't figure out to do on the legs. I decided to make/buy some boot covers (see some WWI uniforms and the Amestris military uniforms from FMA). I ended up buying some cheap ones off Amazon which served their purpose well. I will come back and make my own to get them to match closer to the rest of the costume. (Color is off and it's felt looking where the rest of the costume has a "canvas-like" material)
Head:
Goggles, nuff said. PSA: The welding goggle repaints on Amazon are dirt cheap, but incredibly uncomfortable.
----------------
Build:
Mask:
The creator of the mask I was basing mine off of used leather, which I have no experience with, so I planned on using a base of foam with thin copper sheet as the facing. I followed his Instructable for the fabrication of it (Replacing leather with foam). I used the template I made to cut the foam to sketch out the shape of the copper "plates" and used a pair of tin snips to cut it out. A pair of pliers with some rubber nubs and a file was used to round out the edges so they weren't angled outwards. I drilled holes in the corners of each plate (apx 1/8" to 1/4" from the edge) to make holes for some copper carpet tacks I used as rivets. I cut off most of the tack and used a small dot of super glue to hold it in. I made a stencil of the area not covered by the copper to make the "shark face" design you see on some war planes and cut another sheet of foam to raise the design up to the level of the copper. I then took a shoe box, my copper, and some old screwdrivers and spare metal, and shook violently to add damage to the really clean copper. After bending the sheets roughly to the shape of the mask, I used some sandpaper in different areas for more scuffs the highlated (washed?) with charcoal/brown paint to finish the effect. While the "shark face" piece of foam was still separate, I used a pencil to trace design through my sketch, used a sharpie to do the edging detail, and acrylic paint for the rest. I came back with a sharpie to fix my mess ups. Knowing what I know now, I would've sealed it before paint... Oops. The copper plate was mounted to the foam, rivets added, and straps added to finish it.
Pouch/Bandoleer:
These were a last minute deal, though it turns out that mod podge on top of brown craft foam looks really similar to leather, grain and all. I made a simple template (think of how a cube looks when flattened), folded it into shape, using hot glue to hold it together. I then took a small piece of copper to make a "button". These are non-functional and will be replaced in the future so they are functional. I used mod podge to finish. For the bandoleer, I added some 1" foam rings to a strip of foam with belt loops. Not much to say here. I will redo with Nylon Webbing as the based and foam as a facade. I inserted some "potion vials" into them. These vials are bottle preforms, or 2L bottles before they are blown up to full size, so they resemble a large test tube with a screw top.
Banners:
I came up with the banners idea after seeing some medieval armor and the colored "flags" they would have hanging below their chest piece. I used some cheap canvas (Earth colored) and created a design in Paint.NET based off my Diablo 3 emblem (Raven Moon). I added some flair and a cog around it, printed it out on cardstock, and used an exacto knife to cut out a stencil. I used a few layers of acrylic paint to paint the design on and duplicated it on two (front and back of my belt. Using fabri-tac I rolled the edges, made a triangular end, and made a small loop to go on my belt. (Paint is still drying in picture)
Left arm rig:
The idea for this was pretty simple, I wanted some glowing test tube rig on my high left arm, and used two of the preforms sticking out of a 4"x4" foam box. I potted (sealed in with a water proof seal) leds into the tubes for a green and blue glow and filled the tube with dyed water. I took some highlighters, pulled the ink sponges out, and soaked them in hot water (suggestion from another build) to give the water a more fluorescent look. Used a webbing strap that went up the over-shoulder part of the vest to support it, and used an elastic strap around my arm. I used brown craft foam to cover the exterior and sealed it with mod podge. The tubes were done with 1/4" vinyl tubing filled with colored water (same trick as the test tubes). I used LEDs stuck in the ends of the tube for lighting. Interestingly enough, they are just slightly larger than the tube and need no glue to hold them inplace to waterproof the tube.
I liked the look of it, but it felt wonky to wear and ended up with a dead LED after a weekend of use (Not bad all things considered). I already have it's replacement laid out, and I totally didn't think of half of it while doing this write-up.
Left gauntlet:
I had 0 experience with foam while doing this and ended up with a panel on the outer side of my arm with some cobbled together copper, tubing, and scrap metal. I'm really not proud of it. (Still wet. Totally not the night before)
Left Glove:
To make an armored glove, I used paper to make templates for ellipses that would sit on each knuckle (on top of a glove), taped them on to test fit, then used a heat gun to bend them in half and glued them down to my glove (harbor freight mechanics glove). I used hot glue, and needed to have the glove on my hand to get the shape right, so I wore a pair of jersey gloves underneath. This proved problematic because either the hot glue soaked into the glove, or the gloves fused together and are now inseparable. This isn't a huge issue, but I only have about a quarter of my regular movement.
Pistol (Blaster):
I used a Nerf nightfinder as a base and started by disassembling it (a con I attend regularly doesn't allow anything that can ever function) and removed air tube, and rerouted the wiring from the "laser" to an area just behind it. I took another bottle preform (filled red this time), potted a red led into it, and attached it using a wedge of foam so that it was angled toward the grip. I used the existing switch for the laser to run the red led. Lesson one: I used 12v LEDs because they came prewired. The Nerf gun uses two AA batteries (3v) and can't drive that. Oops. I changed up the battery bay wiring and made a CR123 (12v) battery fit in there. Problem solved. I removed the components and applied brown, copper, and bronze (it was closer to gold) spray paint. I used black acrylic for the grips and then applied clear (Rustoleom matte). Lesson 2: Enamel clear doesn't like the hammered copper (lacquer?) Rustoleom paint. It looked mostly okay.
Misc:
I used a half finger leather glove for the right hand. It worked as intended. When I found the boot covers, I bought a pocket watch that was suggested. It was bronze-grey, it had a cool map as the face, neat runic looking designs. It was cheap impulse buy, Shut up. Strangely it has kept time for nearly a year now. Only about a minute or so off. I also bought some painted welding goggles. They did their job, but were very uncomfortable.
Hope you guys enjoyed! (I loved every minute of making it) I'm currently working on a Destiny costume and have a halo one afterwards, but I'll be upgrading this soon.
Let me know what you think, think I did wrong, or what I can do. Thanks!
Sources:
- Ibles Erza Cosplay (Gloves idea)
- Ibles Dieselpunk Mask (Mask idea)
- RPF (Random bits, thanks guys
)Attachments
Last edited: